Are you a victim of stolen content on your website? Do you want to disable the right-click to protect your content?
Every day many websites’ content gets stolen and the thieves make revenue out of that content while the original owner gets no credit or money even though their website rankings are going lower because of their content is not unique.
You should consider protecting your website’s content especially if you are providing original content on your website.
In this article, you learn if disabling the right click is for you, how to disable the right click on WordPress without a plugin, and how to disable the right click in WordPress.
Pros and Cons of Disabling Right-click on WordPress
If you are not sure whether you should disable right-clicking on your website or not, I made a list of all the Pros and Cons of disabling right-click for you to decide:
Disabling Right Click Menu Pros:
Thieves can steal your post’s content and images with a simple right-click. So by disabling right-click feature, you can protect your website’s content.
Another use of right-click is hotlinking your images, which means someone is using your images and your host resources to benefit themselves.
Disabling Right Click Menu Cons:
The biggest flaw of disabling the right-click function is user experience(UX). Especially if your website contains instructional content like food recipes and DIY content.
Besides copy paste function in right-click menu, there are many other functions like opening a link on a new tab, the refresh option, and more. By preventing right-clicking in WordPress, you are also stopping people from these options and it decreases their experience on your website.
Many users might leave your website because you disabled right-clicking. So it might not be the most practical way to protect your content.
Besides disabling the right-click being bad for your website UX, it is also not the most secure way to protect your content. Thieves can simply re-enable the right-click by disabling JavaScript on their browser.
But we found the WPShield Content Protector plugin that offers a replacement feature for disabling the right-click menu. It has a unique feature that does not disable right-click menu but disables dangerous items like view source and save images. It doesn’t create bad UX for your visitors
How To Disable Right Click in WordPress [3 Methods]
If you like to disable right-clicking, WordPress doesn’t offer an option to do so, so you either need to use a plugin or a custom code.
In the following, you learn three different ways to disable the right click.
I will also let you know later in this article about some methods that are more practical and can protect your content better.
Method 1: Use WPShield Content Protector Plugin (Most Secure Method)
Using a plugin is probably the easiest and most secure way to achieve a goal in WordPress websites because plugins are protecting your site content in multiple methods. However, not all plugins offer many convenient features.
Many content protector plugins, can disable the right-click function. But I want to introduce the WPShield Content Protector plugin which besides disabling right-click also offers 14 other protector modules to protect all types of content on your site.
Please also consider using the Right Click Menu Limiter available in WPShield Content Protector Pro which is more practical and doesn’t impact your website’s UX.
To use the WPShield Content Protector plugin, follow these instructions:
Step 1: Download the WPShield Content Protector plugin.
Step 2: Go to Plugins → Add New and install the plugin on your WordPress.
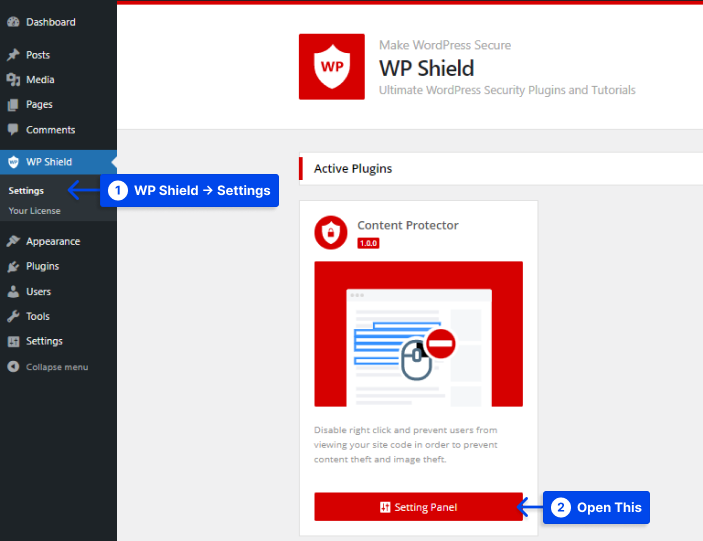
Step 3: Go to WP Shield → Settings and open the Content Protector panel.
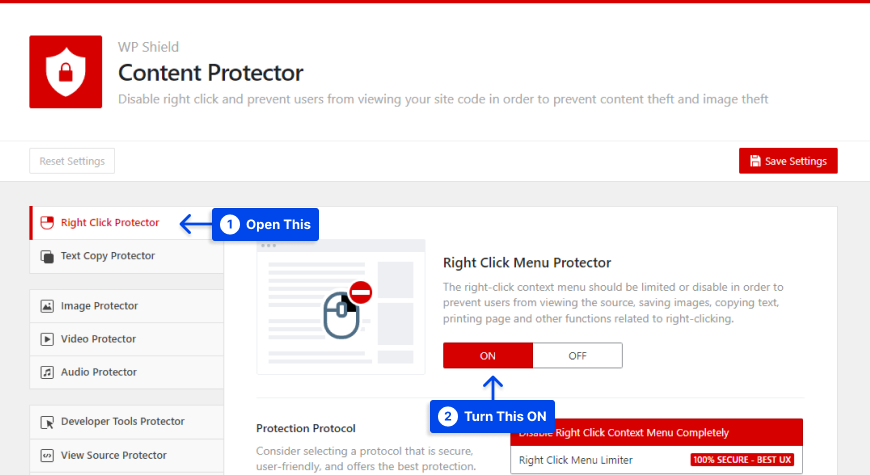
Step 4: Open Right Click Protector and turn on Right Click Menu Protector.
Step 5: Select Disable Right Click Context Menu Completely in Protection Protocol.

This option also supports disabling right-click menu in Elementor and all WordPress themes and WordPress plugins.
However, disabling completely the right-click has a bad impact on your website’s UX (User Experience). To make sure your content is protected and your viewers are happy, WPShield Content Protector Pro offers a unique feature named Right Click Menu Limiter.
To limit the right-click menu, follow these steps:
Step 1: Go to Right Click Protector and enable Right Click Menu Protector.
Step 2: Choose the Right Click Menu Limiter as the Protection Protocol.
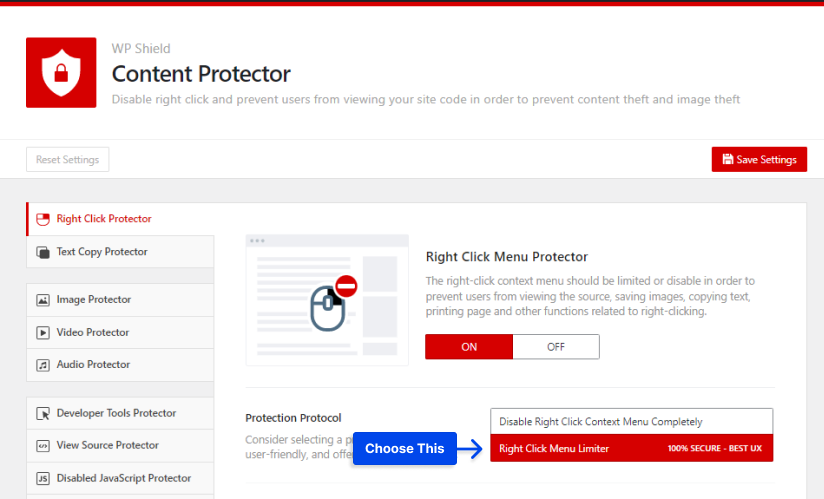
With this option enabled, users can right-click on your website, but items like “Copy”, “Save Image As” or “View source” are disabled in the right-click menu!
The Right Click Menu Limiter option is only available in the WPShield Content Protector Pro plugin, and you can make sure your content is 100% secure, and your website’s UX is unimpacted.
One of the content thieves’ most common ways to re-enable right-click is to disable JavaScript on their browser since protector plugins work with JavaScript codes so content protector plugins will not work if the visitor disables the JavaScript on the browser.
But WPShiled Content Protector has another unique feature named Disabled JavaScript Protector that doesn’t enables visitors to let to see your site If the JavaScipt is disabled.
Note that Right Click Menu Limiter and Disabled JavaScript Protector are specific and unique options available only in WPShield Content Protector Pro and can help you secure your website’s content.
Follow these steps to protect your website from disabling JavaScript:
Step 1: Go to WP Shield → Settings.
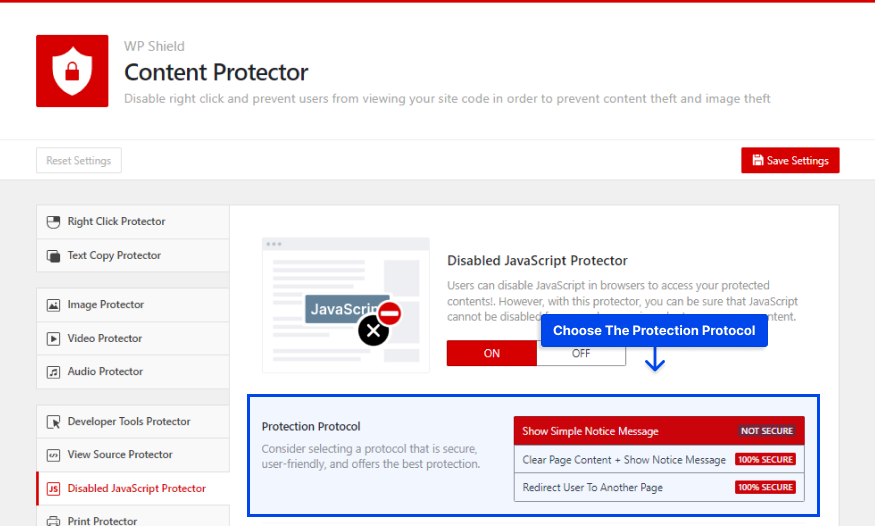
Step 2: Open Disabled JavaScript Protector and turn on Disabled JavaScript Protector.
Step 3: Disabled JavaScript Protector offers three different methods that you can choose from.
- Show Simple Notice Message: You can select Show Simple Notice Message as the Protection Protocol. If a user disables JavaScript on their browser, they will receive a message asking them to turn it back on to continue using the website. It is not the most secure way between all the protocols available.
- Clear Page Content + Show Notice Message: You can select Clear Page Content + Show Notice Message as the Protection Protocol. If someone tried to enable right-click by disabling JavaScript on their browser, it will force delete the website’s content and show them a notice message.
- Redirect User To Another Page: You can select Redirect User To Another Page as the Protection Protocol. You can choose a page in Redirect To Page, so if someone disables the JavaScript, they get redirected to the page you chose.
With this option, your website should be secured from disabling JavaScript hacks.
Method 2: Disable Right Click Without a Plugin
If you like to disable the right-click on your website, you can simply add a JavaScript code to your website’s file.
Since this method is with JavaScript, if a user disabled JavaScript on their browser, they can simply use right-click to copy your content.
If you like to make sure no one can use disabling JavaScript option to use the right-click, download WPShield Content Protector to use the Disabled JavaScript Protector option.
To add JavaScript to your website, follow these steps:
Step 1: Go to Appearance → Theme File Editor.
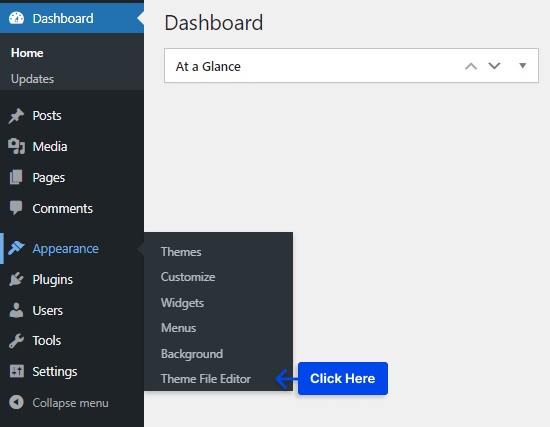
Step 2: Open the footer.php file in Theme Files.

Step 3: Find the </body> tag.

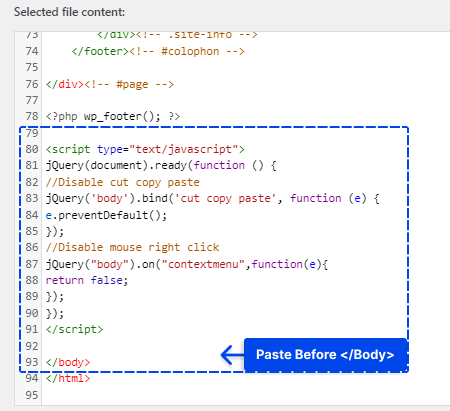
Step 4: Add the following code before the </body> tag:
<script type="text/javascript">
    jQuery(document).ready(function ()
        jQuery("body").bind("cut copy paste", function (e)
            e.preventDefault();
        );
        jQuery("body").on("contextmenu", function (e)
            return false;
        );
    );
</script>
Example:
After adding this code, both right-click and text selection should be disabled on your website.
Method 3: Disable Right Click Using CSS
You can use CSS code to protect your content. This code doesn’t necessarily disable the right-click, but it disables the text selection on your website, which you need to copy the content.
Note that as much as it is easy to use CSS to disable text selection, it is very easy to revert it. So this method doesn’t secure your content properly.
I suggest you use WPShield Content Protector if you like to ensure your content is 100% safe
To add the CSS code to your website do this:
Step 1: Go to Appearance → Customize in your WordPress dashboard.

Step 2: Open Additional CSS.

Step 3: Paste the following code there.
*
     -moz-user-select: none;
     -khtml-user-select: none;
     -webkit-user-select: none;
     user-select: none;
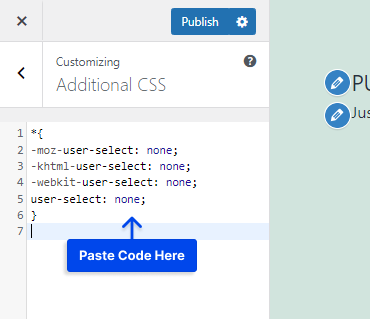
Now, text selection should be disabled on your website.
Alternative Ways To Protect Your Content
Coping content is not the only way people can steal your content especially if you use different types of media like images, video, and audio on your website.
If you like to ensure there is no way anyone can steal your content, please read the rest of this article.
Disable Hotlinking on WordPress
WordPress easily lets others use your page’s link to fully embed them on their website which is called iFrame Hotlinking.
When they embed your website on their website, they are benefiting from using your content and your WordPress host resources to get views and revenue.
Even if you disable right-clicking on your website, they can easily copy the embedded content with no issue.
WPShield Content Protector can help you disable iFrame Hotlinking easily.
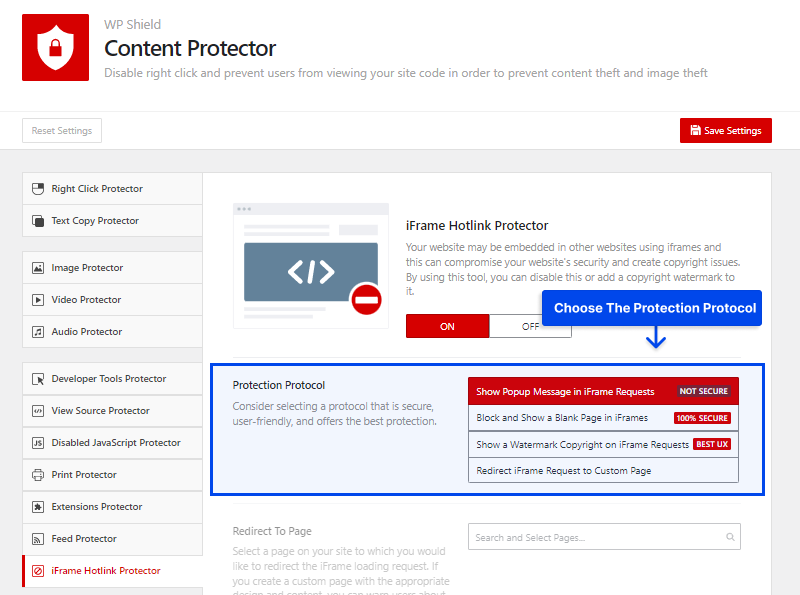
To prevent iFrame Hotlinking, follow these steps.
Step 1: Go to iFrame Hotlink Protector and turn on the iFrame Hotlink Protector.
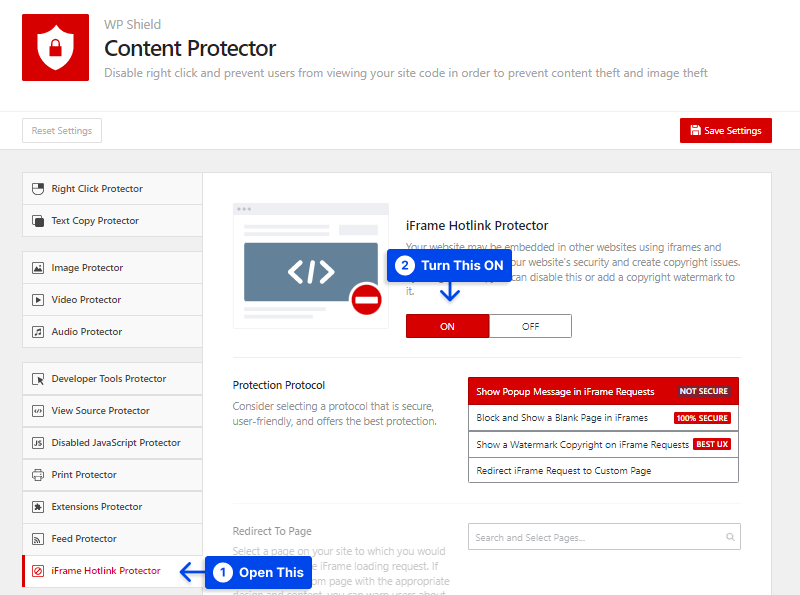
Step 2: WPShield Content Protector plugin offers four different protocols to protect your website from getting embedded into other websites.
Choose the protocol that suits your needs and situations:
- Show Popup Message in iFrame Requests: If you choose Show Popup Message in iFrame Requests as the Protection Protocol, a popup message shows up instead of the requested iFrame.
- Block and Show a Blank Page in iFrames: Using Block and Show a Blank Page in iFrames as the Protection Protocol means that when content is embedded, nothing will appear on the iFrame.
- Show a Watermark Copyright on iFrame Requests: If you choose Show a Watermark Copyright on iFrame Requests as the Protection Protocol, a watermark appears on the requested iFrame.
- Redirect iFrame Request to Custom Page: If you choose Redirect iFrame Request to Custom Page as the Protection Protocol, any requested iFrame will be redirected to the page you chose in Redirect To Page.
Protect Videos on WordPress
If you add videos to your website and want to monetize them and keep them secure, you can use
Video Protector in WPShield Content Protector.
To protect your videos from getting downloaded, follow these steps.
Step 1: Open Video Protector and enable Video Download Protector.
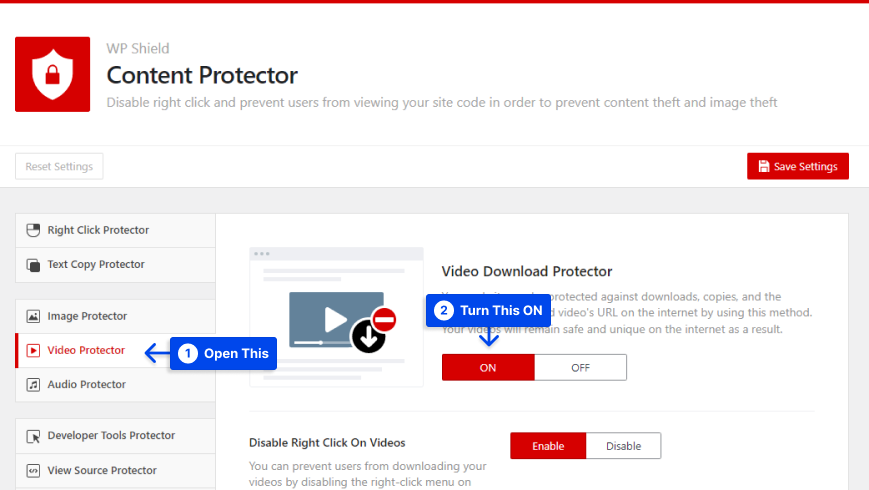
Step 2: Video Download Protector gives you different levels of security to choose from.
- Disable Right Click On Videos: If you turn this on, right-click will be disabled on videos, so they can’t use downloaders to download your videos.
- Remove Videos Download Button: Most video players have a download button by default, using this option you can delete the download button.
- Hotlink Protection for Videos: Your video’s link can be used to embed the video on other websites, using this option prevents the video from getting loaded on other websites.
Protect Images on WordPress
When you upload an image on WordPress, people can easily download and use it. Protecting images especially is important if you make original photos.
WPShield Content Protector offers Images Theft Protector which ensures images are safe on your website.
Follow these steps to protect images on your website.
Step 1: Open the Images Protector and turn on Images Theft Protector.

Step 2: Images Protector gives you different levels of security to choose from.
- Disable Right Click On Images: If you like to protect photos in WordPress, Disable Right-Click On Images, so no one can download them.
- Disable Drag and Drop on Images: Users can use drag and drop to easily download your photos. With this option, disable drag and drop on your images.
- Remove Anchor Link Around Images: This option makes sure there are no links surrounding the image to the full or larger-sized version of the image.
- Hotlink Protection for Images: Your image’s link can be used to embed the image on other websites, using this option prevents the image from getting loaded on other websites.
Protect Audio on WordPress
Thieves can download your audio when you upload them to your website. Most audio players even have a download button.
If you are looking for a way to protect audio on your website, WPShield Content Protector is a perfect choice.
Follow these steps to ensure audio is safe on your website.
Step 1: Open Audio Protector and enable Audio Download Protector.
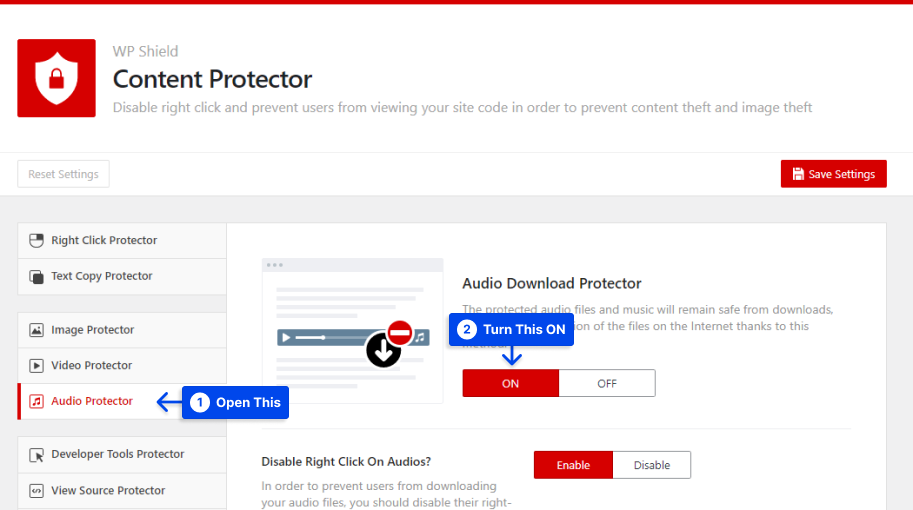
Step 2: Audio Download Protector gives you different levels of security to choose from.
- Disable Right Click On Audios: If you turn this on, right-click will be disabled on audio, so they can’t use downloaders to download your songs and audio.
- Remove Audios Download Button: Most audio players have a download button by default, using this option you can delete the download button.
- Hotlink Protection for Audio: Your audio’s link can be used to embed the audio on other websites, using this option prevents the audio from getting loaded on other websites.
Add a Copyright Notice On Your Site
You can add a copyright notice to your website and let the viewers know your content is original. The Copyright notice can prevent some users from copying your content.
For example, you can add a copyright text on the top of your website’s content like: “This Website’s content is the property of the owner and may not be used without permission”
Add Watermark to Your Images
If you watermark your images with your site name or logo, users won’t be able to copy them. This can prevent visitors from bypassing a disabled right-click and taking screenshots of your images.
Watermarks can’t be removed without destroying the image’s quality, so this is regarded as an effective method of preventing content theft.
With plugins such as Image Watermark, you can customize the size, transparency, and location of the watermark and back up the original image if necessary. When you go to Settings → Watermark, you can select where to place the watermark.
You can also check our review of best WordPress watermark plugins for more information.
Use Copysentry
A tool called Copysentry lets you know when your content is stolen. It scans the Internet regularly, notifying you as soon as it detects anything stolen.
A DMCA takedown notice can be issued when you discover that someone is using your content without permission
Conclusion
This article has discussed why you need to consider disabling right-clicking, how to prevent content thief, alternative ways to protect your content, and more.
I suggest using WPShield Content Protector, which makes sure your content is 100% secure. It also offers many unique features you can’t find on any other plugin.
I appreciate you reading this article, please let me know your thoughts on the article by leaving a comment.
If you are interested to know about our new content follow BetterStudio on Facebook and Twitter.