Currently, the Gutenberg editor is going through a complex and unambiguous development path. Love it, or hate it, the new WordPress editor is here to stay for a very long time. And so far, some tasks are quite problematic to solve using the WordPress native builder alone.
Of course, building a portfolio WordPress website with the new editor is much more convenient than the possibilities of the Classic Editor. Still, building grids with Gutenberg editor is an issue right now because the process is quite time-consuming and complicated; you need to use many blocks and even apply some CSS knowledge that contradicts the developers’ idea about the simplicity of editing.WordPress doesn’t have a single solution to display the posts flexibly. But, lucky you, Crocoblock does. The JetGridBuilder will rock your portfolio WordPress website because building beautiful grids has never been easier. So, let’s get the show on the road.
Table of Contents
WordPress Blocks for Making Portfolio Websites
When working on the portfolio website, the main thing is to showcase your work in the most attractive way. The information you present should include visuals to keep the visitors’ attention and some details about your work. Of course, you should organize all the content in a neat portfolio layout using a variety of instruments – photos, video presentations, thumbnail galleries, and more.
Let’s first see what blocks WordPress has for building portfolio page layouts and then discuss what JetGridBuilder can add to the native builder’s capabilities.
Gallery block
This WordPress block allows adding multiple images simultaneously and quickly arranging them in a gallery. You can define the spacing between images and select how many should appear in each row. Image settings allow you to edit images individually, crop them, resize, do basic styling changes, and link them to image files with their original size.
Cover block
Cover block is primarily for adding a banner or a hero image to the website. You can use this helpful tool to place text, a CTA button, or other content over the image, and it is a go-to WordPress instrument for creating a colored background for a separate section or a group of blocks.
This block provides very few settings, and it’s really straightforward to use, which is the essential WordPress quality.
Media & Text block
This is a dedicated block for placing text beside an image or video file vertically or horizontally. The text area can include other blocks, allowing you to add a neat title and a CTA button. When you use multiple blocks one after another, flip media and text areas, and change their sizes and background colors, it’s really easy to create a visually versatile page design with very little content.
Columns block
The following two blocks are under the Design section in the WordPress block inserter dashboard. They are essential to learn if you want to create a little more complicated portfolio layout than can be done using previous portfolio blocks.
The Columns Block allows for organizing any content on your page in up to six columns. Without it, stacking different types of content in columns is achievable by inserting blocks inside other blocks. Still, it creates unnecessary complexity, takes more time, and doesn’t allow controlling the positioning of blocks from one place.
Spacer block
It’s difficult to position blocks within other blocks freely – you must use the site’s CSS or coding. For non-technical website builders, a Spacer Block is really helpful. It adds space between the elements on a page and is an effective instrument to add a custom look to your portfolio.
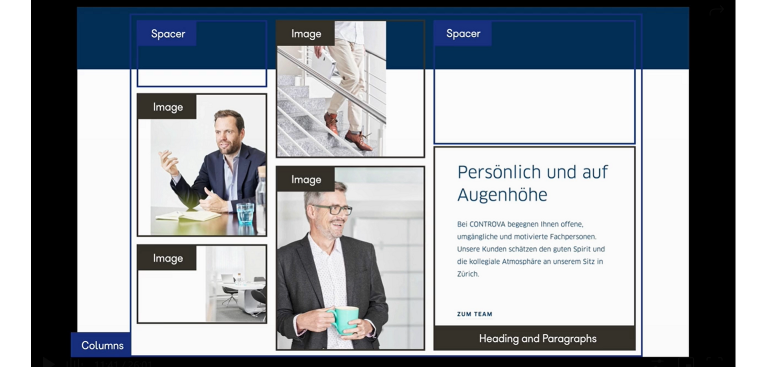
Combining a few WordPress blocks makes it possible to create interesting layouts. In this example, the layout looks like a masonry grid, even though WordPress doesn’t have a native tool for building such structures. The WordPress editor offers many simple tools, but to create designs with more personality, one must do a lot of steps.
Having seen the capabilities that the WordPress native editor provides for creating portfolio layouts, let’s now examine what functionalities the JetGridBuilder plugin adds.
JetGridBuilder Functionality
Our company, Crocoblock, is a renowned developer of WordPress plugins with excellent client service and overwhelmingly positive reviews from users. At first, our goal was to help users make better websites with Elementor page builder. But the great news is that Crocoblock expands its support of WordPress native builder, offering products that drastically improve its capabilities.
JetGridBuilder is a feature-rich plugin that is geared toward creating highly customizable grids. Its uniqueness is in drag-n-drop builder and the possibility to move the posts along the backing grid freely, resize it right away, and get the web design portfolio you need. You can play around with the demo on the JetGridBuilder landing page to experience how simple it is to use.
JetGridBuilder settings
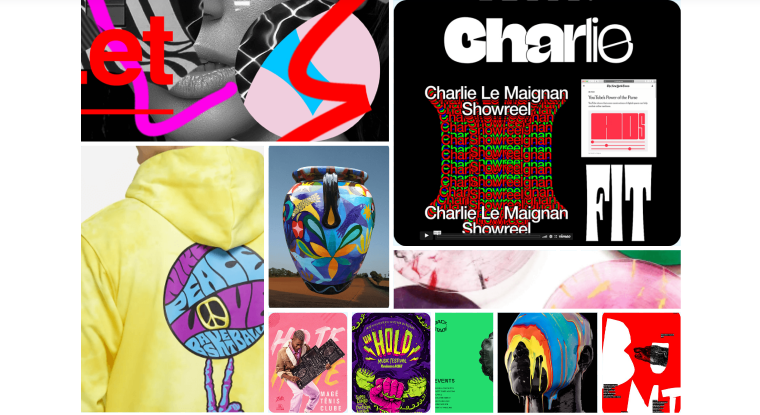
Creating such a layout with only WordPress blocks wouldn’t be possible. And with JetGridBuilder, it’s just a matter of a few minutes, provided you have created all the posts you want to appear on the grid. Yet, the JetGridBuilder plugin has some more features and settings. Let’s overview them briefly. ☝️
JetGridBuilder offers two blocks — Posts Grid Builder and Terms Grid Builder. With Posts Grid, you can display every project separately in your portfolio and apply Terms Grid to organize the projects in categories.
You have three tabs with settings, General (refers to the whole look of the grid), Post Item (to customize the look of each post separately), and Advanced (to add CSS classes).
In the General setting sections, you can set the number of columns for the future portfolio grid, specify a Gutter size, choose the Item Style, etc. The unique Vertical Compact feature automatically aligns all the cards to the top. In this tab, you can select the Loading Spinner type.
In the Post Item section, choose the Thumbnail and its size, toggle on or off the elements you want to see on each card (Title, Autor, Date, etc.).JetGridBuilder works flawlessly with WooCommerce, so both tabs contain WooCommerce settings too. Toggle Stars rating, Categories, Price, and Add to Cart buttons. Read the detailed overview of the JetGridBuilder settings in our Knowledge base.
Organize the Posts step by step
If you already have the posts with your projects created by all possible tools and you only need to showcase them in the well-structured portfolio grid, follow the simple algorithm:
- Tap the “Add Block” button designated with “+.”
- Find Posts Grid Builder there and click on it to add to the WordPress Editor.
- Press an “Add Posts” button to choose the projects you need to display.
- Organize the tiles corresponding to the posts by dragging them to the necessary place.
- Loading spinner
If you have a single-page portfolio and want to display all the projects in a row, apply the Loading spinner to show the animated icon while the posts are loading.
- Click an “Update” or “Publish” button to save the changes.
JetGridBuilder and JetEngine – dynamic content combo
If you just want to display static content on an eye-catching custom-made layout neatly, JetGridBuilder is enough for you. But combining it with Crocoblock’s dynamic content plugin opens up many new possibilities for building portfolio websites.
If you have JetEngine installed, you will see a “JetEngine Listing” option in the Items Type section that will allow adding previously made JetEngine listings to the grid. The new dynamic feature allows updating post content without editing the page containing the grid.
This is a perfect solution for building unique layouts with product listings, such as hospitality and renting businesses, blogging websites, and e-stores, but also portfolio websites that need to display use cases in uniform yet original ways.
JetEngine also adds grid blocks to WordPress that you can use for structuring listings. They are called Grid, Map, Calendar, and Query Loop blocks.
Creating WordPress Portfolio from Scratch
If you don’t know where to start designing the portfolio website, here’s a detailed instruction on how to do this with Crocoblock tools — JetGridBuilder and JetEngine. I’ll take you through the step-by-step process of creating a portfolio website on WordPress.
Web pages must start with a header and end with a footer. For building these wrapper structures, the native editor relies on patterns – pre-built groups of blocks. It’s easy to use them, and in case you don’t need something extraordinary in the header and footer sections, WordPress has you covered. You can make some minor styling changes, choose typography, edit navigation, and even create submenus.
Create posts
To start building a beautiful portfolio grid, create a CPT for each project and add the meta fields using the JetEngine plugin. Look through the detailed guidelines from the Knowledge base to know more about it. Also, you can use JetEngine widgets in Gutenberg.
Display projects in a grid
On the step of displaying projects in a clear-cut portfolio, JetGridBuilder comes into play. You can create any possible portfolio layout to showcase the projects because only your fantasy is the limit. For example, as an architect, you can combine images with different widths and heights, as if putting high towers, skyscrapers, and low-height buildings. With the help of such flexibility, you can highlight the primary projects and make them the first ones the visitors see.
To make your portfolio look unique, you can do the following:
- define the number of columns for the backing grid to scale the tiles and layout in general;
- resize each tile — you only need to pull its corner;
- move the cards along the grid freely — the width and height of others will adapt automatically;
- set the required gap between the tiles to form the seamless grids or, on the contrary, the one with the particular break;
- add a customizable Loading Spinner (choose one of 25 amazing spinner types).
Apply stylization settings to the portfolio grid
Look at the Item Style settings. They define the appearance of a thumbnail on the tile. Here you will find two options: Standard and Content Overlay. Use the first option to place the thumbnail over the text info, or apply the second to make the content overlay the image.
In the Post Item section, you can choose whether to show a thumbnail. Also, add or remove the following elements: Title, Author, Date, Post Type, and Divider. It will also give a new look to the tile. At last, you can always opt for CSS to style each portfolio tile.
Provide clear navigation. People like controlling things and will appreciate the nice level of control while looking through your WordPress portfolio. Apply the navigational capabilities of JetEngine, such as arrows for your slider, dots for the carousel, and pagination, in case you are not interested in JetGridBuilder’s Loading Spinner.
Along with presenting your projects/photos/designs, you can also sell the items. For instance, you want to monetize your handiwork and advertise or distribute handmade items. With the help of JetGridBuilder, you can build a product grid, too.
Last but not least, you can assign a category to every project (or product) and display them on a separate page, utilizing the Terms Grid Builder block that features all the same settings Post Grid Builder has.
How to Get JetGridBuilder?
The good news is that JetGridBuilder is free. Download the plugin, add it to the admin panel of your portfolio website, and start using it right away. Also, check the JetEngine prices and enjoy the perfect combo of both plugins.
Bottom Line
JetGridBuilder helps to put all the projects together effortlessly in the form of an elaborated grid. This flexible and feature-rich tool allows you to easily create amazing layouts that drive your idea and demonstrate experience through the projects you display using WordPress builder. Have you already tried our JetGridBuilder? Was it easy to create the grid you required, or did you have issues? Do you find it useful for you? Share your feedback in the comments below.