Do you know how to take a screenshot on Mac? Although taking a screenshot is as easy as pressing a couple of keys on the Mac, screen capture on the Mac has been something that has not always felt intuitive.
There are various basic ways to take a screenshot if you own any kind of Mac. In this article, you will find information on how to take a screenshot on a Mac, how to paste a screenshot on a Mac, and how to disable screenshots on a Mac.
Furthermore, you can find how to customize keyboard shortcuts in System Preferences, how to add annotations to mac screenshots, and advanced terminal hacks to take mac screenshots.
How to take a screenshot on Mac?
Most new Apple users, particularly those who are migrating from Windows, don’t immediately know how to take a screenshot on a Mac and how to snip on Mac, particularly if they’re used to using the Print Screen button on Windows.
These are some methods to take a screenshot on Mac:
Method 1: Capture a Screenshot of the Entire Screen
For Mac users, these steps will guide you through the process of taking a screenshot:
- Press and hold Command + Shift + 3 simultaneously
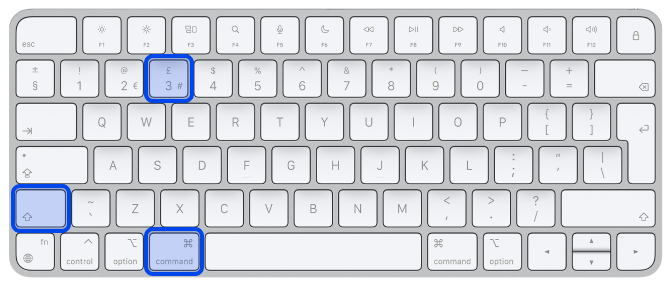
- On your screen, click the thumbnail if it appears in the corner to edit a screenshot.
Additionally, you may wish to wait until the screenshot has been saved to your computer.
Method 2: Print Screen of a Selected Area
As mentioned before, you can use shortcuts to take a screenshot. Here’s how to take a screenshot of a specific area:
- Press and hold Command + Shift + 4 simultaneously
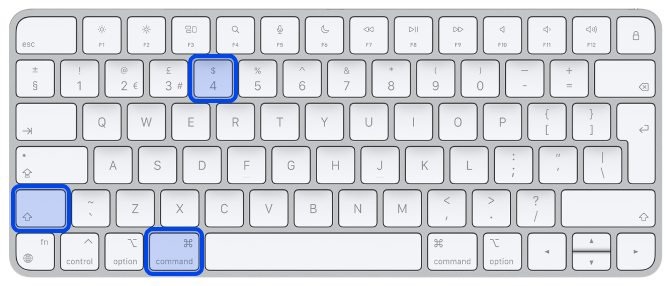
- Drag the crosshair across the screen to select the area that should be captured and press and hold the Space bar while dragging to move the selection. You can stop the screenshot by pressing the Escape key.

- To take a screenshot, release the button on the mouse or trackpad
- In the corner of your screen, you can click on the thumbnail to alter the screenshot. As an alternative, you can wait until the screenshot has been saved to your desktop.
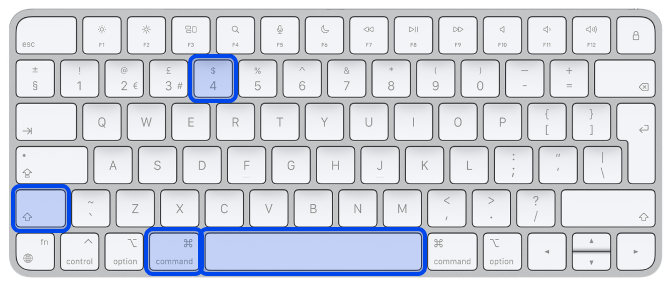
Method 3: Screenshot a Specific Section or Window on Mac
Now, we explain how you can take a screenshot of a specific section or window on Mac; follow these steps:
- You should open the window that you intend to capture
- Then press and hold the Command + Shift + 4 and Space bar keys. The pointer will change to a camera icon. You may cancel the process by pressing the Escape key.
Method 4: Command + Shift + 5
The shortcut command Cmd-Shift-5, introduced in macOS Mojave in 2018, allows you to view your screen capture options at the bottom of your display. You can take a screenshot of the entire screen, a window, or your screen selection:
- Press and hold Command + Shift + 5 simultaneously
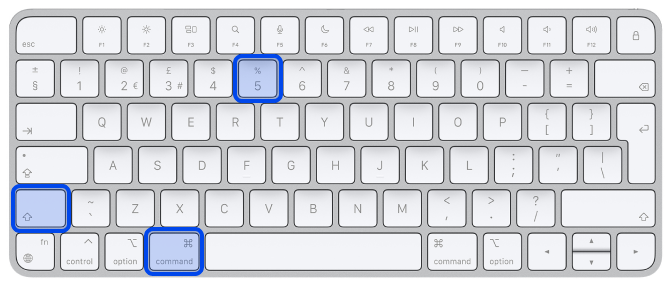
- A small panel will appear at the bottom of your display with your screen capture options. In this panel, three screenshot buttons let you capture the entire screen, a window, or your screen selection.
An X button is located on the left side of the screenshot panel, but you can also close the screenshot panel by pressing the Escape key.
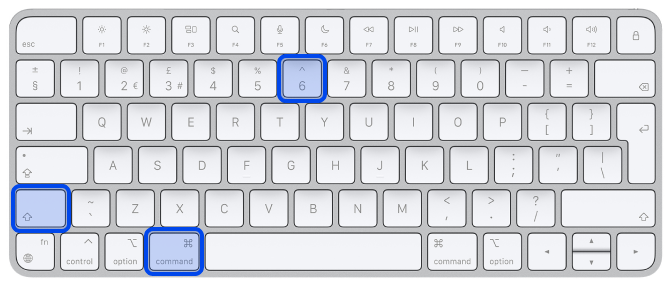
Method 5: Take a Screenshot on the MacBooks Touch Bar
It is also possible to take a screenshot of what is currently appearing on the Touch Bar if you have an older MacBook Pro 15-inch, 16-inch model or a current 13-inch MacBook Pro with the Touch Bar. Follow the following step to use the Macbook screenshot shortcut:
- Just hit Command + Shift + 6 to take a very wide and skinny screenshot of your Touch Bar.
Method 6: How to print screen on Mac with Preview?
The Preview application is Apple’s native image and PDF viewer – probably one of the most critical components of your workflow. It offers a screenshot tool that lets you take a screenshot of either a portion or the entire panel.
The Preview program allows you to take screenshots and edit them directly from the same window once you have taken them. As a result, you can resize the image and add annotations afterward.
Follow the bellow steps:
- In the app menu, select File
- In the File, select Take Screenshot
- Choose which part of the screen you want to capture
- Take a screenshot
As a result, you are now free to edit and save your screenshots to any location on your Mac.
How to Paste a Screenshot on Mac?
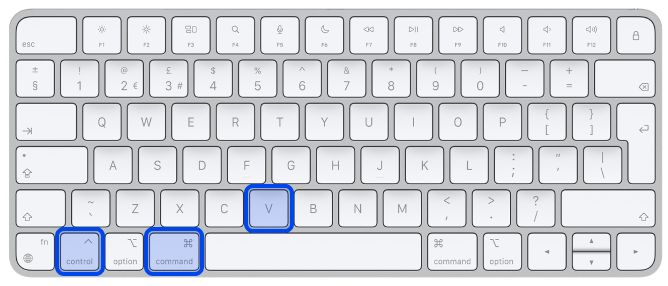
Copying screenshots to the Mac clipboard is an easier option than saving them all to the desktop or another location. So, you can paste them into a document or online form you are working on.
In particular, this can be useful when the screenshot is intended to be used right away and the screenshot is not to be kept.
- Press Control while taking a screenshot on a Mac to copy it to the clipboard. This works in all types of shortcuts for taking screenshots on Mac.
- Then press Command + V in any other app to paste the screenshot.
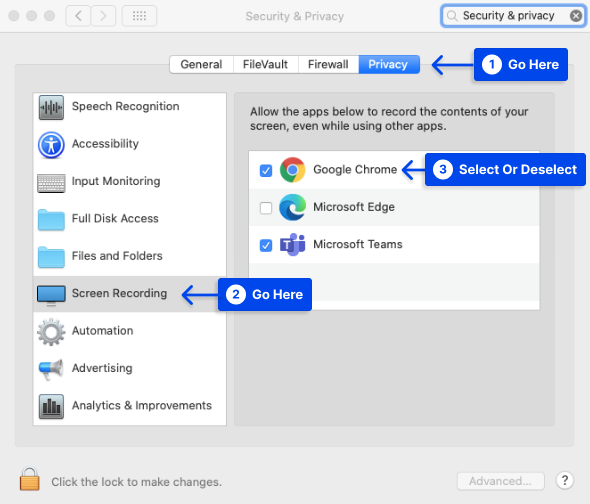
How to Disable Screenshots on Mac?
Follow these steps to to disable screenshots on Mac:
- Go to System Preferences
- Go to Security & Privacy
- Go to Privacy
- Go to Screen Recording
- Unlock the Padlock with your password
- Here you can view a list of the applications that are currently recording your screen. You may select or deselect the apps.
Where to Find Your Mac Screenshots?
You may want to know where screenshots go on Mac. Your desktop is the default place where screenshots appear when you take them on Mac.
There will be an automatic title next to your screenshot stating “Screenshot,” followed by the time and date it was taken.
Customize Your Keyboard Shortcuts in System Preferences
You can change the default shortcuts if you do not like them.
Follow these steps to do this:
- Open the Apple Menu
- Select System Preferences.
- Click Keyboard, then
- Click the Shortcuts tab.
- From the menu on the left, select Screenshots
- Select the screenshot option you wish to edit
- Select the current keyboard shortcut
- Press the new combination of keys instead
- The new shortcut will be automatically applied
The Restore Defaults button is located at the bottom right corner of the window. You may undo your changes by clicking on it.
How to Add Annotations on Mac Screenshots
In macOS, the Screenshot application includes markup capabilities. You can, therefore, add highlights to text, draw arrows to highlight details, draw freehand sketches, add your signature, and much more to any screen capture.
Follow these steps to add annotations on Mac screenshots:
- After taking a screenshot, you can view the Markup toolbar by selecting the thumbnail you see in the bottom-right corner.
- When you select the thumbnail of a screenshot, you are introduced to a window that includes a Markup toolbar.
This system utility window appears above all other windows and does not have the usual options to maximize, minimize, and resize an application window.
Additionally, this application provides several drawing tools, a text tool, a signature option that allows you to sign using your trackpad, a webcam, or an iPhone to take a picture of an ink and paper signature, and many other features.
- Using the Shapes tool, you can create perfect squares and circles; however, the Sketch tool, which can be found at the top-left of the page, makes it possible to correct wobbly hand-drawn shapes, including boxes, stars, triangles, ovals, and arrows.
- In addition, you can edit your drawings and annotations. You simply deselect the current tool, and the cursor becomes an arrow, allowing you to select an annotation to change its size, position, and color. Lastly, hit the Delete key to remove your annotation or sketch text.
- In order to save the screenshot after you have marked up it, select the Done button at the upper right of the window.
Alternatively, you may use the Share menu to AirDrop to send the screenshot to another app or trash it if you are not interested in keeping it.
Advanced Terminal hacks to taking screenshots on Mac
You can use the Terminal application to change the file format or default name and remove the timestamp from a screenshot by using system commands.
Although this adjustment may be of critical importance to you, you should proceed cautiously when making changes in macOS Terminal since the commands must be typed precisely. Do not forget to hit Enter after each command has been run.
Change the file type
defaults write com.apple.screencapture type JPG
While this example utilizes a JPG file, a PNG file is the default. A variety of other options are available, including TIFFs, GIFs, and PDFs. Ensure that there is a space between “type” and the format you desire.
Change the default name
defaults write com.apple.screencapture name “NAME”; killall SystemUIServer
Change NAME to whatever you would like to call it.
Remove the timestamp
defaults write com.apple.screencapture “include-date” 0; killall SystemUIServer
Restore the timestamps by replacing the 0 with a 1.
Remove drop shadows
defaults write com.apple.screencapture disable-shadow -bool true ; killall SystemUIServer
By changing “true” to “false“, you can restore shadows.
If you prefer, you can also disable shadows completely when saving a screenshot by pressing and holding the Option or Alt key according to your device.
To ensure that these commands take effect, you may need to reboot your computer.
Conclusion
The steps in this article demonstrate how to create screenshots on Mac, and now that macOS has a dedicated screenshot capture menu, taking screenshots on your Mac is easier than ever.
Please feel free to leave any other questions regarding blogging in the comments section. We hope you found this article to be helpful.
We would appreciate it if you could share this article on social media. You may follow us on Facebook and Twitter as well.