The Domain Name System (DNS) is one of the backbones of the modern web. Hundreds of millions of records make up this system, which contains information on what IP addresses map to which domains. You can submit records to update the DNS. Understanding how these records work and the basics of WordPress DNS configuration is a key step in launching new websites.
By WordPress DNS “configuration,” we mean knowing how to update records, configure nameservers, and more. All of these are basic tasks that you need to complete so your website becomes accessible through the domain you choose. Understanding how to configure DNS records also comes in handy if you want to migrate web hosts.
In this article, we’ll explain 👨🎓 how to change your domain’s records, configure nameservers, set up redirections, and manage add-on domains.
Let’s get to it!
📚 Table of contents:
How to change your domain’s records
Domain Name System (DNS) records are mapping files that include information about what IP address connects to which domain. When someone tries to access your website’s URL, the DNS records tell the browser “where” to send them.
💡 If you need a more in-depth primer on DNS, we have a separate post explaining what DNS is.
There are several types of records and you can submit new ones through registrars when you change a domain’s configuration. Some of the types of records you can deal with include:
- Address Record (A Record): This points a domain or subdomain to an IP address.
- AAAA Record: This is similar to an A Record, but it points to an IPv6 address instead of an IPv4.
- Canonical Name Record (CNAME Record): You can use these records to redirect or map an alias to the canonical domain.
- Mail Exchange Record (MX Record): This points to the servers that should handle email for a domain.
- Text Record (TXT Record): These records don’t direct traffic but provide text-based information to other services, such as when verifying domain ownership. For example, you can verify Google Search Console with a TXT record.
- Nameserver Record (NS Record): These records determine which servers will communicate DNS information for a domain.
In practice, you won’t need to deal with many of these types of records. The most important records for most websites are A, CNAME, and MX (if you use a mail server).
When you register a domain, it’ll start with no records (or with records for your registrar’s parking page, in some cases). That means the domain isn’t pointing anywhere. To get the domain working, you’ll need to configure an A record.
That process works much the same regardless of what domain registrar or hosting service you’re using to add or update domain records. For example, to add an A record, you’ll want to access the management options for the domain you’re editing. Find the option to add a new record and select A Record from the available options:
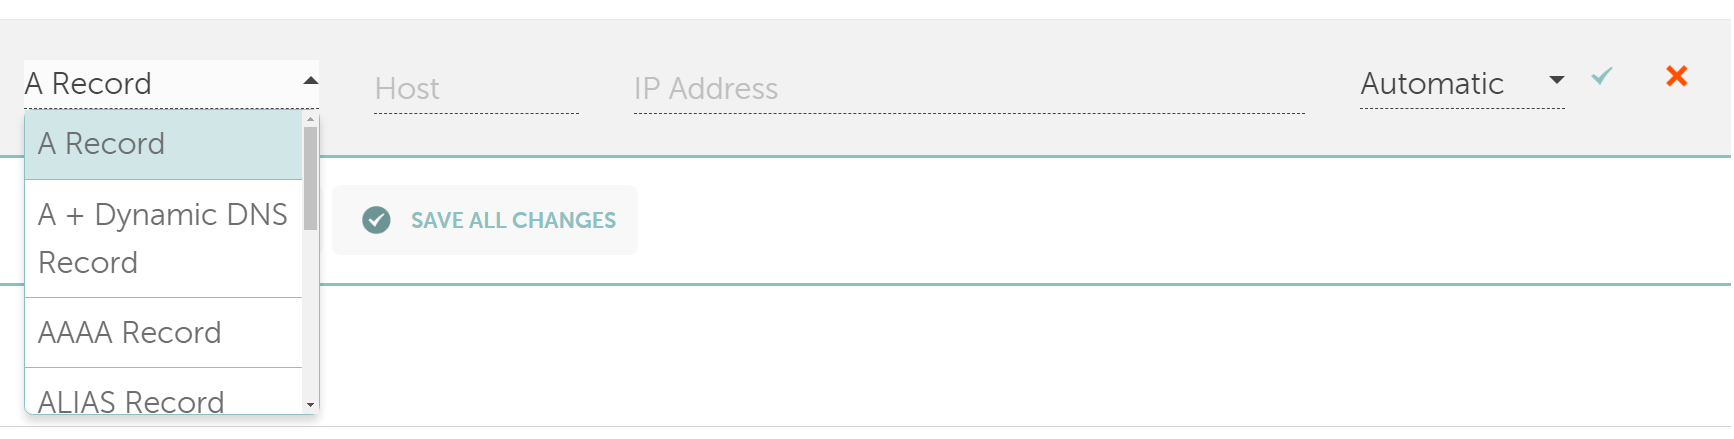
A records include three main components. The first is the name or host, which specifies the domain or subdomain you want to target. Second is the IPv4 address of the web server that hosts the site and third is the Time-to-Live (TTL) setting. That setting determines for how long the DNS caches the record’s information before checking for updates.
To put that into perspective, here’s an example of an A record for a root domain, such as yourwebsite.com:
- Name: @ (representing the root domain)
- Value: 192.0.2.1 (the IP address of your web server)
- TTL: 3600 (1 hour)
You can use the “@” symbol to indicate that you’re pointing toward the root domain instead of a subdomain such as blog.yourwebsite.com. That A record would look like this:
Name: blog
Type: A
Value: 192.0.2.1
TTL: 3600
As for the IP address, you can get that information from your web host. When you set up a new website, your web host will show you a corresponding IP address for it. That’s the address you need to add to the A record for the domain you want to connect to the site.
MX records work similarly, but they have four components. You have the host, the value (which is the equivalent of the IP address in A records), the priority, and the TTL:

These components work mostly the same as with A records. The host determines which domain the record applies to. In that example, the “@” means the record works for emails that go to yourwebsite.com (the root domain).
The value in an MX record points toward the domain name of the email server you want to use. Some registrar and hosting providers might also offer email hosting services. If not, you can use third-party email hosting services. These services will tell you what value to add to the MX record.
If you have multiple records, the “priority” setting determines the order in which they resolve. That means that emails will try each record, in order, until they hit a server that responds.
When adding any type of record, it’s important to note they can take time to propagate. This can be a few minutes or a day in some cases, until the records disseminate to other DNS servers. Until this propagation is complete, you might run into issues trying to use the associated domain.
How to configure nameservers
Nameservers are the servers that store DNS records. When you try to visit a website, these servers handle the queries that give you the IP address you need to connect to.
When you register a domain, it’s typically linked to that registrar’s nameservers. However, you can update the nameserver records to point towards another company’s servers. This can be useful, for example, if you’re using your web host’s nameservers or when you’re setting up a content delivery network (CDN) to work with your WordPress website.
If you want to set up custom nameservers for a domain, you’ll need to access its management settings.
You’ll do this from your domain registrar – e.g., Namecheap or Google Domains. Or, if you purchased your domain name through your web hosting account, you might need to manage nameservers there.
There should be an option among those settings to add a new nameserver:

Nameserver records contain one component, which is the server’s URL. You’ll need to add at least two servers for any custom records. For example, if you’re integrating WordPress with Cloudflare, those nameservers might look something like this:
👉 tom.ns.cloudflare.com
👉 sullivan.ns.cloudflare.com
These nameservers will depend on what service you use and they’ll typically be provided to you. After adding new nameserver records, you’ll need to wait for them to propagate.
How to manage add-on domains
Knowing how to set up add-on domains is a key part of managing your WordPress DNS settings. Depending on your hosting plan, you might only be able to host one WordPress website. In that case, you might be able to set up add-on domains to get additional websites up and running.
This process works from your hosting control panel. Some control panels might not offer the option to create add-on domains. In cPanel, you’ll find the option under the Domains section:

That option will enable you to add another domain to your hosting account.

If you want to set up a subdomain for your main WordPress domain name – e.g., subdomain.yoursite.com – you can use the separate Subdomains tool in cPanel.
How to set up redirections
Redirections are important components in WordPress DNS configuration, particularly if you change domains. If there’s a redirection set up for a domain, it’ll send users to another address instead. For example, you can redirect traffic from yourwebsite.com to mynewwebsite.com:

Typically, redirections don’t happen at the DNS level. However, most registrars enable you to set up redirections while configuring your domain’s DNS settings.
In the previous example, you can see a basic redirect. Wildcard redirections work differently. With a wildcard redirect, you can point traffic from any page from the source URL to a corresponding page in the destination URL.
For example, if you set up a wildcard redirect from yourwebsite.com to mynewwebsite.com and someone tries to access yourwebsite.com/contact, they’ll be redirected to mynewwebsite.com/contact. This type of redirect is perfect for domain migrations.
⌛ It’s worth noting you can also set up redirects in WordPress with the right plugins. Depending on the plugin, it might give you more control over redirects compared to most registrars.
Final thoughts on WordPress DNS configuration 🧐
Setting up a new WordPress website is easy. However, registering and configuring domains can feel intimidating if it’s your first time doing it. You’ll need to understand how DNS records work and how to point a domain toward your website so visitors can find their way to it.
If you know how to set up A and MX records, configure nameservers, set up redirects, and manage add-on domains, that’s everything you need to tackle in WordPress DNS settings. Configuring DNS settings for a new website shouldn’t take long and it’s a much simpler process than you might imagine.
Do you have any questions about WordPress DNS settings? Let’s talk about them in the comments section below!