Looking for an easy-to-follow tutorial on how to set up a WordPress HTML sitemap?
You’ve landed on the right page then. 😎
Sitemaps serve different purposes, depending on whether you’re talking about an XML sitemap or an HTML sitemap. In simple terms, the former is made for search engines and is important for SEO. In contrast, the latter is intended for humans and improves the site visitor experience, with some mild SEO benefits as well.
📚 In this article, we’ll first discuss the difference between XML sitemaps and HTML sitemaps in a little bit more detail.
Then we’ll go over why relying on the native WordPress sitemap feature won’t give you the same benefits as creating your own HTML sitemap. Finally, we’ll show you how to easily set up an HTML sitemap using a plugin. 🌾
What’s the difference between an XML vs HTML sitemap?
XML Sitemaps and HTML Sitemaps are two different types of sitemaps used in website development and search engine optimization (SEO) practices. Here’s a breakdown of their differences:
An XML sitemap is designed specifically for search engines to understand the organization of a website’s content effectively. It uses the XML (eXtensible Markup Language) format, which allows for structured representation of URLs, metadata, and the relationships between different pages. XML sitemaps use specific XML tags to convey this information to search engine crawlers.
On the other hand, an HTML sitemap is intended for website visitors first. It is a human-readable page that presents a comprehensive list of the important pages and sections of a website. By providing a user-friendly layout with organized links, an HTML sitemap facilitates navigation and enables users to locate specific information on the site easily. HTML sitemaps are written using HTML (Hypertext Markup Language), the standard markup language for creating web pages.
In general, using both XML and HTML sitemaps can provide a comprehensive approach to website optimization. XML sitemaps help search engines crawl and index your site effectively, while HTML sitemaps enhance user experience and assist with navigation. By utilizing both types, you cater to the needs of search engines and website visitors simultaneously.
💡 In this tutorial, we’re going to teach you how to create a WordPress HTML sitemap, but if you’re interested, you can also check out our dedicated XML sitemap page for an explanation of how to create one of those as well.
Benefits of creating your own WordPress HTML sitemap vs relying on the native WordPress sitemap
Since 2020, WordPress has been able to generate a simple sitemap to include all your categories, tags, post types, posts, and archive pages. There’s just one issue. The native WordPress sitemap is an XML sitemap and it cannot be customized. So, while it’s useful to help search engines find your content, it doesn’t do anything for your site visitors looking for an easy way to navigate your website.
Hence why it’s a good idea to create your own HTML sitemap. Below are some of the benefits you’ll get as a result:
Customization 🎨
Creating your own HTML sitemap allows you to have complete control over its design, structure, and content. You can customize it to match your website’s branding and layout, providing a consistent user experience.
Improved user experience 🧑💻
A custom HTML sitemap enables you to organize and present links to important pages and sections in a user-friendly manner. You can categorize the links, add descriptions, or include additional information to enhance navigation and help visitors find what they need more easily.
Flexibility and additional information 🖱️
Unlike the native WordPress sitemap, a custom HTML sitemap can include more than just page URLs. You can deliver additional details such as descriptions, excerpts, or thumbnail images, providing context and attracting visitors’ attention.
SEO benefits ⚙️
By structuring and organizing your custom HTML sitemap effectively, you can improve the internal linking structure of your website. This can make it easier for search engines to crawl and index your pages. Additionally, a user-friendly navigation tool can indirectly contribute to better user engagement and longer visit durations, positively impacting your website’s SEO performance.
You can even include a link to the native WordPress sitemap within your custom HTML sitemap, ensuring search engine accessibility while still enjoying the benefits of customization and enhanced user navigation.
In summary, creating your own WordPress HTML sitemap offers advantages such as customization, improved user experience, flexibility in providing additional information, SEO benefits, and the option to integrate it with the native WordPress sitemap.
With that out of the way, let’s show you how to actually do it. 👇
Create a WordPress HTML sitemap using the Simple Sitemap plugin
If you need to generate HTML sitemaps in WordPress quickly, you can use a plugin called Simple Sitemap. One of the advantages of this tool is that it allows you to both build and preview your sitemap directly in the WordPress editor, and now even includes support for blocks.
You don’t need any coding or setup. Simple Sitemap works right out of the box.
How to install the Simple Sitemap plugin
🚧 To install this plugin, simply:
- Go to your WordPress admin area and click on Plugins > Add New.
- Enter “Simple Sitemap“ in the text box and click on Search Plugins.
- Locate the plugin and click on Install Now.
- Don’t forget to click Activate to activate the plugin after installation.
Insert a WordPress HTML sitemap into your pages and posts with the Simple Sitemap plugin
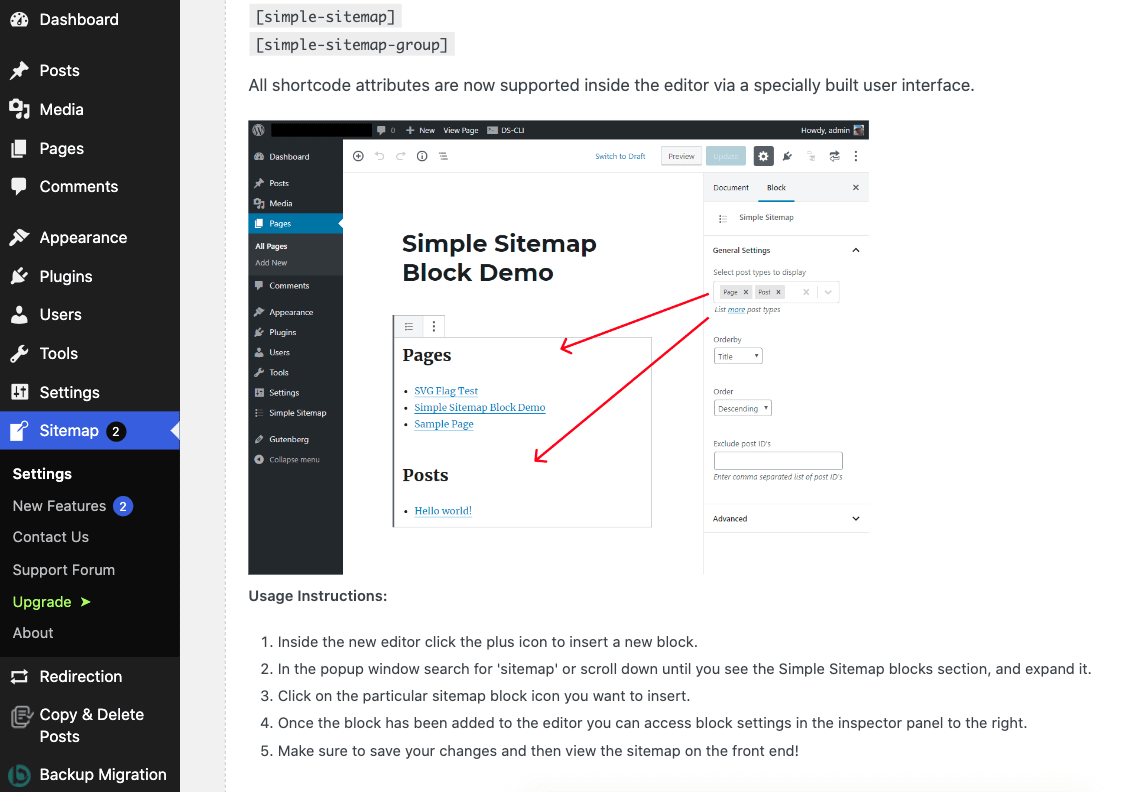
If you are using WordPress 5.0 or higher, you will have access to the block editor, and can use the (+) icon to insert a new block. In the pop-up dialog, search for “sitemap” or scroll down to the Simple Sitemap section and expand it. Then, click on the Simple Sitemap block icon.

That will insert the HTML sitemap into your post. You can then use the righthand sidebar to customize it in various ways. For example, you can sort the order of the sitemap by different fields. The default is title. The vast majority of users will keep it on that, but if for some reason you wish to order it by date, author, etc., then the option is there for you.

You can also do other things, like choosing to display the page/post excerpt below each link. Be careful with this one, though. If your excerpt is too long, it will make for an awkward and clunky sitemap:

Overall, everything is very straightforward, and this is arguably one of the most beginner-friendly plugins for WordPress that you could possibly use.
Just a quick note that if you’re using an older version of WordPress and still have the classic editor running, then you should probably upgrade to the latest version of WordPress. However, if for whatever reason you don’t want to, you won’t be able to use the block method shown above. Instead, you will need to insert the following shortcodes into your post or page: [simple-sitemap] or [simple-sitemap-group].
The plugin also has a Pro version that offers more features and advanced configurations, including additional shortcodes, custom post types, advanced tabbed layouts, and hooks.
Final thoughts on creating a WordPress HTML sitemap 🏁
In closing, to enhance your website’s navigation for human visitors, it is crucial to create a WordPress HTML sitemap to go alongside the basic XML sitemap in WordPress. The most straightforward approach to get the job done is the Simple Sitemap plugin. To recap:
- Go to your WordPress admin area and click on Plugins > Add New.
- Enter “Simple Sitemap“ in the text box and click on Search Plugins.
- Find the plugin and click on Install Now.
- Click Activate to activate the plugin after installation.
- Go to whatever page or post you want to insert the HTML sitemap.
- Tap the (+) icon wherever you want the sitemap to go.
- Type “sitemap“ into the block search bar.
- Choose Simple Sitemap.
- Adjust and customize the sitemap to your liking using the settings in the sidebar.
🚢 By following the steps outlined above, you’ll be able to generate a WordPress HTML sitemap easily and insert it wherever you’d like on your website.
Do you still have questions about WordPress HTML sitemaps? If so, please drop a comment below, and we’ll do our best to help you.