Do you struggle with organizing your content on your WordPress website? If yes, then this blog post is perfect for you!
In this article, we will be discussing how to create a table of contents in WordPress. A table of contents is an essential feature that allows your readers to quickly find the relevant information they are looking for in your long-form content.
According to a recent study, websites that use a table of contents have a 15% higher engagement rate than those that don’t.
In this tutorial, we will show you how to add a table of contents to your WordPress website using a simple plugin. We will also cover some best practices for creating a table of contents that will help improve the user experience on your website. So, let’s get started!
Why Use Table of Contents in WordPress?
Using a table of contents in WordPress helps readers navigate your content easily and enhances the user experience. By providing a clear outline of your content, readers can quickly locate and access the information they need and reduce the chance of them leaving your website early.
Here are the reasons why you should use a table of contents in WordPress:
1. Eases Navigation: Long-form content can be intimidating for readers and may cause them to lose interest quickly. With a table of contents, readers can quickly scan through the content and jump to the section they need, making the reading experience much more enjoyable.
2. Reduces Bounce Rates: When readers can easily find the section they need, they are less likely to leave your site. A table of contents encourages readers to spend more time on your page, which can help reduce bounce rates.
3. Improves SEO: A well-organized table of contents not only improves the user experience but also can improve your search engine ranking. Search engines favor sites with good organization, making it easier for them to crawl your content.
4. Increases Engagement: A table of contents encourages readers to remain on your page for longer periods, increasing their engagement with your content. This can lead to higher conversion rates and more satisfied readers.
In short, a table of contents is a must-have feature for any WordPress website looking to provide a user-friendly experience for its visitors while also improving its search engine visibility.
How to Add Table of Contents in WordPress
Looking to add a table of contents to your WordPress site? It’s easier than you think!
Learn how to create a table of contents on your WordPress website with easy-to-follow steps.
This feature helps to organize your content and assists readers in locating information quickly. With this tutorial, you can elevate the user experience for your audience and improve your website’s functionality.
Method 1: Adding a Table of Contents Automatically in WordPress
If you’re looking to make it easier for your readers to navigate your WordPress posts, adding a table of contents is a great option. LuckyWP Table of Contents is a plugin that makes it easy to automate this process.
Here’s how you can add a table of contents to your WordPress posts automatically using LuckyWP Table of Contents:
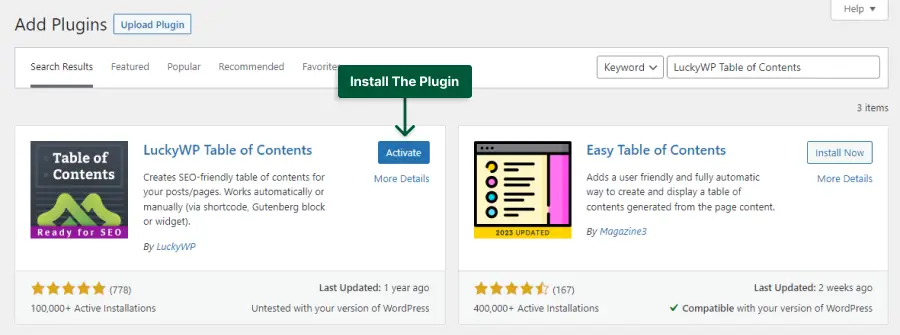
STEP 1: Install and activate the LuckyWP Table of Contents plugin from Plugins → Add New.
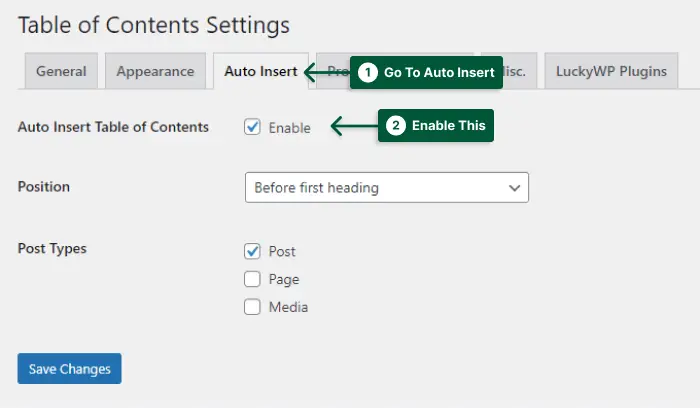
STEP 2: Go to Settings → Table of Content, and open the Auto Insert tab.
STEP 3: Enable the Auto Insert Table of Contents option to add the table of content autonomously to your posts.
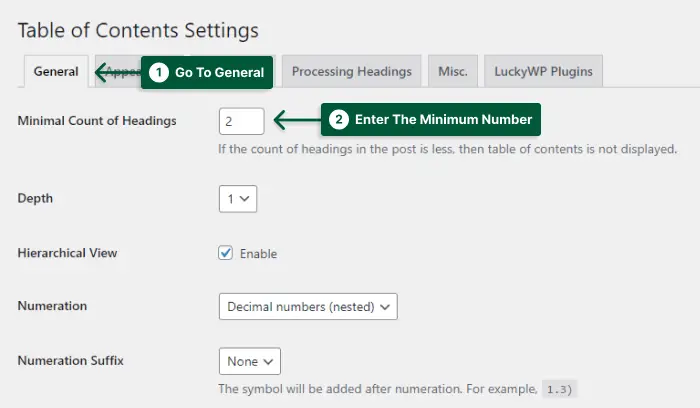
STEP 4: Go to the General tab and configure the setting as you want.
STEP 5: In the Minimal Count of Headings section, enter the minimum number of headings required for the TOC to appear.
To add the TOC manually, edit the post, search for the table of content, and add it there.

That’s it! Your post now has a table of contents that will be automatically generated based on the headings in your content.
If you’re looking for a sticky table of contents in WordPress, consider using the Sticky TOC – Advance Table Of Contents plugin. Give it a try and see how it works for you.
This plugin is a great way to make your content more scannable and accessible. Plus, it’s easy to use and offers a range of customization options. Give it a try today!
Method 2: Adding a Table of Contents Manually in WordPress
In this section, we’ll cover creating a table of contents in WordPress. This method involves manually adding headings and creating jump links using HTML and CSS.
Don’t worry if you’re not familiar with coding, we’ll guide you through the process. For this method, we’ll be using the Gutenberg block editor.
Here’s how to create a table of contents manually in WordPress:
STEP 1: Go to the post or page where you want to add the table of contents.
STEP 2: Create the headings that will be used as items in the table of contents.
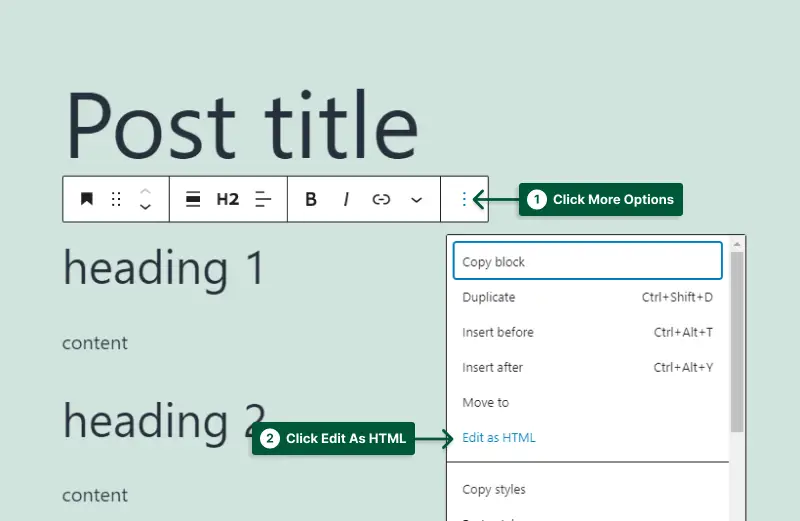
STEP 3: Click on the first heading block and select the More Options button(three dots). Then, select Edit as HTML.
STEP 4: Add a unique ID name to the opening tag of the heading.
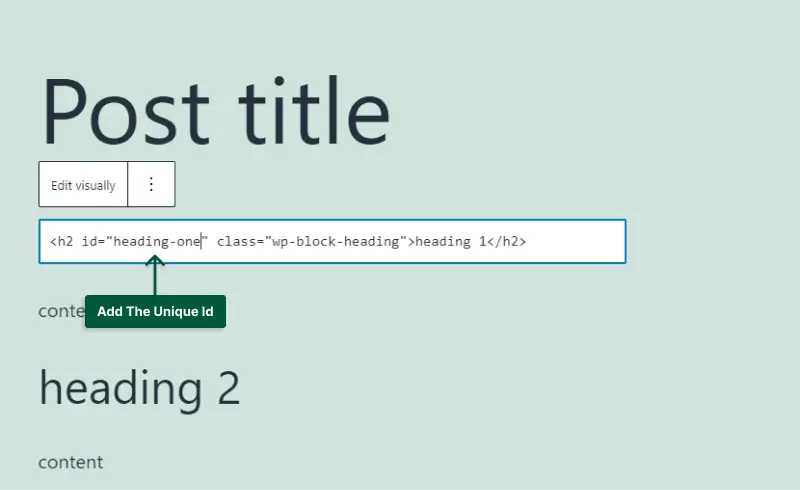
STEP 5: Repeat the previous step for the rest of the headings on the page.
STEP 6: Click the Add Block button and select the Custom HTML block.
STEP 7: Add the table of contents code with jump links using the provided HTML code.
<div class="toc">

<p>Table of contents</p>

<ol>

<li><a rel="noopener" target="_blank" href="#heading-one">Heading 1</a></li>

<li><a rel="noopener" target="_blank" href="#heading-two">Heading 2 </a></li>

<li><a rel="noopener" target="_blank" href="#heading-three">Heading 3 </a></li>

<li><a rel="noopener" target="_blank" href="#heading-four">Heading 4 </a></li>

</ol>

</div>
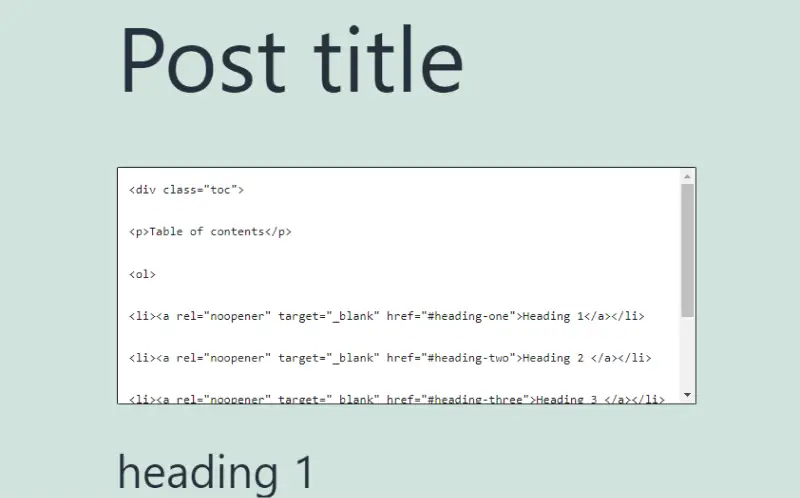
STEP 8: Customize the section names and jump links as needed.
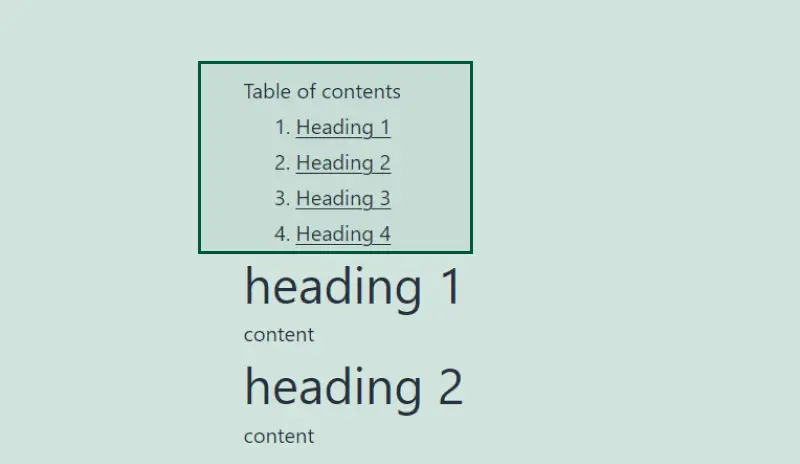
And that’s it! You have successfully added a table of contents manually to your WordPress post or page using HTML and CSS.
If you’re not comfortable with coding, don’t worry, there are plenty of plugins available that can do this for you.
If you are looking for a more visually pleasing option, use the Smart List Pack plugin. This plugin has different styles to separate the headings to different pages, add paginations, and more.
FAQ
A table of contents in WordPress is a list of links that appear at the beginning of a webpage or blog post, which allows readers to easily navigate through the content. It provides a neat and organized look to the overall design and enhances user experience.
Creating a table of contents can greatly benefit your readers, as it helps them easily find the information they need on your webpage or blog post. It also enhances the overall user experience and provides a neat and organized look to your content. Additionally, it can improve your SEO ranking by making your content easier to navigate for search engines.
Yes, a table of contents can be good for SEO as it makes it easier for search engines to crawl and index your content. The headings and subheadings used in the table of contents provide a structure for your content, which helps search engines understand the topic and relevance of your page. Additionally, a table of contents can increase the time spent on your site and reduce bounce rates, which are positive ranking factors.
While using a plugin is the easiest way to create a table of contents in WordPress, you can also create one manually using HTML and CSS. However, this requires some knowledge of coding and can be time-consuming. It’s recommended to use a plugin unless you have a specific reason not to.
Conclusion
By following the simple steps outlined in this article, you can easily create a table of contents in WordPress and enhance the user experience on your website.
We discussed the importance of using a table of contents plugin, how to install and activate it, and how to create and customize your own table of contents.
Thank you for taking the time to read this article. If you have any questions or need further assistance, don’t hesitate to leave a comment below. We value your feedback and are always happy to help.
We hope you found this tutorial helpful! For more insightful WordPress tutorials and tips, be sure to follow BetterStudio on Facebook and Twitter. We regularly update our social media platforms with the latest WordPress news, tutorials, and more. Stay tuned for more!