Are you wondering how to create a travel booking website?
If yes, grab yourself. We have the answer to your question.
Today, WordPress has made creating a website a walk in the park. With WordPress, you can now have your travel booking website ready with all the functionalities in just a minute.
Wondering how? Hang on.
In this article, you’ll learn the tried and tested ways of creating a travel booking website with WordPress.
After this read, you can start a fully functional website in no time.
What are the Must-Have Things for Your Travel Booking Website?
Is your goal to create a seamless website ensuring users a stress-free experience from the moment they land on your website to the point they complete their booking?
If yes, here are some crucial things to consider:
- Ensure your travel booking website is responsive, simple, and visually appealing.
- Ensure your website has a smooth, user-friendly online booking system enabling users to browse available dates, make appointments, change or cancel them, and get immediate confirmation.
- Make sure users from different regions can easily book by including a safe and a variety of payment alternatives (such as credit cards, PayPal, etc.).
- Include accurate and compelling content (descriptions, reviews, photos, videos) of the travel destinations, accommodations, and services for users to make informed decisions.
- Enhance user experience and improve your search engine ranking with a fast-loading site.
- Make sure your site supports multiple languages and currencies to cater to a global audience.
- Assist users with queries or issues with the help of reliable customer service systems (live chat, phone, email).
- Protect customer information and transactions with robust security measures, like SSL encryption.
- Provide a system for customers to rate and review their experiences to build trust with prospective customers.
- Optimize your website for search engines to increase visibility, traffic, and, ultimately, bookings.
- Integrate with social media for increased visibility and user engagement.
Choosing the Best Platform for Your Travel Booking Website
Now that you know the prerequisites of an excellent travel booking website, you must wonder how it can be easy.
The trick is the platform you choose to create your travel booking website. There are plenty of website-building platforms on the internet. And choosing your right fit can be daunting.
To overcome the nerve-wracking experience, WordPress is an ideal choice. It’s a trusted website-building platform that has been in the business for a long time.

So, building a travel booking website with WordPress will be a BIG WIN for you as a travel company.
Now, let’s understand why WordPress is the top choice.
Why Choose WordPress for Creating a Travel Booking Website?
WordPress shines as the ideal platform for creating an excellent travel booking website. But do you know why?
First, it’s user-friendly, and you don’t need to be a tech expert to navigate the platform. It’s as easy as pie!
Additionally, WordPress comes jam-packed with many travel-focused themes that can be customized to your specific needs.
But here’s the kicker: it’s the plugins.
A vast arrangement of powerful WordPress booking plugins at your disposal transforms your site into a full-fledged booking portal, enabling customers to make reservations, manage bookings, and even pay online.
Want to hear more?
WordPress has an SEO-friendly design that helps users find your website easily and further helps it rank higher in search results. It’s also easily adaptable for the growth of your business and website.
And the icing on the cake? It’s affordable! Yes, WordPress keeps costs down, whether you’re starting as a small website or going big from the get-go.
For this reason, it’s no wonder why so many travel businesses set sail with WordPress!
How to Create a Travel Booking Website with WordPress?
With that, let’s explore the step-by-step guide for creating a travel booking website with WordPress.
The following steps are to make your website-creation journey way easier. Let’s move on!
Step 1: Choose a Domain Name
Your domain name is your website’s address on the internet, and it’s one of the first things your visitors will see. Choosing a domain name that is easy to remember, pronounce, and spell is crucial.
Here are some tips to help you choose the perfect domain name for your travel booking website:
- Your domain name should be relevant to the travel industry, clarifying what your business is about.
- Keep your domain name simple and easy to remember, and avoid using complex words or phrases that might confuse your visitors.
- Your domain name should be unique and stand out from the crowd.
- Avoid numbers and hyphens, as they can make a domain name harder to remember and more prone to typos.
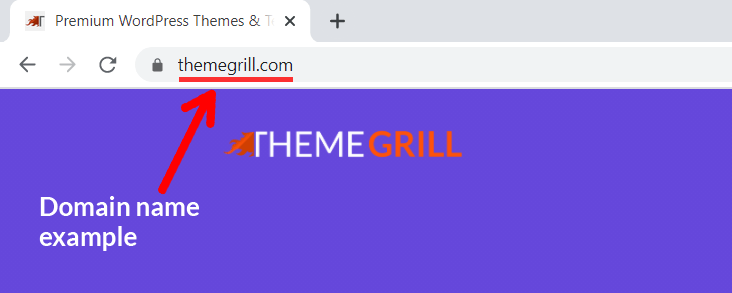
Since your domain name is the first thing your visitors notice, it’s important to create an impact.
For example, themegrill.com clearly illustrates the company’s focus on creating themes and templates.
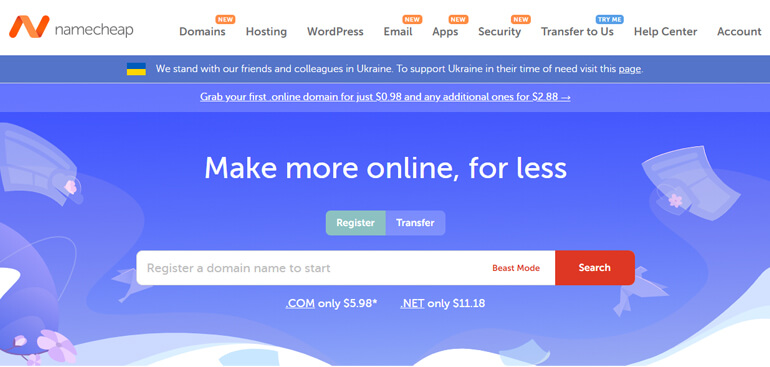
After choosing a unique domain name representing your travel business, you must purchase the domain name from trustworthy domain registrars.
Some of the best affordable domain registrars are as follows:
Step 2: Choose a Suitable Hosting
Now that you have your domain name ready, it’s important to secure the location of your website.
And this is where web hosting comes into play. Web hosting is a platform where all your website’s essential files and data are stored.
The following are some tips for you to choose a suitable web hosting for creating your travel booking website:
- Look for a web hosting service that guarantees at least 99.9% uptime, ensuring your website is available for visitors almost all the time.
- Choose a hosting that is known for its speed and performance.
- You should get reliable 24/7 support from your hosting provider.
- Look for a web host with features like SSL certificates, firewalls, and regular backups.
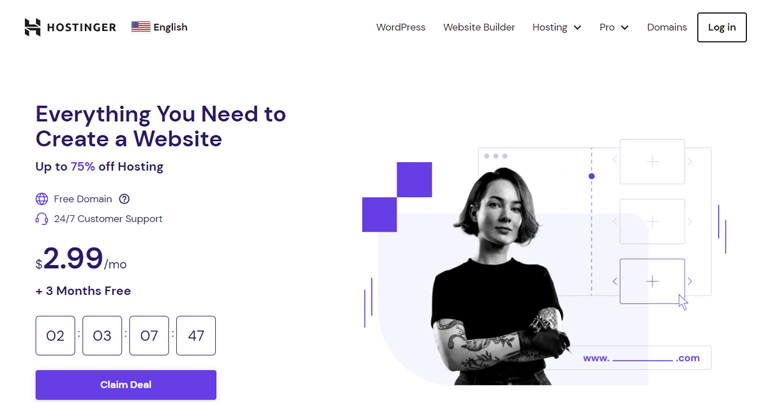
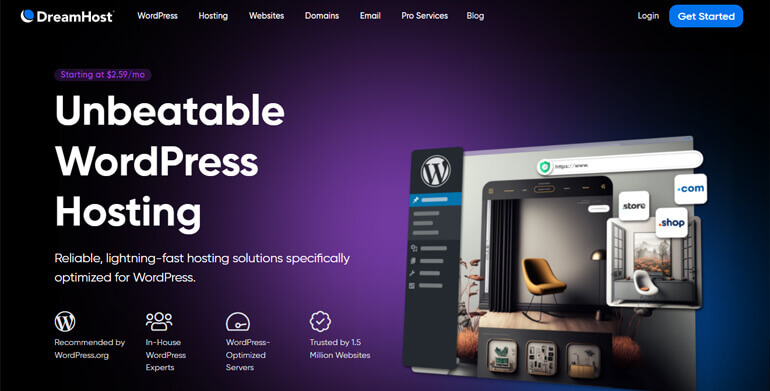
Here are some of the best web hosting services to host your travel booking website:
Step 3: Install WordPress
After choosing a domain name and a suitable web hosting service, the next step in creating your travel booking website is installing WordPress.
And if you are thinking about how to do that, keep calm. These days, most hosting providers such as Dreamhost and Kinsta come packed with WordPress auto-installation or one-click installer features.
That is why choosing the best hosting is so important.
All you need to do is follow the steps below:
- Access Your Hosting Account: Log in to your web hosting account. Look for the control panel or dashboard. It’s where you manage all aspects of your hosting service.
- Find the WordPress Installer: Most hosting providers offer a one-click WordPress installation feature. Look for the WordPress icon in your control panel. It might be under a section called Website or Software.
- Start the Installation Process: Click on the WordPress icon to start the installation process. You’ll be guided through the steps by the installer.
- Choose Your Domain: You’ll be asked to choose the domain where you want to install WordPress. Select the domain name you registered earlier from the dropdown menu.
- Enter Site Details: Next, you’ll need to enter details about your site. This includes the site name, admin username, password, and email address. Choose a strong password and keep these details safe; you’ll need them to log in to your WordPress dashboard.
- Install: Once you’ve entered all the necessary information, click the Install button. The installer will now set up WordPress on your domain. This process may take a few minutes.
- Confirmation: You’ll see a confirmation message once the installation is complete. You’ll also receive an email with your WordPress login details.
After successfully installing WordPress on your domain, you can log in to your WordPress dashboard by going to yourdomain.com/wp-admin and entering your login details.
Step 4: Choose a Perfect Theme for Your Website
After securing a domain name, choosing a web hosting service, and installing WordPress, the next step in creating your travel booking website is to choose the perfect theme.
The theme you select will determine the look and feel of your website.
A WordPress theme is a collection of templates and stylesheets that define the appearance and layout of your website.
For a travel booking website, you want a visually appealing theme, easy to navigate, and designed with travel and booking functionality in mind.
Here are some tips to help you choose the perfect theme:
- Choose a theme that fits the travel industry. Look for themes with built-in features for displaying travel packages, booking forms, and destination galleries.
- Select a responsive theme that adjusts its layout across different screen sizes and devices. With the increasing use of mobile devices, a responsive theme is a must.
- Your chosen theme should load quickly to enhance user experience and help with your website’s search engine ranking. Therefore, look for a lightweight theme optimized for speed.
- Look for themes that offer a variety of color schemes, multiple-page templates, and customization options for headers and footers.
- Ensure the theme is compatible with popular WordPress plugins. This will allow you to add functionalities to your website, such as booking systems, contact forms, and SEO tools.
- Choose a theme that is regularly updated and has good support from the theme developer. This will ensure your website stays up-to-date with the latest WordPress updates and security patches.
These tricks can help you pick a suitable theme for your travel website. However, finding your best pick can still be problematic in the ocean of choices.
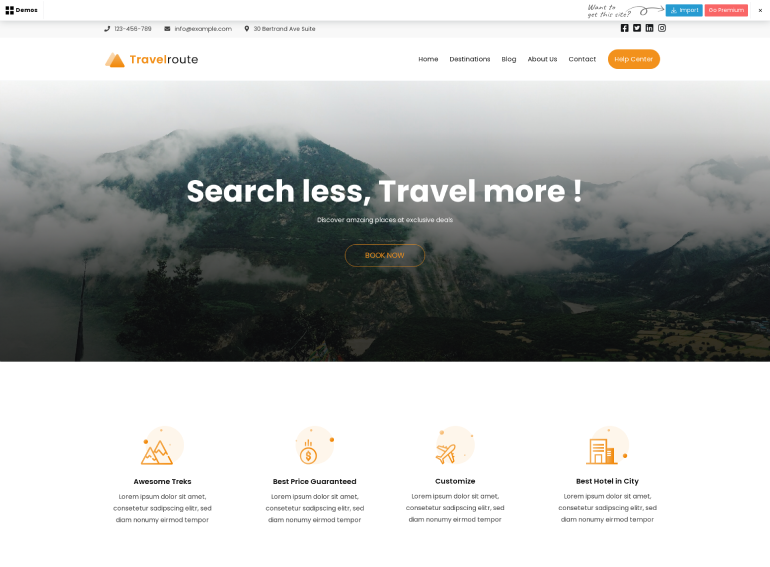
To narrow your search, here is the Zakra theme, for a great travel booking website.
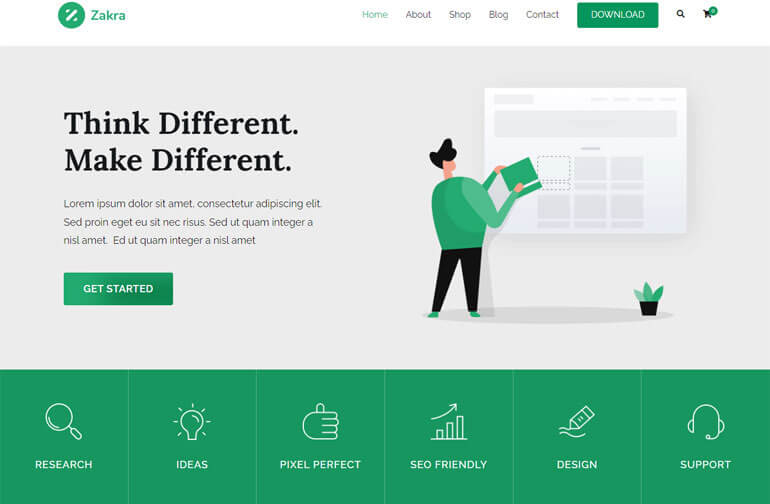
Zakra theme is among the best themes used by over 60 thousand users worldwide. It’s a versatile and lightweight theme suitable for various websites, including travel booking sites.
Here’s why Zakra could be the perfect theme for your website:
- Design flexibility
- Optimized for speed and performance
- Mobile responsive
- SEO friendly for higher search engine ranking
- Compatibility with major WordPress plugins
- Dedicated support and detailed documentation
Install a Zakra theme
Once you’ve chosen your theme, you can install it from your WordPress dashboard by navigating to Appearance>>Themes>>Add New.
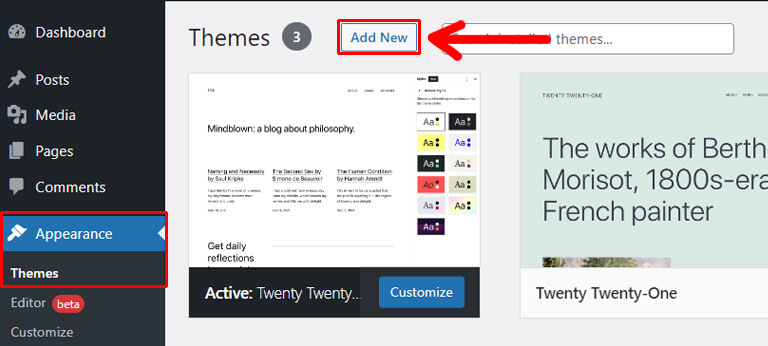
After that, type Zakra in the search bar from the Add Themes page.
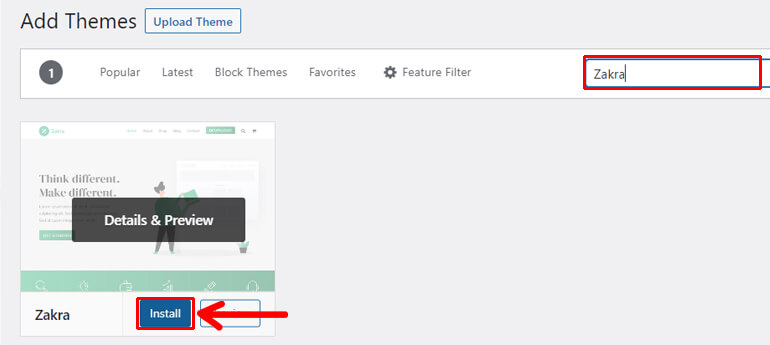
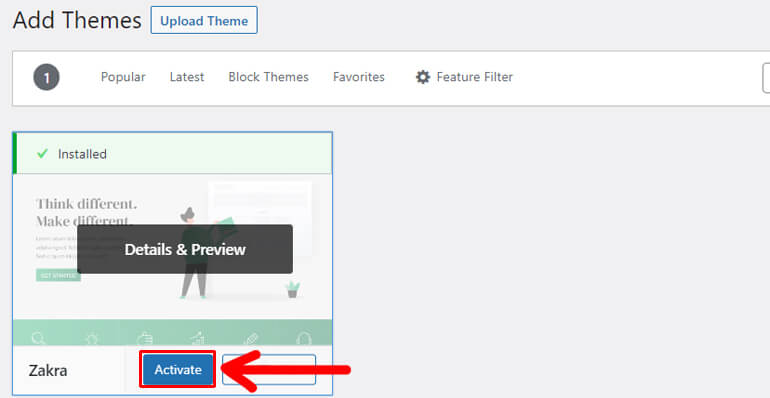
Then, you can hit the Install button. This step will lead you to the option to activate your theme.
In this step, you must click the Activate button. And you are ready to import the perfect template for your travel booking website.
Import Zakra’s Travel Demo
The welcome message at the top of the page will appear as soon as you finish the activation process. In addition to the message, the Get Started with Zakra will appear.

After you click this button, the ThemeGrill Demo Importer plugin will be installed and activated. This will lead you to the Demo Importer page, which contains various free and premium demos for different websites.
You can filter your search and find the perfect demo for your travel website. However, you must opt-in to the Pro version for accessing the premium template.
But, if you are looking for a free theme to start your travel booking website, Zakra theme presents the Travel demo at absolutely no cost.
Moving on, after you decide on the template perfect for your travel booking website, click on the Import button to import the template easily.

Finally, you only need to hit the Confirm button on the dialogue box.
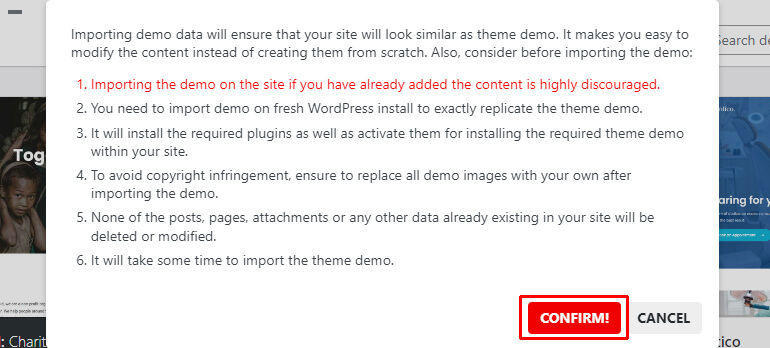
This confirmation will successfully let you import the demo.
By now, you must know that the Zakra theme is a great choice for all travel websites. Alternatively, you’ll also find many free and paid travel WordPress themes for your site.
Customize Your Theme
One of the most incredible things about the Zakra theme is you can customize the theme as you desire.
For customization, you must click on Appearance and then choose Customize.
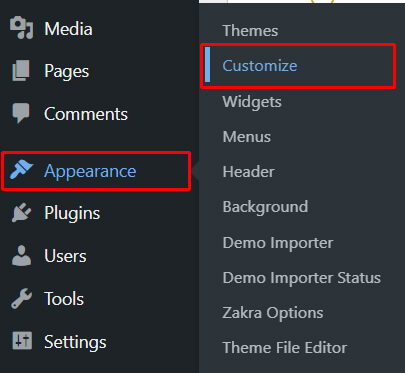
Moving on, let us take you through some customization options Zakra theme facilitates you with:
- Header: This allows you to personalize the header of your website. You can configure different header options like the top bar, menu, search bar, etc.
- Global: You can edit the backgrounds, colors, layouts, typography, etc., on your website.
- Content: You can easily decide on the appearance of your website content like page header, blog/archive, single post, etc.
- Menus: This theme allows you to create, edit, and remove menus on your site.
- Widgets: This customization option allows you to add and modify widgets to your website per your need.
- Footer: You can easily include the footer section, and style and customize it as per your need.
- Homepage Settings: You can easily select the display of your homepage

Step 5: Add Content to Your Travel Website
After setting up your website, choosing the right theme, and customizing it, you’re now ready to add the necessary content to your website.
With the help of Pages and Posts, adding content to your website is as easy as a finger’s click.
The following are some of the necessary pages for your travel booking website:
- Homepage: On this page, you can mostly write about the tagline of your travel business. Here you can include an overview of what your company stands for. You can also include CTA (Call-to-Action) on this page.
- Destinations Page: As a travel website, you must let your visitors know what they can expect from your company. Here, you can write about the destinations and packages you offer.
- Trip Page: On this page, you can include new trips, destinations, trip types, and prices of the trip. This page will be one of the most important sections of your travel booking website.
- About Us Page: This is where you write about who you are as a travel company. You can take this page as a section for introducing your company. The content in this section should be clear and concise, and relatable for your visitors.
- Contact Page: Here, you can include your company’s contact information and the section where visitors can leave their contact information.
Moving on, since you are looking for a fully-functional travel booking website, it’s important to know that, Trip Page is one of the most important pages.
This page allows your users to find out about the trips and destinations you offer along with the pricing and other important details of the trip they choose.
As a result, it’s important to wisely construct these pages on your travel booking website.
While WordPress lets you add most of the pages for your website, it’s better to choose a fully-functional travel plugin for adding Trips to your travel booking website.
And, for this, we have WP Travel Engine, one of the best travel booking plugins.
Following are the steps for adding trips to your travel booking website:
Step 1: Go to the Trips menu in your WordPress dashboard. This section on the menu will appear after you successfully install the WP Travel Engine plugin on your website.
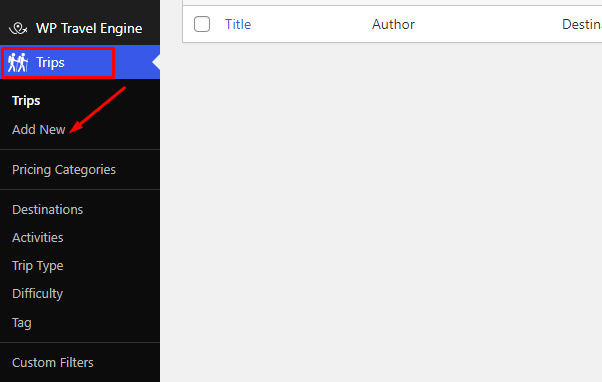
Step 2: Select Add New and you’ll get the option to add the title of your trip.
One of the examples of the title can be “Everest Base Camp Trek – 15 Days”
Step 3: After adding the title, at the bottom of the page, find WP Travel Engine – Trip Settings >>Overview. In this section, you can add trip descriptions and trip highlights.
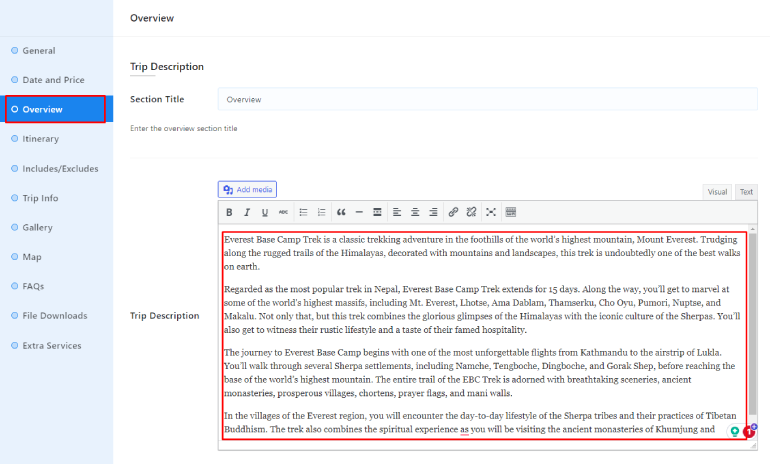
Tips: Writing a trip description involves setting a consistent tone, using descriptive language, and focusing on the unique aspects of the trip.
It’s important to highlight what makes the trip special, include practical details, and use storytelling to engage readers. The goal is to create a vivid, enticing picture of the trip experience.
After writing the description, click on Save & Continue.
Step 4: Now go to WP Travel Engine – Trip Settings>> Itinerary. In this step, you can add an itinerary for each day.

Start by adding the itinerary title on Day 1 followed by a brief content.
Then, if you want to add more itineraries, you can simply click on Add Itinerary, and repeat the above process.
After you are done adding itineraries, click Save & Continue.
Tips: Writing a travel itinerary involves a structured approach. Include detailed information for each day, such as activities, places to visit, transport options, accommodation suggestions, and insider tips.
Step 5: Add Images and videos.
First, go to WP Travel Engine – Trip Settings>> Gallery.
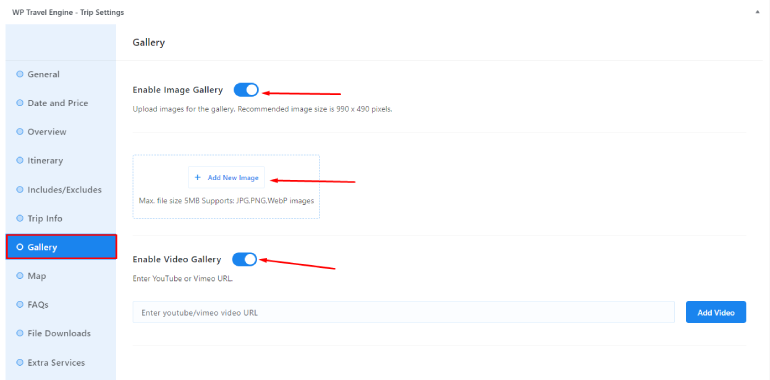
Now, click on Enable Image Gallery and you’ll get an option to Add New Image.
You can repeat the process to add more images.
Furthermore, if you want to add videos, you can click on Enable Video Gallery. Then, you’ll have to add the video URL and click on Add Video.
After this, you can click on Save & Continue to move forward.
Tips: Higher resolution and larger-sized images will significantly slow down the loading of your page. They should be shrunk down and resized for the web.
Similarly, you should add alt text for SEO purposes. If the visitor can’t view the image for any reason, this alt text will be displayed.
Also, you should not upload your video directly on your website. First, you should upload it on YouTube and upload the link.
Step 6: Go to WP Travel Engine – Trip Settings>>Date and Prices.
In this section, you can include the pricing and schedules of the trip.
Tips: You’ll get the option to customize your pricing details. You can clearly mention different pricing for customers of different age ranges. For example, you can include different prices for adults and children.
Also, you can add group discounts so that your customers can choose from different price ranges.
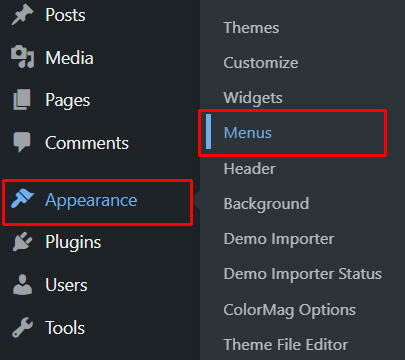
Step 6: Display Pages on Your Website’s Menu
Now that you know how to add pages, more than this will be needed to have your travel website up and running.
You need to display the pages on your website’s menu so that your visitors can find the information they are looking for. For that, you can follow the following steps:
- Go to Appearance>>Menus in your admin dashboard.
- Give it a name (for example, Navigation Menu), and click Create Menu.
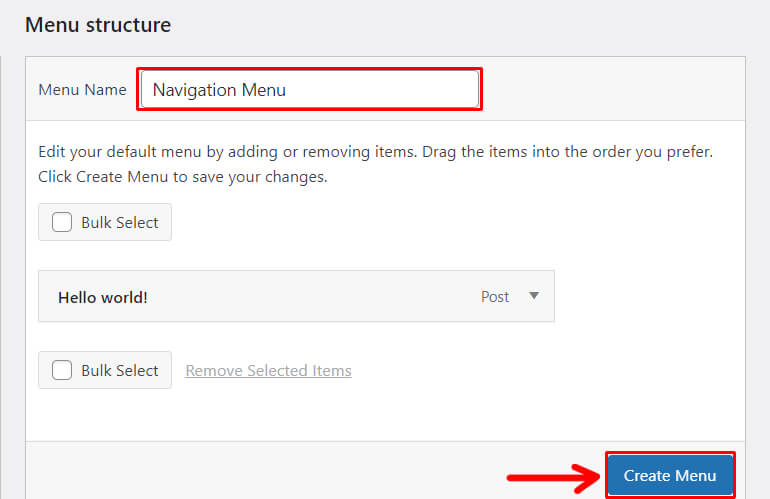
- On the left side of the Menus screen, you’ll see a box labeled Pages. You can see a list of all the pages you’ve created here. Check the box next to the pages you want to add to your menu, then click Add to Menu.
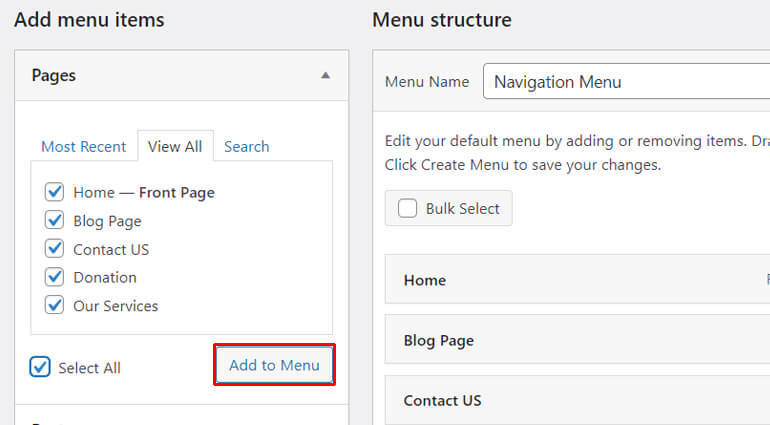
- You can arrange the order of the menu items by dragging and dropping them into place. You can also create sub-items by dragging a menu item slightly to the right of another item.
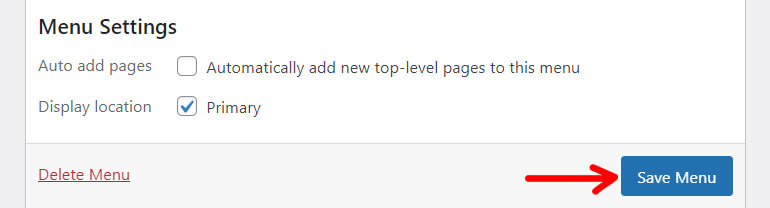
- Once you’ve added all your pages and arranged them in the order you want, you need to set the location for your menu. Under Menu Settings, check the box for the location where you want your menu to appear. It’ll typically be the Primary Menu or Top Menu, depending on your theme.
- Don’t forget to click Save Menu when you’re done!
Now, when you visit your website, you should see your menu at the top, with all your pages displayed in the order you set.
Step 7: Make Your Website Ready With WordPress Plugins
WordPress plugins are tools that add new features and functionalities to your website. You’ll need plugins for booking functionality, SEO, security, and more for a travel booking website.
Here’s how to install a WordPress plugin:
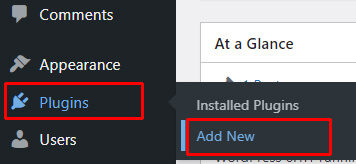
- Go to the Plugins Section: On the left-hand side of your dashboard, you’ll see a menu. Click on Plugins>> Add New.
- Search for a Plugin: In the Add Plugins screen, you can search for plugins by typing in the search box. For example, if you want to add a booking system to your website, you might search for WP Travel Engine.
- Install the Plugin: Once you’ve found a plugin you like, click on the Install Now button next to the plugin.

- Activate the Plugin: After the plugin is installed, the Install Now button will change to Activate. Click on this button to start using the plugin.

- Configure the Plugin: Most plugins will have settings you can configure to suit your needs. After activating the plugin, look for its settings in the WordPress menu.
Some Handy Plugins for Your Travel Booking Website
Not to mention, there are many plugins committed to assisting website builders in the process. However, the key is to find the right fit for your travel booking website.
So, the following are some useful WordPress plugins for your travel booking website:
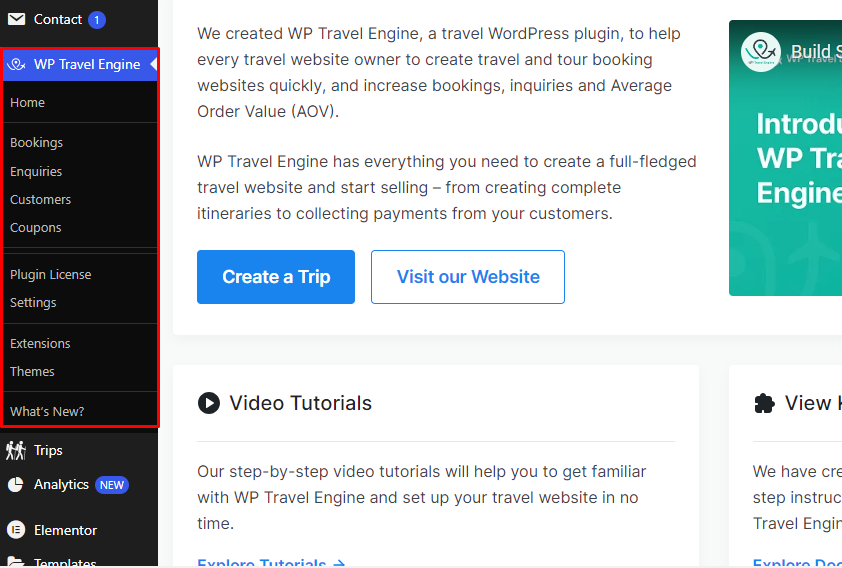
1. WP Travel Engine
WP Travel Engine is a powerful WordPress travel and tour booking plugin.

It allows for the creation of unlimited itineraries, the addition of destinations and prices to trips, and the management of payments directly through your website.
It powers over 10,000 travel agencies, making it a reliable choice for travel businesses.
With the WP Travel engine, booking packages is easier. The extensions on this plugin make the websites fully packed with great features. Some of the excellent add-ons on this plugin are:
- Trip Fixed Starting Dates (shows available dates and seats)
- Group Discount (allows travel companies to provide various discounts to their customers)
- Extra Services (allows travel companies to add extra services like airport pickups, vehicle rental, and many more)
- Advanced Itinerary Builder (allows the addition of informative and descriptive details per day)
- Stripe Payment Gateway (allows you to accept credit cards directly on your website through a Stripe.com account)
Besides the above-mentioned extensions, the WP Travel Engine offers other important add-ons as well. You can have a look at them here.
One of its unique features is a progress bar that visually represents a guest’s booking progress. This feature helps in increasing the conversion rates of your website.
It also includes advanced search features, enabling guests to find tours matching their needs quickly.
The plugin is fully translation-ready, making it suitable for businesses operating in different languages.
Furthermore, it also supports various payment gateways through WooCommerce, ensuring a smooth booking experience for your customers.
Key Features
- Ability to create unlimited itineraries, destinations, and prices
- Excellent payment gateway support
- Advanced search options
- Translation-ready
- Elementor and Gutenberg support
- SEO-friendliness and schema friendliness for increased visibility and ranking
- Ease of selling tours and activities
2. Everest Forms
Everest Forms is a powerful, flexible, and user-friendly WordPress plugin designed to create and manage different types of forms for your website.
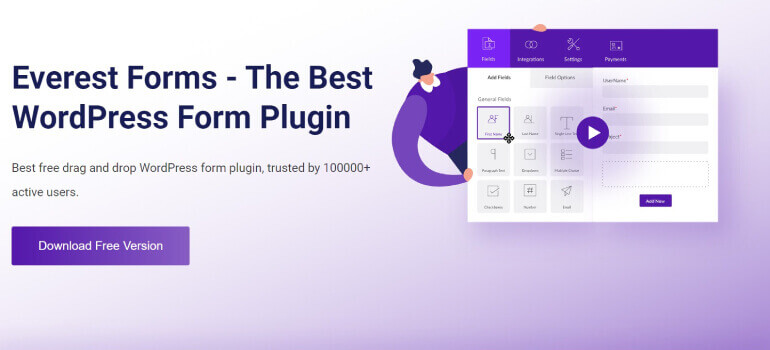
It’s a comprehensive solution for businesses, bloggers, and developers who need a reliable and efficient way to collect information from their site visitors.
Everest Forms also offers seamless integration with popular email marketing services and CRM software.
This means you can automatically add form submissions to your email lists or customer databases, streamlining your marketing and customer management efforts.
In summary, Everest Forms is more than just a form builder.
It’s a comprehensive solution that simplifies data collection, enhances user engagement, and integrates seamlessly with your marketing and customer relationship management systems.
Whether you’re a small business owner, a blogger, or a developer, Everest Forms can make your life easier and your website more effective.
Key Features
- Allows users to create online forms in WordPress using a simple drag-and-drop form builder interface.
- Offers a variety of pre-built form templates, saving time and effort in creating custom forms.
- Allows users to customize the appearance of their forms, including colors, fonts, borders, and backgrounds.
- Stores all submitted form entries in the Entries section, which can be easily accessed from the WordPress dashboard.
- Allows users to create an unlimited number of forms without any restrictions.
- Ensures the success of marketing campaigns with effective email marketing services like Mailchimp, ConvertKit, MailerLite, ActiveCampaign, and Campaign Monitor.
- Comes with an inbuilt Elementor widget that can be easily dragged and dropped in the Elementor builder.
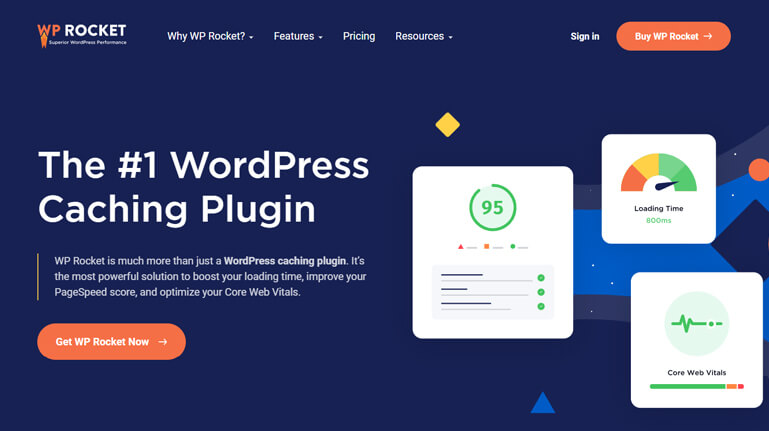
3. WP Rocket
WP Rocket is a leading WordPress caching plugin designed to optimize web performance and improve site speed.
WordPress experts recommend it for its ability to deliver incredible speed results and optimize websites for the Core Web Vitals.
Upon activation, WP Rocket applies 80% of web performance best practices, saving users from the hassle of manual configuration.
It offers advanced features such as delayed JavaScript execution, removal of unused CSS, minification, and LazyLoad, all of which contribute to a faster loading time and improved website performance.
WP Rocket is the heart of any fast WordPress website, from personal blogs to large eCommerce stores.
Top WordPress professionals trust it, and it’s compatible with the most popular themes and plugins. With WP Rocket, you can ensure a fast, efficient, and user-friendly website.
Key Features
- Web performance optimization to improve site speed and performance
- Page speed performance improvement to enhance your website’s Google PageSpeed Insight Score
- Advanced features such as delayed Javascript execution, removing unused CSS, minification, and lazy load
- User experience enhancement by making sites load faster
4. Wordfence Security
Wordfence is a comprehensive security solution for WordPress, offering robust protection for over 4 million websites worldwide.

As the most popular WordPress firewall and security scanner, Wordfence provides an endpoint firewall and malware scanner specifically designed to safeguard WordPress sites.
The security solution identifies and blocks malicious attackers targeting WordPress, offering robust security tools such as malware scanning, two-factor authentication, rate limiting, brute force protection, and vulnerability alerts.
Wordfence receives firewall rules and malware signatures from the industry-leading Wordfence Threat Intelligence team, albeit with a 30-day delay.
Wordfence also includes centralized management through Wordfence Central, allowing users to manage the security of multiple WordPress sites from a single console.
This feature enables rapid assessment of the security status of all your websites on a single page, detailed security findings view, and notifications when one of your sites experiences a security event.
Key Features
- Robust security tools, including malware scanning, two-factor authentication, rate limiting, brute force protection, and vulnerability alerts
- Identifies and blocks malicious attackers targeting WordPress
- Enables rapid assessment of the security status of all websites on a single page, detailed security findings view, and notifications when one of your sites experiences a security event
- Provides free WordPress.org forum support.
5. Everest Backup
Everest Backup is a modern, user-friendly WordPress plugin designed to handle your website’s backups, restoration, migration, and cloning.

It seamlessly integrates with your cloud storage with just a single click, ready to store your backup files on your remote cloud storage.
Everest Backup is not only limited to backup and restoration. It’s also one of the best WordPress website migration plugins. Website migration is as simple as copy and paste.
You can generate and copy your migration key from the source website and paste this migration key onto your destination website. In a single click, your migration of the site happens.
Key Features
- Allows for both manual generation of backups and setting up automated backups.
- Facilitates website migration and cloning by creating and transferring a backup file from one website to another.
- Provides notifications when a backup completes or requires attention.
- Connects with Google Drive to automatically upload all backup files.
Step 8: Integrate Online Booking and Payments
Integration of online booking and payments is one important way to establish credibility. Also, this maintains trustworthiness among customers and business owners.
Using plugins like WP Travel Engine makes it quick and easy to set up a reliable and user-friendly online system for bookings, reservations, and payments, which is further improved by the plugin’s payment add-ons.
Here are some of the reasons why integrating online booking and payments is fruitful for your travel booking websites:
- It allows your customers to complete both booking and payment at the same time. This ensures better cash flow.
- It enables instant payment without having to wait for days to receive payments.
- Instant payments through secured means of payment like PayPal ensures a secure way to conduct business.
Here’s a simple step-by-step guide on how to integrate online bookings and payments using the WP Travel Engine plugin:
- Navigate to WP Travel Engine>>Settings>>Payment.
WP Travel Engine supports payment gateways like PayPal, Stripe, and more. Enable the ones you want to use and enter the necessary details.

- Finally, test your booking and payment system to ensure everything works correctly. Try booking a trip and making a payment to see if you encounter any issues.
After successfully completing all the above steps, you’ll finally get a travel booking website that’s on your mind.
Conclusion
So, you’ve made it to the end of our guide on creating a travel booking website with WordPress. Let’s recap.
First, we started securing a domain name and a reliable web hosting service. Remember, these are the building blocks of your website.
Next, we installed WordPress and chose a WordPress theme, Zakra.
We also added a Trip Page to your site’s menu. This simple step makes it easy for visitors to navigate your website. Also, this allows your visitors to easily book and pay for the trips they choose.
And here’s the kicker: we enhanced the site’s functionality with WordPress plugins.
WP Travel Engine is an essential plugin for a travel booking website. It allows you to create custom trips with detailed itineraries and other important extensions.
Now, here comes the crucial part. We integrated online bookings and payments. This feature allows customers to book trips and make payments directly on your site.
But wait, there’s more. Creating the website is just the beginning. You need to regularly update your site with new trips, engaging content, and customer reviews. It keeps your site fresh and helps attract more visitors.
Lastly, themes like Zakra and plugins like WP Travel Engine come packed with SEO friendliness and schema friendliness ensuring better ranking of your website on search engines.
So there you have it.
With dedication and regular maintenance, your travel booking website can become a go-to resource for individuals planning their next adventure. And that’s a big win for your business.
Disclaimer: Some of the links in the post may be affiliate links. So if you purchase anything using the link, we will earn affiliate commission.