A key component of good web design is accessibility. Your site needs to be accessible to users with diverse needs and physical abilities; otherwise, you might alienate a sizeable portion of your audience (and find yourself in legal hot water). Therefore, it’s essential to conduct a web accessibility audit at least once a year.
Luckily, the process is not as complicated as you might think. 💡 We’ve put together a list of steps you can take to ensure that your site complies with accessibility standards like WCAG and that it offers a smooth user experience, regardless of the visitor’s abilities.
An overview of web accessibility
Web accessibility is the practice of ensuring that anyone can use a website, including people with disabilities. For example, a person with a neuromuscular disorder may be unable to use a mouse. However, if a website supports keyboard navigation, they should still be able to interact with it.
Typically, professional web developers and designers follow the Web Content Accessibility Guidelines (WCAG) when creating websites. These guidelines include suggestions on how to cater to users with physical disabilities, including visual impairments.
However, if you’ve built your website yourself, using a Content Management System (CMS) like WordPress or an all-in-one solution like Wix, your content might not be fully accessible. For example, you might be using colors with insufficient contrast or uploading images without alt text.
Therefore, you’ll need to perform a web accessibility audit to make sure that your site accommodates users with diverse needs. In some countries, this is actually a legal requirement. For example, the Americans with Disabilities Act (ADA) requires all websites to be accessible to users with disabilities.
How to perform a web accessibility audit (in 6 steps)
Now, let’s look at 🔎 how to conduct a web accessibility audit. The following steps are based on the recommendations outlined in the WCAG.
Step 1: Try navigating your site with only a keyboard 🧭
As mentioned above, users with neurological conditions might be unable to navigate the web with a mouse. If your site supports keyboard navigation, it enables them to browse your site and select items on the page using the tab, arrow, enter, and spacebar keys.
To check if your site offers this functionality, visit one of your pages on the front end and press the tab key. The first interactive element on your page (typically a menu item) will be selected.
You can keep pressing the tab key to jump from one element to another, and hit the Enter key to visit the linked page or perform an action (like submitting a form):
If you’re unable to navigate your site with the keyboard, you’ll need to add this feature with a dedicated tool. For example, WP Accessibility Helper offers keyboard navigation and several other features to make your site align with WCAG.
Step 2: Make sure your site has sufficient color contrast 🔆
Ideally, every piece of text on your site should be legible. You might already be using clear fonts and a large font size, but you’ll also need to consider the colors of the text and the background on which it is displayed.
Users with visual impairments like color blindness will likely be unable to read your content if there isn’t sufficient contrast between elements. For example, you might be using a similar shade of blue for both the text and background or using a bold color like red over a strong shade of green.
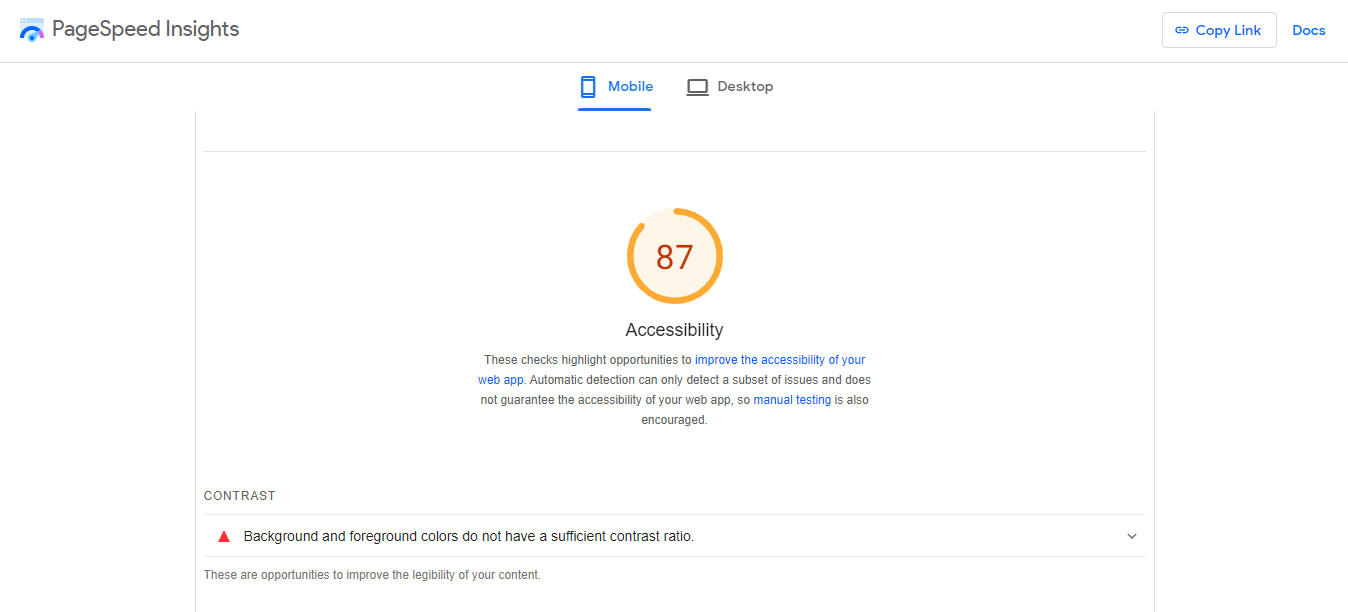
To check if you have sufficient color contrast on your site, you can perform a test with PageSpeed Insights. Simply enter your URL, then wait for the results to appear and navigate to the Accessibility Section.
Here, you might see a message that says Background and foreground colors do not have a sufficient contrast ratio:
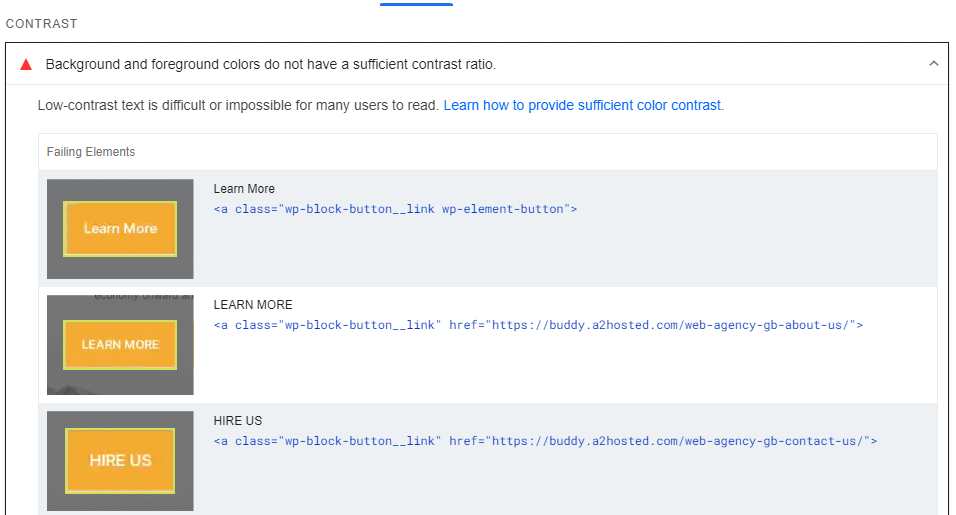
If you click on it, it will show you which elements need to be corrected:
Then, you can use a tool like the WebAIM Contrast Checker to pick the right colors. This will show you the contrast ratio between your selected colors:
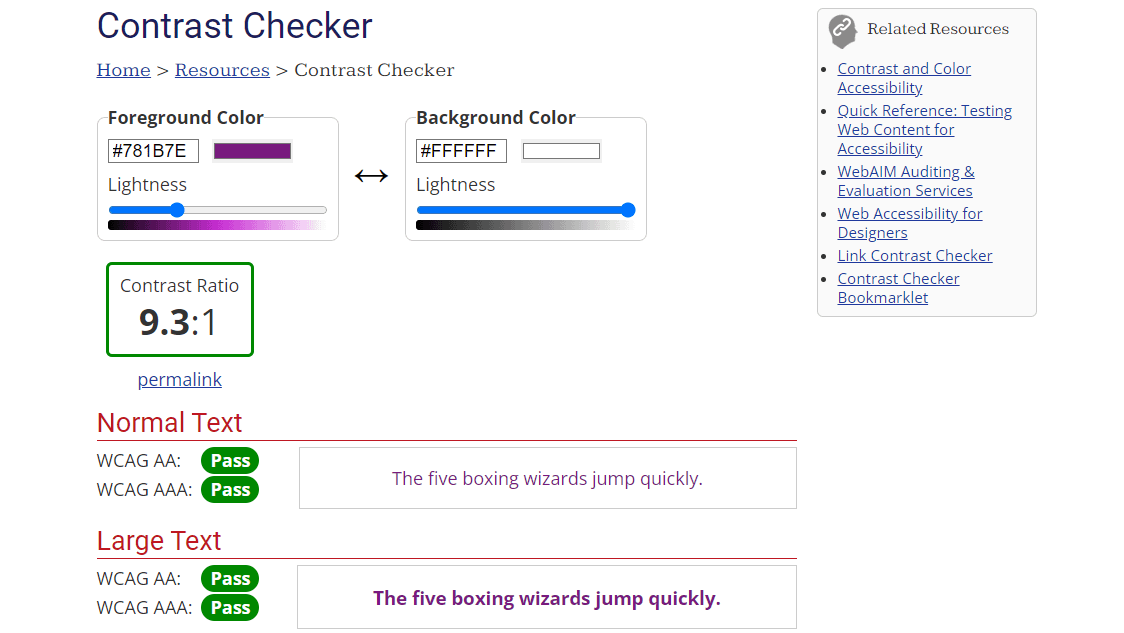
It will also tell you if they meet the WCAG accessibility guidelines. You’ll want to aim for a pass in all components.
Step 3: Disable any animated content that plays automatically 🎞️
Animated content like videos and image carousels can make your website more interesting. The problem is that if this content is set to autoplay, users with cognitive issues may find it distracting or overwhelming.
Therefore, you’ll want to go through your pages and identify any such elements on your site. Then, you’ll need to disable autoplay and make sure that the user has control over the animation. For example, they should be able to play it and stop it as they please, and control the volume.
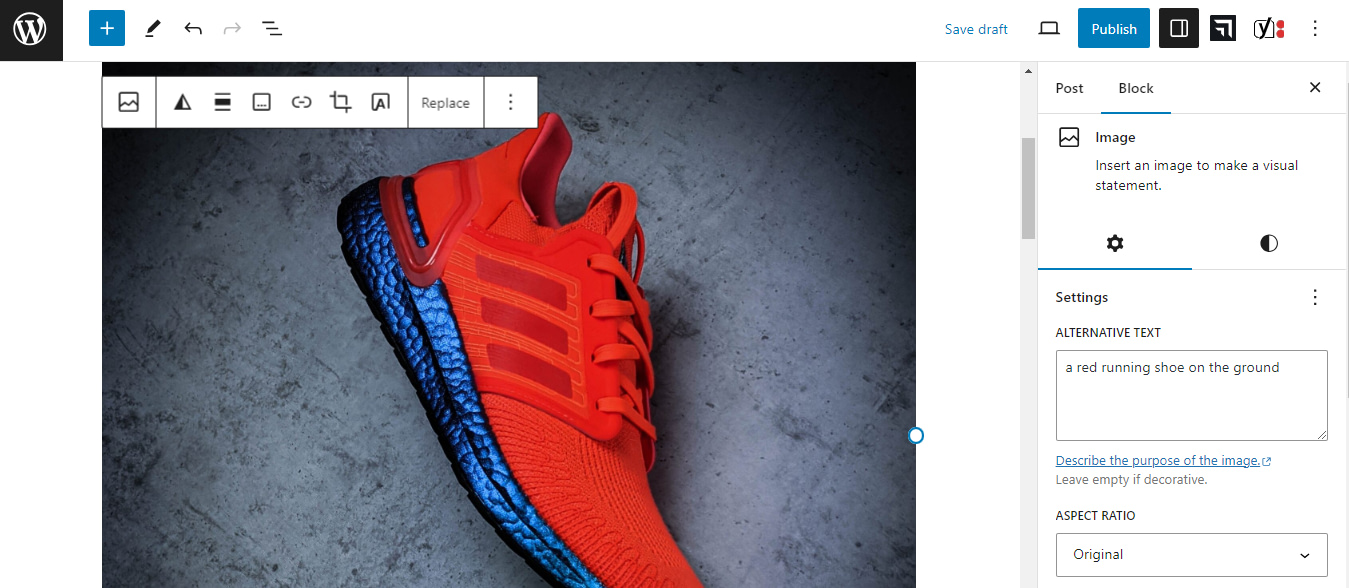
Step 4: Look for images without alt text 📷
Another important step in your web accessibility audit is to make sure that every image on your site has alt text. This is a description of the image and its contents, which is read out by screen readers to users with visual disabilities.
Of course, if you have a large website or a blog, checking every image will likely feel like a never-ending task. Once again, you can run a test through PageSpeed Insights and look at the Accessibility section to see if it has flagged up any images without alt text.
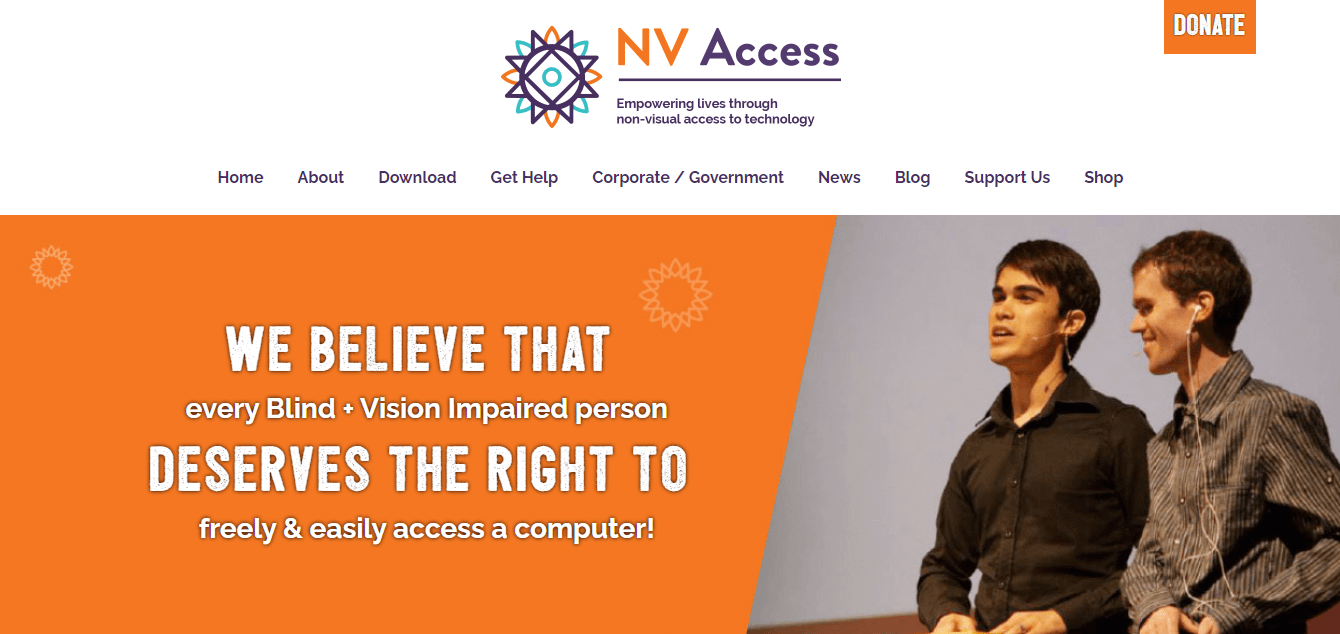
Alternatively, you could use web accessibility tools like NV Access to check your site with a screen reader:
If you have a WordPress site, adding alt text is fairly easy. All you need to do is select the image in the Block Editor and look for the Alternative Text field in the settings panel:
You can even add the alt text by editing your photos in the Media Library.
Step 5: Ensure that elements like tables, headings, and bullet lists are marked properly ⚡
As you may already know, individuals with visual impairments use screen readers to navigate the web. This software reads out the content to them, but if elements like tables or lists are not marked properly on the page, the screen reader will not be able to recognize them. As a result, the output may be a little confusing.
Tables should be wrapped in the <td>, <th>, and <tr> tags, while bullet lists should be placed within the <ul> and <li> tags.
To check this in Google Chrome, select the page element you want to inspect. Then, right-click on it and select Inspect. This will show you the HTML code of that element:
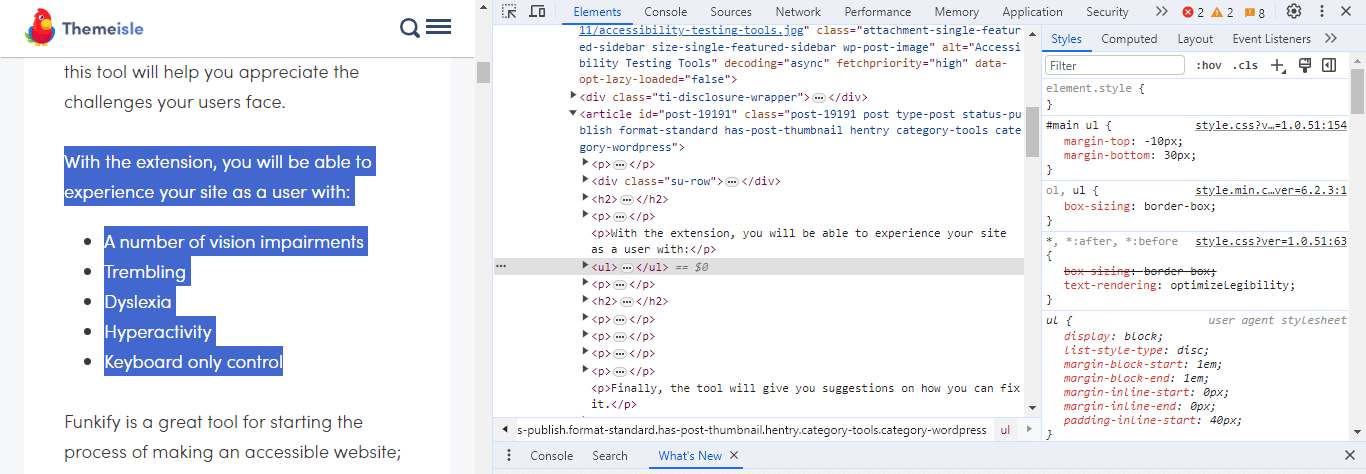
Likewise, you’ll want to make sure that your headings are wrapped in tags like <H2> or <H3>.
Step 6: Test interactive tools like forms 🛠️
Finally, you’ll want to check all interactive tools on your site, mainly forms and buttons. Form fields should be marked up properly, with labels that clearly indicate what information users need to provide.
Additionally, there should be an error message when a user enters the incorrect details. Otherwise, they might struggle to understand why they’re unable to submit the form, or what they’ve done wrong.
For example, an individual with dyslexia might mistype an email address. In this case, they might see a message that informs them that the email address is invalid.
This will make it easier for them to identify the mistake in the form. You might even provide additional details about the error, rather than a simple “invalid number” or “invalid date.” For example, you might add something like “You cannot choose a date in the future” or “No special characters are allowed.”
You’ll also want to check any other elements within the form to make sure they work properly and are easy to use and understand. These include dropdown menus, radio buttons, and call-to-action buttons.
Conclusion on performing a web accessibility audit 🧐
By performing a web accessibility audit, you can ensure your website meets the needs of all users, regardless of their abilities. Plus, it will help you conform to important accessibility regulations and the WCAG.
To start, you’ll want to make sure that your site supports keyword navigation and uses sufficient color contrast. Then, you’ll need to disable autoplay on animated content, look for images without alt text, and ensure that elements like tables and lists are marked up properly. It’s also essential to test interactive tools like forms and buttons. 🕹️🕹️🕹️
Do you have any questions about performing a web accessibility audit? Let us know in the comments section below!