Looking at scroll depth in Google Analytics can help you understand how visitors are interacting with your website’s content. For example, you can see whether they are reading a post in its entirety or leaving mid-way through it. As such, it can give you a lot of information about how engaged people are with your site. This, in turn, can influence what adjustments you might make to improve that engagement rate. In short, scroll depth data is something valuable that most website owners would benefit from if they had access to it.
The only question is, how do you set it up? 🤔
In this article, we will address that very question. More specifically, we’ll discuss two popular methods for setting up scroll depth tracking. The first is via Google Analytics, and the second is by using a WordPress plugin.
We’ll also cover why it’s essential to set 🔧 everything up correctly.
Without further ado, let’s get started.
What is tracking scroll depth through Google Analytics and why does it matter?
If you own a website, you know that one of the most important things to make sure it grows is to understand the impact of your work. This is not just in terms of numbers (e.g., the total traffic you’re getting), but also in terms of understanding visitor behavior.
There are many ways to analyze this type of data. For example, bounce rate, average visit duration, and most visited pages. Another popular metric that is often overlooked is scroll depth in Google Analytics. Rather than focusing on how long a person looks at your content, scroll depth tracks how much of the page they actually see. The way Google Analytics does this is by measuring various scrolling behaviors, such as scroll direction, length of the vertical scroll and horizontal scroll, and different scroll depth events (like scroll trigger) or scroll depth units.
What’s average scroll depth, and how much should you aim for?
The most popular metric when it comes to measuring scrolling behavior is the average scroll depth. This is how far down the average visitor scrolls when on your website. If you have a scroll depth of 75%, it means people read, on average, three-quarters of your pages or posts.
The number you should aim for will depend on your industry and the length of your content, but a typical minimum benchmark is 54% [1]. If your content is shorter, you should try to achieve a higher number. If it’s longer, you can often get away with it being lower.
We’ll now go through the two best methods for analyzing the results of your scroll depth tracking. These are using Google Analytics itself and then using a plugin.
Method 1: How to track scroll depth in Google Analytics directly
Setting up scroll depth in Google Analytics is not hard, but you will first need to set up Google Tag Manager, which is the tool through which Google Analytics gets the data it needs.
To set up depth tracking, simply go to the Google Tag Manager (GTM) workspace and follow these steps:
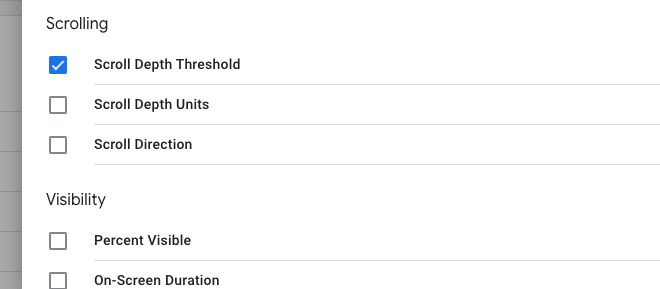
Step one: if using Universal Analytics, enable a scroll depth variable
Go to your Google Tag Manager, locate the left-hand menu on your home screen, and select Variables. Click on the Configure button. Then click the three boxes titled Scroll Depth Threshold, Scroll Depth Units, and Scroll Direction.
Step two: if using GA4, create a tag
Tags are an event that gets recorded when a particular tag is triggered. To add one, select Tags from the left-hand menu and click on New. You can choose any category you’d like.

Then, select the tag type called “Google Analytics: GA4 Event“. Don’t forget to also give your event a name so you can easily find it in the future.

In the Configuration Tag, select “None“. Then, in Measurement ID, paste your GMT Measurement ID. For Google Analytics, your Measurement ID is the same as your destination ID (you can learn how to find it here).

Step three: create a trigger
You will want to create scroll events for when the user reaches a specific point on the page. To do this, click on the block that says Triggering and then on the “+” sign to add a new one.
Scroll down until you see the section called User Engagement, and select Scroll Depth.

Here, you will be able to select the type of scroll depth you need (vertical scroll depth or horizontal scroll depth), and what depth will cause the event to be triggered. You will also be given the option to use percentages of pixels to determine the depth.

Lastly, click Save and submit. Once you’ve completed the steps above, make sure you test the configuration to see if it all works as expected. You can do this by using Google Tag Manager’s preview feature. Then, you will need to wait a few days to see the results roll in.
If all goes well with your tests, you should be able to move forward with tracking the scroll depth data from your visitors. You can do this by using the Analytics’ Pages report, which you can find in the Events section of your main menu).
Method 2: How to track scroll depth via a WordPress plugin
One of the most popular plugins for tracking Google Analytics metrics in WordPress (and our recommendation) is Google Tag Manager (GTM4WP). This plugin natively supports scroll depth tracking based on pixels or percentages, which makes it an obvious choice for our purposes here. The advantage of using a plugin instead of setting up things manually on GTM is that the tool will simplify everything for you. You’ll be shown the scroll depth data via handy, user-friendly reports.
You can see Google Tag Manager’s scrolling setting by going to Settings > Google Tag Manager and then clicking on the Scroll tracking tab. Make sure you check the box that reads “Enable scroll tracker script on your website“. You’ll then be able to set up time delays, minimum distances, and a scroller time. Remember to save your changes after you’re done.
As mentioned, the plugin supports scroll depth tracking calculated by using percentages or pixels, as well as additional scroll events that are designed to capture a user’s engagement or intent.

Final thoughts on tracking scroll depth in WordPress 🏁
Analyzing scroll depth can help you understand how your visitors interact with your content and see which pages are more engaging. Scrolling behaviors include direction, length, and events such as triggers.
In this article, we’ve covered different methods for tracking scroll depth using Universal Analytics, GA4, and a WordPress plugin. Once you’ve chosen your method, just remember that the data is based on tracking real visitors’ behavior on your site. In practice, this means you will have to wait a few days for your initial results to come in.
Hopefully, you now have a good grasp of scroll depth in Google Analytics and how to set up scroll depth tracking in WordPress. If you still have questions, drop them in the comments below, and we’ll do our best to help you.