JetEngine’s Query Builder is, without exaggeration, an incredibly powerful feature unique to Crocoblock. Well, you can build a query manually, writing dozens of lines of code, but even with the help of generators, it will take a lot of time. Plus, you need to be familiar with PHP, not to mention the knowledge for the further process of displaying the data on the front end.
In this article, I will go over the Query Builder’s popular use cases using SQL query type, its Advanced/AI mode, and the basic SQL syntax with examples.
Table of Contents
How to Build SQL Queries with JetEngine
First, go to JetEngine > Query Builder. There, you can choose the query type by the type of data to be queried: posts, terms, users, Woo products, etc. But other than that, you can fetch data directly from the database using the SQL query type.
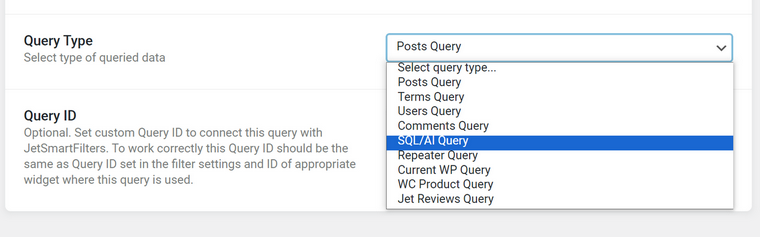
Depending on the query type, you have various options for building it. For example, for the post query type, you can choose a status, keywords, terms, authors, and so on.
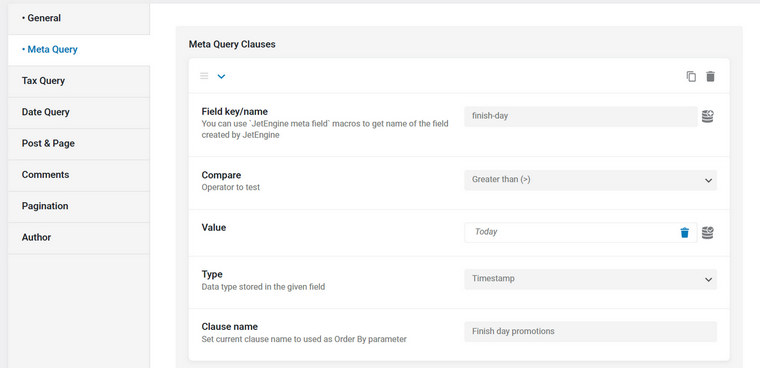
My personal favorite perk here is the ability to filter posts by meta clauses (the combination of meta fields of the post). A great example of its application is how to display future and past events described in this guide.
There are plenty of other neat ways you can use the Query Builder tool, but in this article, let’s dive into the SQL query type and its practical applications, along with leveraging the AI integration.
You can preview the results of the query code right here by switching the “Preview results” toggle.
The algorithm for using Query Builder to display data on the front end is the following:
- Create a custom query in JetEngine > Query Builder, selecting the data you want to display on the front end.
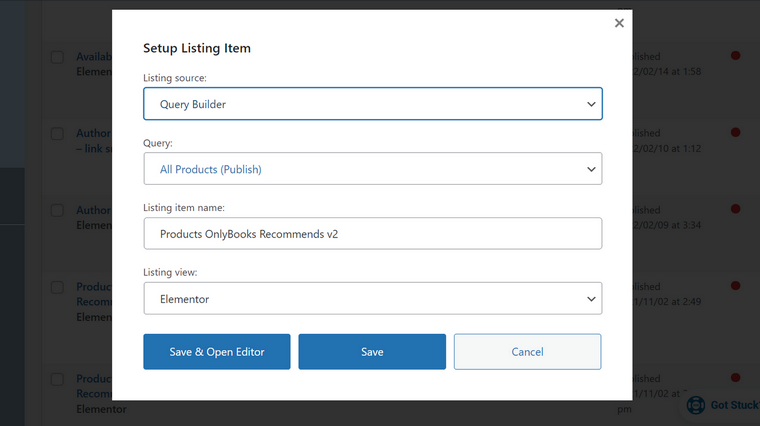
- Build a listing template based on this query. When dealing with posts, you can apply the custom query (created with Query Builder) to an existing listing. But when dealing with SQL queries, you should build a dedicated listing, using the Query Builder as a listing source, and choose the query you want to use:
- Finally, add a Listing Grid widget/block to the front end and choose the listing template you’ve just created.
One of the recent JetEngine updates got a new tool in the SQL query builder – the Advanced/AI query mode. After activating the toggle, you can either write a prompt for the embedded AI wizard to assist you in creating a query (you can also choose from the suggested examples and modify them) or write an SQL query manually. You can insert JetEngine macros into this field as well.
SQL Syntax Basics
First of all, it’s instrumental to understand some SQL syntax basics before using the SQL query builder. It has a visual interface where you can select the values, and the builder will create a query for you, so you don’t have to write anything manually. However, I’m strongly convinced that it’s much easier to use it if you understand what’s going on.
Another thing important for creating efficient SQL queries is understanding the WordPress database structure in general and your website in particular.
For some people, including myself, it’s easier to write most of the queries in the Advanced editor than to create them using the visual UI, and, of course, it gives more freedom.
But first, let’s delve into SQL syntax basics.
Most used SQL statements with examples
SQL stands for “structured query language.” It’s not as complicated as programming languages and deals with database tables, columns, and rows for retrieving and manipulating data from the database.
SQL statements are commands that tell what should be done with the data.
There are a few of the most used statements and clauses when creating SQL queries for fetching and displaying certain data on the front end: SELECT, SELECT DISTINCT, and JOINS.
SELECT statement
SELECT statement selects all the database rows with the given characteristics. It uses clauses and operators, such as WHERE, AND, OR, NOT, IN, etc.
Most of the SQL commands are quite self-explanatory, and you can see how they work using the following examples.
💡 For the full information, check the W3Schools SQL Tutorial.
NOTE
These examples are given as a demonstration using simple queries, which you can create using the “post query,” “term query,” or “user query” types in the Query Builder.
In real life, SQL queries are used for more complex cases when you want to fetch very specific values.
Example 1.
SELECT post_title, post_date
FROM wp_posts
WHERE post_type="product"
AND post_status="publish";
It will return post titles and post dates of all the WooCommerce products from the wp_posts database table (where products are stored).
Example 2.
Now, let’s select all the posts, the title of which has the word “Money” or the word “History”:
SELECT post_title, post_date, post_content
FROM wp_posts
WHERE post_type="post"
AND post_title LIKE '%Money%' OR post_title LIKE '%History%';
Let’s modify this query and select all the reviews from the wp_jet_reviews table that have the word “History”:
SELECT *
FROM wp_jet_reviews
WHERE title LIKE '%History%';
The asterisk means that it will return all the columns (all the data), and I was using “title,” not the “post_title” because this is the column name in the wp_jet_review table.
Example 3.
Select posts from the ‘post’ post type published this week.
SELECT *
FROM wp_posts
WHERE post_type="post"
AND post_status="publish"
AND post_date >= DATE_SUB(CURDATE(), INTERVAL WEEKDAY(CURDATE()) DAY)
AND post_date < DATE_ADD(DATE_SUB(CURDATE(), INTERVAL WEEKDAY(CURDATE()) DAY), INTERVAL 7 DAY);
SELECT DISTINCT statement
SELECT DISTINCT statement selects only distinct (unique) values.
Example 1.
These commands will get the list of all the user roles:
SELECT DISTINCT meta_value AS user_role
FROM wp_usermeta
WHERE meta_key = 'wp_capabilities';
Example 2.
Let’s get all the distinct user emails from the orders:
SELECT DISTINCT meta_value AS customer_email
FROM wp_postmeta
WHERE meta_key = '_billing_email'
AND post_id IN (SELECT DISTINCT post_id FROM wp_postmeta WHERE meta_key = '_order_key');
The last expression (after AND) ensures that the main query only considers rows from wp_postmeta where the associated post is an order (identified by having the ‘_order_key’ meta key).
JOIN clauses
WordPress database stores data in different tables for better integrity.
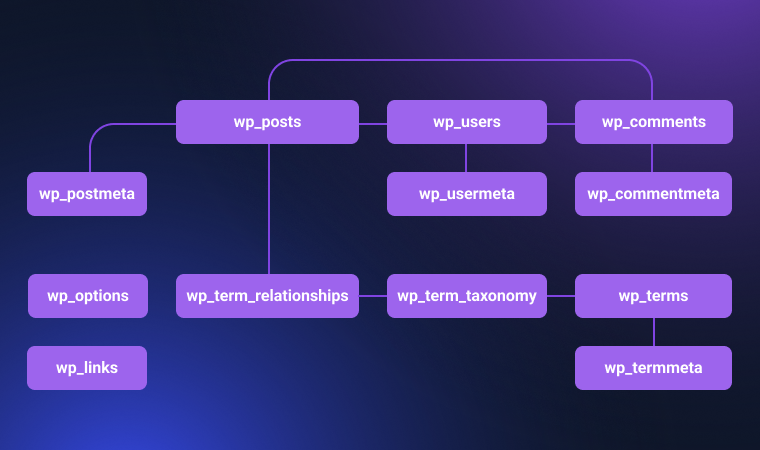
As a rule, the biggest tables are wp_posts and wp_postmeta. The first stores all the posts’ titles, post types, IDs, statuses, and content, while the second is for meta fields, which can vary depending on the post type. For example, attachment URLs or prices for WC products.
Other tables, such as wp_terms, store information about taxonomy terms, etc.
So, when a certain post needs to “find” the row related to it in other tables, the unique post ID is used.
When we need to fetch data from not just one but a few tables, JOIN clauses are used. JOIN combines rows from two or more tables based on the related column that these tables have.
Note that it neither creates an extra database table nor changes the existing ones whatsoever. It just gives a selection as a response to the query.
Types of JOIN clauses:
- INNER JOIN combines rows from two tables based on a matching condition, where the condition must be met in both tables. If you see only JOIN in the code without specifying, it means INNER JOIN.
- LEFT JOIN returns all rows from the left table and matching rows from the right table. If there’s no match, it still returns all rows from the left table with NULL values for the columns from the right table.
- RIGHT JOIN is similar to LEFT JOIN but flips the tables. It returns all rows from the right table and matching rows from the left table, with NULL values for unmatched rows from the left table.
- FULL JOIN returns all rows from both tables and combines them based on a matching condition. If there’s no match, it includes NULL values for columns from the other table.
Check W3Schools for the full info.

Example 1.
Get unique users who published posts in the last two weeks.
SELECT DISTINCT wp_users.ID, wp_users.user_login
FROM wp_users
INNER JOIN wp_posts ON wp_users.ID = wp_posts.post_author
WHERE wp_posts.post_status="publish"
AND wp_posts.post_type="post"
AND wp_posts.post_date >= DATE_SUB(NOW(), INTERVAL 2 WEEK);
Example 2.
Get a list of products with a price greater than 12.
SELECT wp_posts.ID, wp_posts.post_title, wp_postmeta.meta_value AS price
FROM wp_posts
JOIN wp_postmeta ON wp_posts.ID = wp_postmeta.post_id
WHERE wp_posts.post_type="product"
AND wp_postmeta.meta_key = '_price'
AND wp_postmeta.meta_value > 12;
Popular SQL Queries Use Cases for JetEngine and How to Recreate Them
You can find quite many useful cases with Advanced/AI SQL queries and additional code snippets, if they are required, in our Knowledge Base.
Useful Knowledge Base guides
Use a search field in the Knowledge Base for more guides.
List of purchased products by the current user
To create this SQL query, use these settings in the visual SQL query builder:
Then, create a listing with this custom query as a source. Using the Dynamic Field widget/block, add all the fields (Source: Post/Term/User/Object Data and choose the fields from this query from the dropdown list in the Object data field).
The only issue here is that the user will be displayed as an ID. To fix it, use the Filter field output toggle and choose the “Get user data by ID.”
Now, you can add this listing template using the Listing Grid widget/block to various templates where users can see their previous purchases.
Order users by the number of reviews
This case will work with the JetReviews plugin, but you can modify it to deal with other DB tables instead of wp_jet_reviews.
Use the Advanced query field for this command:
SELECT author AS 'author', COUNT(id) AS 'review_count'
FROM wp_jet_reviews AS jet_reviews
GROUP BY author
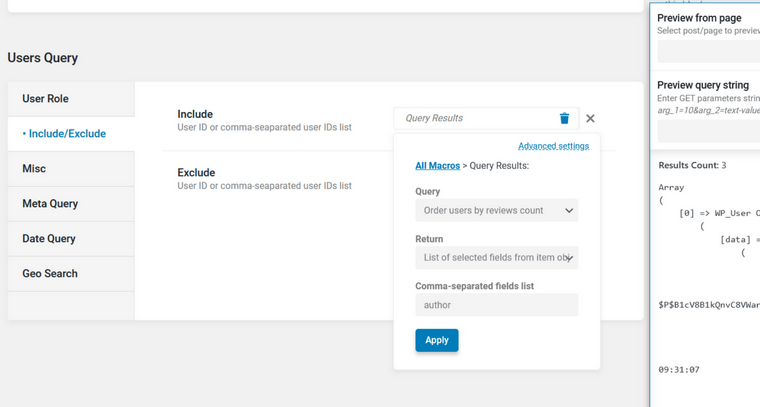
ORDER BY COUNT(id) DESC;Now, create a Users Query and include the results from the previous SQL query into the Users query. In the Include tab, choose Advanced Settings, the query you created earlier. In the Return – “List of selected fields from item object,” and type the fields you want to display. In our case, it’s an “author” field to display the author’s name:
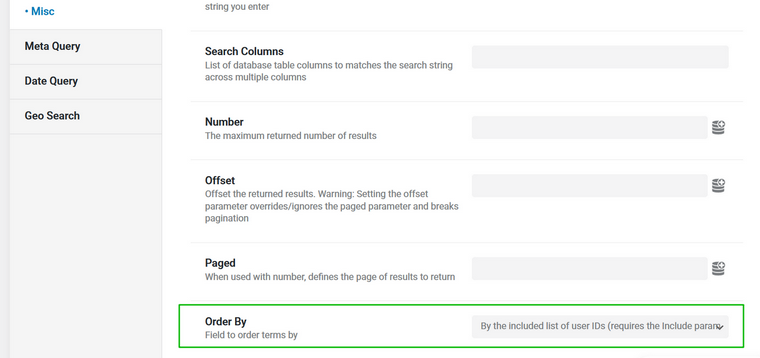
In the Misc tab, order “By the included list of user IDs”:
Then, as usual, create a listing template with this query as a source and display it on the front end with the Listing Grid widget/block.
Break a listing alphabetically with letters
This is a very useful case for directory websites and any type of knowledge base.
You will need two queries and two listings, and we will use a nested structure.
💻 Check the demonstration of this method on the demo page.
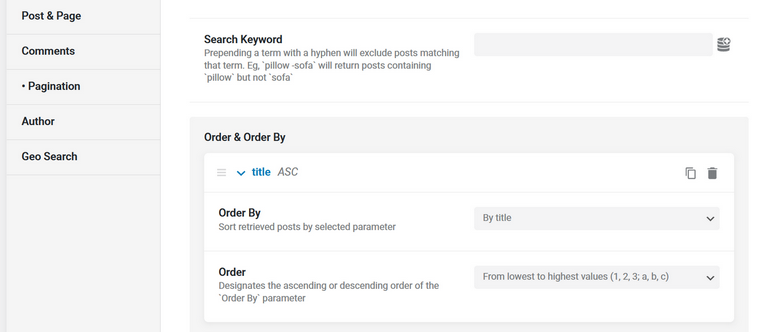
Let’s say we have a post type “Country” and all the countries of the world with their flags, so we want to display them alphabetically. After adding the posts, go to JetEngine > Query Builder, choose “Posts query,” and in the General tab, pick the “Country” post type. In the Order & Order By section, select “By Title” and “From highest to lowest” order. It will sort countries alphabetically without breaking them down by letters.
In the Pagination tab, choose the “-1” value to show all the posts on one page.
After that, in JetEngine > Listings, create a “Countries” listing with a “Query Builder” as a source and the query we’ve just created. Display the country’s name, flag, and whatever else you want to display for each country.
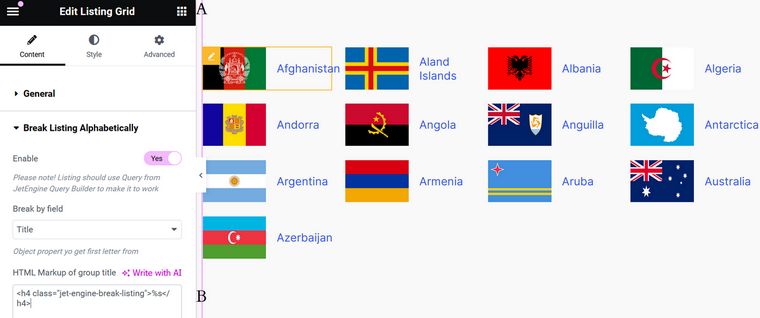
Now, it’s time to use the JetEngine add-on that you can download from GitHub. For now, it’s only for Elementor. After installing and activating it, go to the page where you want to see the alphabetical list of countries, add the Listing Grid widget, and choose the “Countries” listing. Activate the Break Listing alphabetically toggle, and add the CSS class for the letters in the following field (it’s <h4 class=”jet-engine-break-listing”>%s</h4> on the screenshot below) for styling it later using custom CSS.
Enjoy the result:
📚 Read here how to break listing by months.
Nested listings and macros demonstration
Using the same task of displaying items alphabetically, I will show you how to do it using SQL queries and JetEngine macros.
Note that this method doesn’t have good logic, structure, or optimization. It’s given to demonstrate the usage of nested listings and JetEngine macros inside them.
First, let’s display the first letter from your taxonomy. In the Query Builder, create a SQL-type query called “First-letter-element.” Activate the Advanced/AI editor and insert this code:
Important! Replace ‘products_taxonomy’ with your taxonomy slug.
SELECT DISTINCT LEFT(t.name, 1) AS first_letter
FROM wp_terms AS t
INNER JOIN wp_term_taxonomy AS tt ON t.term_id = tt.term_id
WHERE tt.taxonomy = 'products_taxonomy'
ORDER BY first_letter ASC;
Then, create a listing template called “Alphabetic-letter” with this custom query as a source. Using the Dynamic Field widget/block, add the data (Source: Post/Term/User/Object Data and choose the fields from this query from the dropdown list in the Object data field).
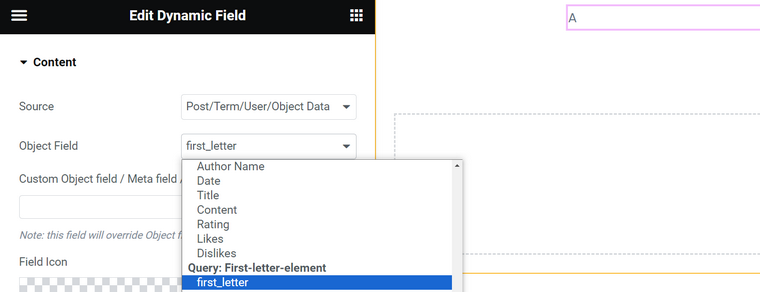
Note that my object field is called “first-letter” (it’s stated in the SQL query). Now, go to JetEngine > Shortcode Generator and insert it into the field. Copy the generated shortcode and switch to the Macros tab. Select “Shortcode result” from the Macros field and insert the copied shortcode in the field that appeared.
In the field below, you will get a macro generated. Copy it.
Now, it’s time to create the second SQL query (JetEngine > Query Builder > SQL query type). Insert this code into the Advanced/AI mode, and replace the ‘product-taxonomy’ with your own taxonomy slug and the shortcode with the shortcode you’ve just created in the generator.
SELECT DISTINCT(t.name) AS name
FROM wp_terms AS t
INNER JOIN wp_term_taxonomy AS tt ON t.term_id = tt.term_id
WHERE tt.taxonomy = 'products-taxonomy'
AND t.name REGEXP '^(%shortcode_result|[jet_engine_data dynamic_field_post_object="first_letter"]%).+'
Save the query, and create one more listing template called “Letter-elements” with the just created query as a source. Do all the styling.
Now, get back to the first “Alphabetic-letter” listing template. Insert the “Letter-elements” listing using the Listing Grid widget/block. Style and save the listing.
Finally, create a page where you want to display your elements in alphabetical order and insert the “Alphabetic-letter” listing template using the Listing Grid widget/block.
NOTE
Please be mindful with nested listings! Remember that too heavy nested listings, as well as having many layers, will affect your page speed negatively, especially if you use Elementor for creating them.
FAQ
No, it doesn’t change a website’s database structure.
If you want to only view your database without editing anything, use the SQL Buddy plugin.
Takeaway
In this article, we explored how to use JetEngine’s Query Builder tool, focusing on the SQL query type. With the JetEngine 3.2 release, the new Advanced/AI SQL editor was introduced to create queries even more efficiently, either manually or with AI assistance.
Additionally, I’ve covered some fundamental SQL syntax and provided usage examples. I hope you found this helpful!