Looking for a no-nonsense, unbiased Uncanny Automator review?
You’re in the right place then.
We know running a website can be both exciting and, a lot of times, dull. Managing a modern one often requires using lots of plugins and third-party tools. Most of the time, these tools don’t connect with each other, which means you need to coordinate between them.
That’s where plugins such as Uncanny Automator come in. With this plugin, you get to automate key tasks in WordPress by connecting plugins with each other and with third-party services. That means less time running between one tool and the next and more spent working on growing your website.
In this Uncanny Automator review, we’ll discuss what features the plugin offers, its price, and go over some automation examples. That way, you’ll know if it’s a good fit for your website or not. Let’s get to it! 🙋♂️
An introduction to Uncanny Automator
Let’s begin our Uncanny Automator review by discussing what it’s all about.
To begin with, the tool uses a trigger/reaction model to enable you to set up automations. It enables you to choose between “triggers” for a lot of plugins and third-party tools and configure reactions to them. This is called a “recipe,” and you can set up as many of them as you need.
The power of this plugin lies in its third-party integrations. Uncanny Automator works with several external platforms and plugins, and it enables you to connect them together. Normally, that wouldn’t be possible outside using yet another third-party platform, such as Zapier.
To give an example, you can have Uncanny Automator publish a social media update when you publish a post. The plugin can also automate complex processes such as registering when a user completes a LearnDash course (that’s one of the integrations it supports) and sending them a corresponding certificate automatically.
Uncanny Automator comes in free and premium versions. The free version of the plugin restricts some integrations, as well as triggers and reactions. That means you’re working with a smaller pool of possible automations if you don’t get a premium license.
⚙️ Key Features:
- Automate processes in and outside of WordPress
- Create automations that involve WordPress events, plugins, and third-party apps
- Set up complex automations that involve multiple triggers and actions in specific orders
- Configure actions that only happen under specific conditions (even if the triggers are met)
- Use “tokens” to pass dynamic data between triggers and reactions in recipes
- Schedule or set delays for automations (only available in the premium version)
- Works with social media platforms
- Monitor automations with activity logs
What can you automate using Uncanny Automator? (2 examples)
In this section of our Uncanny Automator review, we’ll explore some examples of automations you can set up with it. This isn’t meant to be a tutorial, but an overview of what it’s like to use the app and whether it’s worth your time or not.
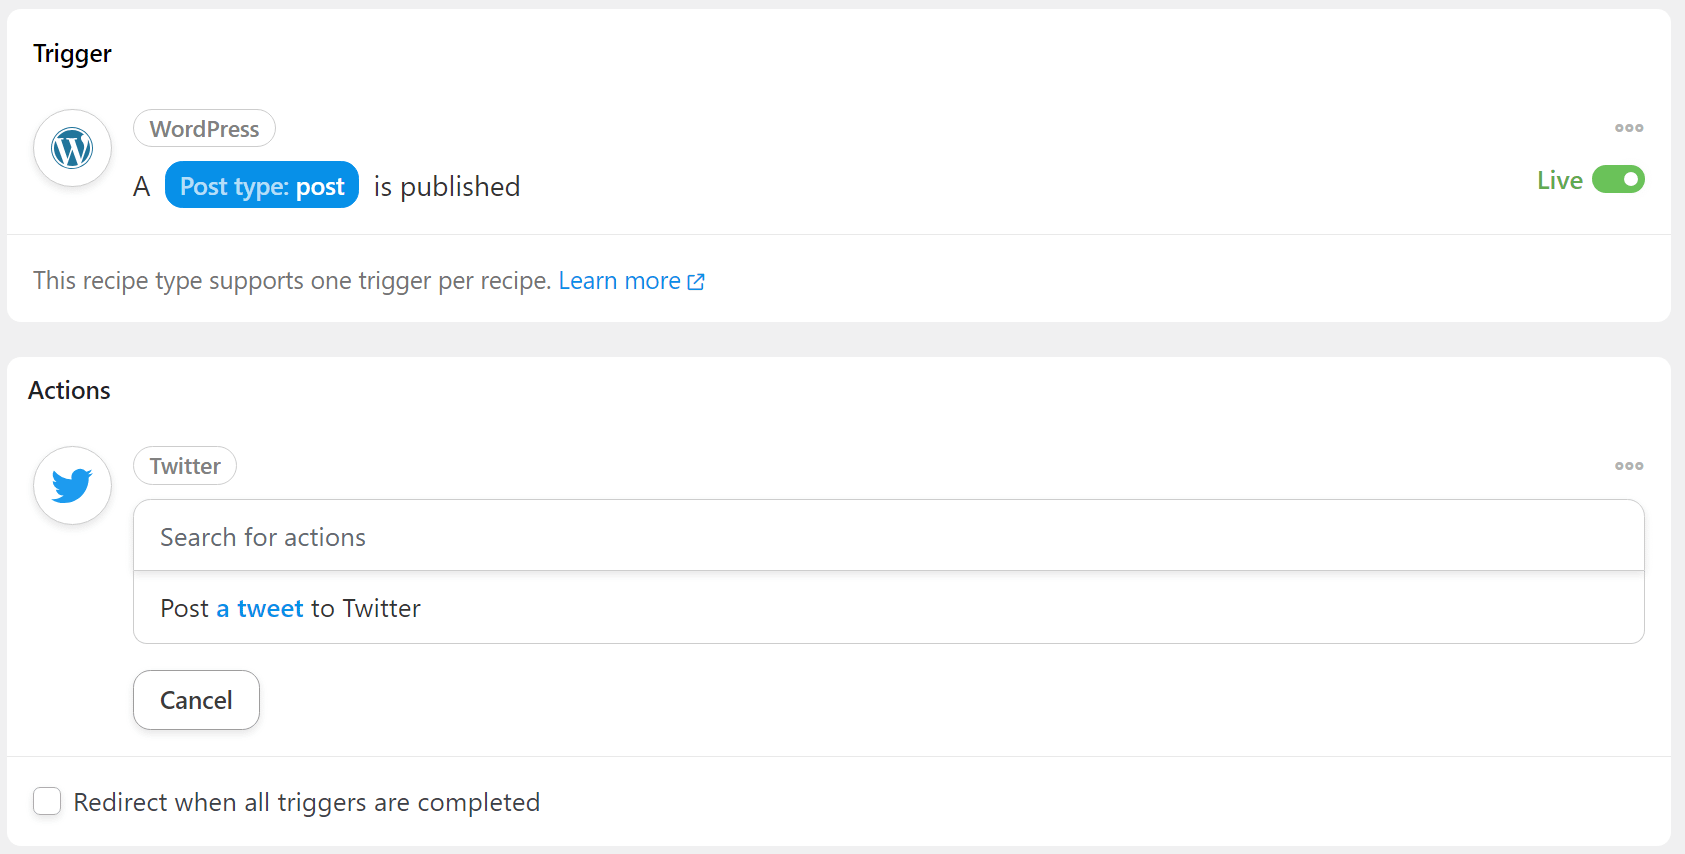
1. Send a tweet when you publish a new post
A lot of websites with a presence on Twitter like to put out new posts when a new article goes live. Usually, you need to do this manually or use a social media management tool. Uncanny Automator enables you to automate the process without leaving WordPress.
To do this, you’ll need to activate the plugin and either sign up for a premium license or use the credits you get with a free account. That is because third-party apps integrations aren’t included with a free license.
If you meet those criteria, you can create a new recipe by going to the Automator > Add new page in the dashboard. Here, you’ll be able to choose a trigger and a corresponding action:
When you configure Uncanny Automator to send an automated message, the recipe enables you to edit its contents. You can use the editor to add presets that pull all kinds of information from WordPress, such as the post and author name:

Uncanny Automator pulls dynamic data from the WordPress database using a token system. Tokens are different types of data, which can include simple elements such as post titles, author names, and more. Tokens enable you to customize actions even further and control what type of information they display:

The editor also offers the option to use what it calls “action” tokens. These are tokens that enable you to chain actions by passing data from one to the next.
Overall, the process is very simple. The only thing that’s lacking is a built-in recipe tester to check if automations work. After setting up an automation, you’ll need to test it manually by replicating the trigger and seeing if the action works.
2. Add a badge when a user completes a course
The coolest aspect of using Uncanny Automator is being able to connect plugins to each other (and third-party tools as well). This makes it possible to set up useful automations such as adding myCred badges to users that finish a LearnPress course.
Those are just two examples of the many plugins that Uncanny Automator supports. If you use them, setting up that automation can be as simple as selecting the right trigger and reaction when creating a new recipe:
The ability to “connect” plugins gives way to a lot of useful recipes that involve tasks you’d need to do by hand otherwise. Adding a badge to a user might only take a minute, but the ability to automate the process is worth using a plugin for.
As we mentioned earlier, Uncanny Automator restricts a lot of integrations, actions, and reactions for its free users. This becomes evident once you start trying to set up plugin automations, as you’ll see a lot of options are unavailable:

This is not necessarily a dealbreaker, but it’s an important factor when deciding whether to use the plugin or not. That brings us to the discussion about price.
Uncanny Automator: Free vs. Premium
Next up in our Uncanny Automator review is a comparison of the free and premium versions of the tool. The free version of Uncanny Automator works a lot of plugins. However, a lot of integrations with plugins are only available for premium users and the same applies to third-party apps. If you’re not willing to pay for a premium license, we recommend double-checking what free integrations the plugin offers:

Uncanny Automator softens the blow a bit by encouraging you to create a free account and connect it with your website. If you do, the plugin gives you access to “credits” that you can use to test premium integrations on a limited basis:

The plugin uses credits every time an automation that involves a third-party app runs. This is not a permanent workaround, but it works fine as a trial system to test if you want to pay for a premium license.
Premium licenses start at $149 per year. That makes Uncanny Automator a relatively expensive plugin. However, its price is somewhat in line with other WordPress automation plugins.
Uncanny Automator review: Conclusion 🧐
Uncanny Automator offers a similar deal to a lot of other WordPress automation plugins. The free version enables you to use integrations with a decent number of plugins, but a lot of the more useful automations are locked behind a paywall.
Those useful automations include recipes such as connecting your website with social media platforms, Google apps, and other similar tools. If you’re willing to spring for a license that costs $149 (or more), you can use Uncanny Automator to get some of your best plugins connected with each other.
Do you have any questions about our Uncanny Automator review? Let’s talk about them in the comments section below!
Pros
It’s easy to set up new automations
You get a lot of options for editing actions in automations
Cons
Some actions for supported plugins are restricted in the free version
Restricts a lot of integrations unless you have a premium license