ImageMagick or Imagick is a single of the libraries made use of by WordPress to optimize illustrations or photos on your site. Even so, by making larger-excellent illustrations or photos, they can also enhance the measurement of your graphic information. This can sluggish down your website and result in a inadequate user practical experience. So, how to handle WordPress Imagick accurately?
Lengthy story quick, you can allow WordPress Imagick with an straightforward-to-use plugin. Then, you can make sure WordPress uses Imagick every single time (in excess of other picture libraries). Meanwhile, you can configure your WordPress Imagick settings to prioritize good quality or dimension to velocity up your loading instances.
An introduction to WordPress Imagick
You may well not know that when you upload a new picture to WordPress, the system immediately optimizes the image for you. To do this, WordPress relies on two PHP libraries:
- 👉 GD Library
- 👉 Imagick (a PHP extension that employs Picture Magick)
Equally of them are PHP modules that are previously installed on your server (at most hosts).
GD Library and Imagick can be employed by any person to resize, crop, compress, and improve photographs. Moreover, you can use them to alter the contrast of visuals, raise the brightness, and incorporate textual content overlay to your pics.
While these libraries perform likewise, WordPress frequently prefers to use Imagick in excess of GD Library if both modules are set up on your server (as of WordPress 3.5).
This is due to the fact Imagick supports tons of picture formats and ordinarily final results in a better-high quality graphic.
Why configure WordPress Imagick on your web-site
As prolonged as your web hosting server has the Imagick module mounted (which virtually all WordPress hosts will do), WordPress will most very likely now be utilizing Imagick to enhance your site’s pictures.
That is, you do not need to do anything just to empower WordPress Imagick optimization (assuming the module is now installed on your server).
Nevertheless, you might want to personalize how Imagick optimizes your photographs, both to use much more intense optimization (which may well cut down impression top quality considerably) or to use significantly less optimization (which will make increased-high-quality photos, but at the cost of file measurement).
For instance, if you operate a pictures web page, you may possibly want to regulate the WordPress Imagick options to be certain that you are not causing any drop in good quality on your portfolio images.
Fortunately, you can use a plugin to customize the WordPress Imagick settings according to your tastes. Then, you can select regardless of whether you want WordPress to prioritize velocity or good quality.
How to enable WordPress Imagick (3 Steps)
Now, let’s just take a seem at how to allow WordPress Imagick and configure the way the library manages your pictures.
Step 1: Install and activate ImageMagick Engine 🖱️
The most basic way to empower and configure WordPress Imagick is to use a free WordPress plugin like ImageMagick Motor.
With this plugin, you’re able to instruct WordPress to use Imagick about the GD Library each individual time.
Far better still, you can optimize unique images measurements for speed or excellent, producing it suitable for a wide range of internet site entrepreneurs. It’s also a great solution if Imagick isn’t at present activated on your server considering that you can allow is easily.
The plugin is totally cost-free, so you can go in advance and activate it immediately within just your WordPress dashboard. On prosperous activation, navigate to Configurations > ImageMagick Engine:
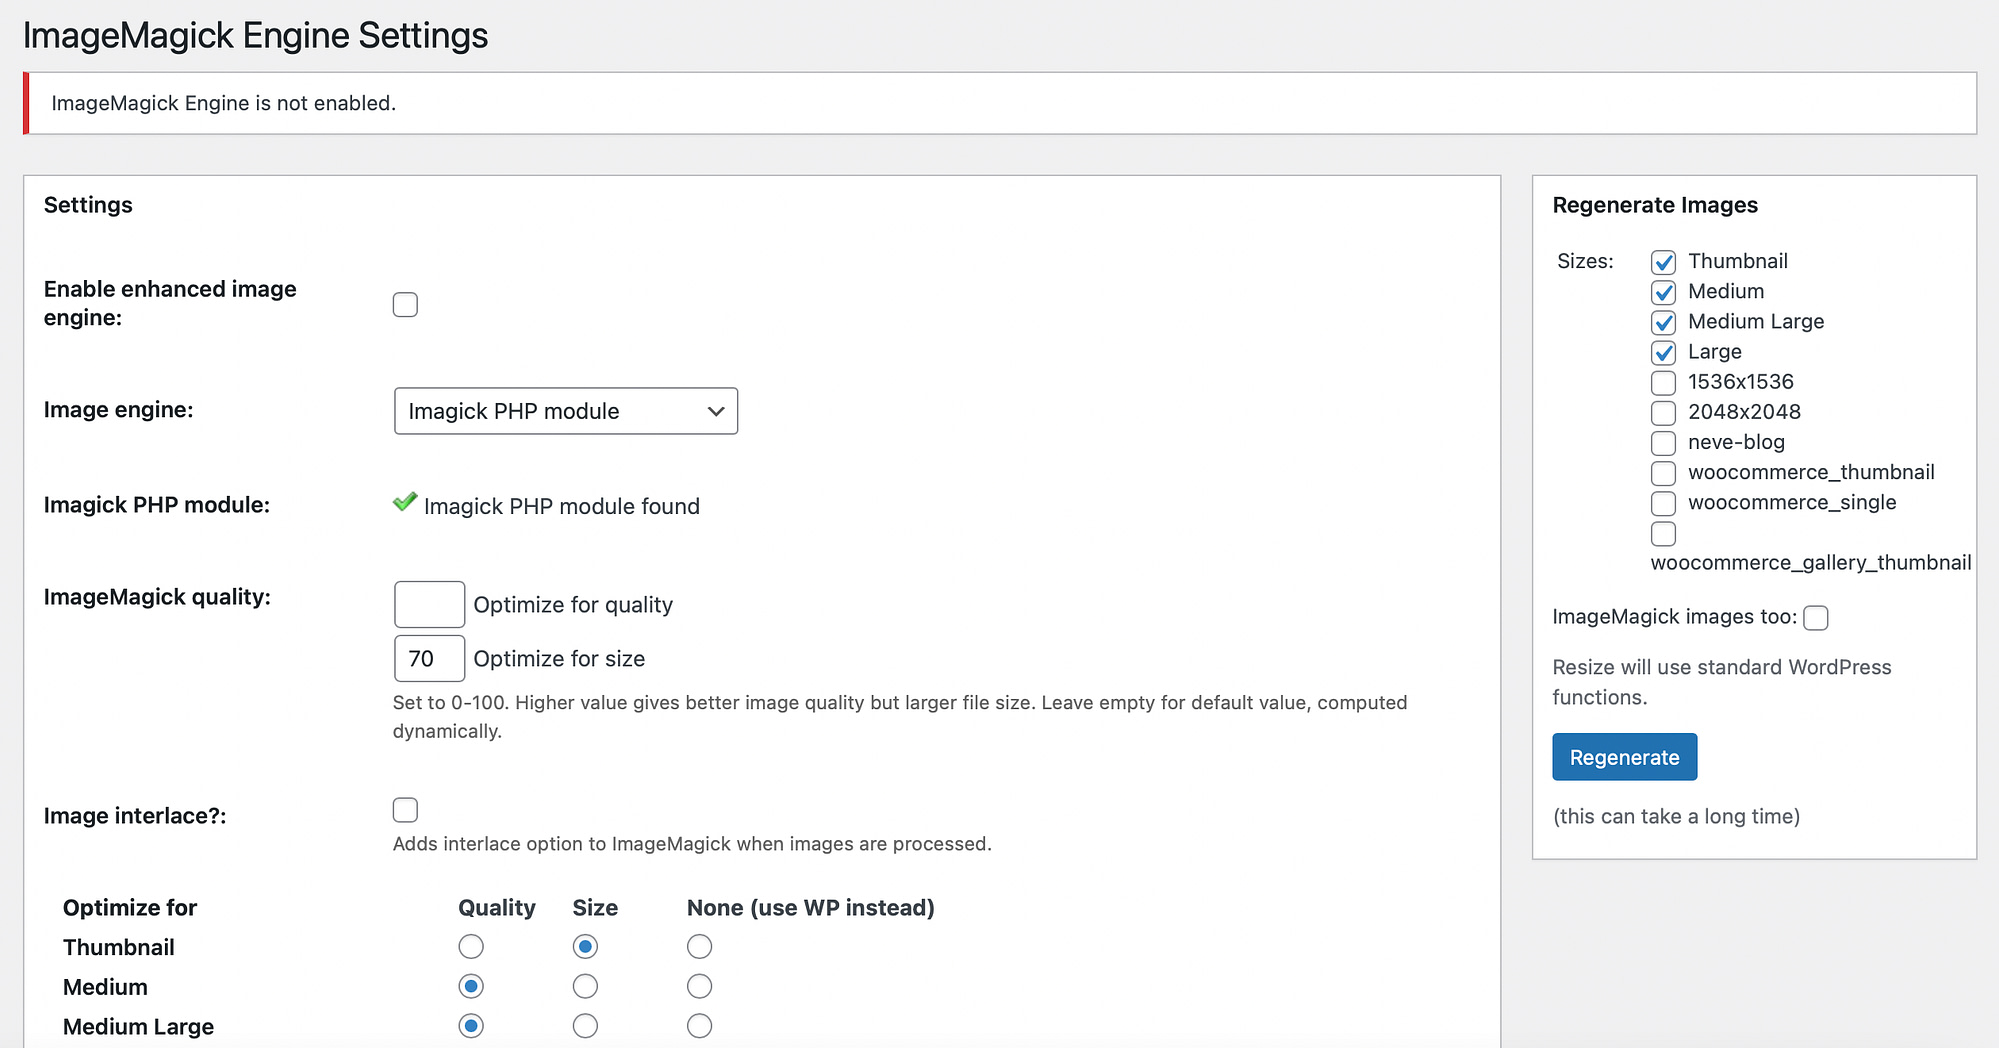
Listed here, you might get a concept that the ImageMagick Motor is not enabled. If this is the situation, all you will need to do is tick the box wherever it states Empower improved picture engine. Now, simply click on Save Variations.
Action 2: Customize the WordPress Imagick options ⚙️
Now that you have activated ImageMagick Motor, you can customize the plugin’s options. Scroll down to the Enhance For segment. Listed here, you will see all the different graphic formats that WordPress supports:

This is in which you can determine irrespective of whether you want WordPress Imagick to aim on picture measurement or excellent for each of the impression sorts.
For case in point, you might like to improve the way that Imagick handles all thumbnails on your site. If you check out the Measurement box, this will end result in a quite modest file measurement, but it will also deliver a lessen-excellent impression. Nevertheless, this dip in high quality may not be quite noticeable considering the fact that thumbnails are incredibly compact illustrations or photos in any case.
But, for huge images, it can be far more useful to show a sharp, crisp photograph considering that they’re more conveniently seen. Therefore, aside from Substantial, you may well decide on Top quality.
In addition, you can test out distinct measurement and high quality options in the ImageMagick top quality part:

Basically enter a variety amongst and 100 into the Optimize for good quality and the Improve for size bins. It is vital to be aware that a bigger value in the Optimize for high-quality box can outcome in a more substantial picture file.
If you’re not absolutely sure what you want to achieve yet, you can depart the containers blank and ImageMagick will determine this mechanically. Now, simply click on Conserve Adjustments to update your WordPress Imagick options.
Step 3: Apply your WordPress Imagick options to present pictures 🖼️
At this place, the ImageMagick Motor plugin will only implement your configured WordPress Imagick options to new pictures that you add. Nonetheless, you might want to apply the Imagick options to current pictures on your web-site.
To do this, you will have to have to regenerate your current illustrations or photos. You can do this by going to Configurations > ImageMagick Motor. Then, head to the Regenerate Images section to the proper of your monitor:

In this article, examine all the impression kinds that you want to apply your ImageMagick configurations, way too. Then, simply click on Regenerate. Now, all visuals on your internet site will adhere to your specific WordPress Imagick needs.
Viewing an “ImageMagick PHP module not found” information?
If you see an “ImageMagick PHP module not found” message future to the Imagick PHP module line in the plugin’s configurations, that suggests that the Imagick module is not put in on your server.
However, this is a little bit trickier to repair.
If you’re using a WordPress web hosting company, we suggest reaching out to them for assist and to see if they can put in the module for you.
Normally, you’ll want to really feel at ease connecting to your server via SSH and installing the module working with instructions. Generally, it is some thing like sudo apt-get install php-imagick.
Get a lot more management in excess of WordPress Imagick
By default, WordPress uses Imagick to improve all illustrations or photos that you upload to the Media Library. Having said that, you never get any way to command how that optimization functions.
Hence, it is a very good thought to empower WordPress Imagick and personalize the settings to enhance your web-site functionality.
🎯 To recap, here are 3 steps to enable WordPress Imagick:
- Set up and activate the ImageMagick Motor plugin. 🖱️
- Customize the WordPress Imagick settings. ⚙️
- Apply your WordPress Imagick configurations to present visuals. 🖼️
Do you have any questions about WordPress Imagick? Let us know in the feedback part under!