Here is something amazing – you can create a classifieds site and let people pay to have their posts featured for a specific amount of time, and after that time elapses, their posts no longer show as “sponsored” posts in certain website areas.
Think along the lines of what Facebook does when they let you pay to sponsor your post, and after the time you bought is over, the post no longer shows to people. If you read to the end, you will even find a very juicy way to let the posts just show randomly within the listings of other posts on the site.
Now, I will show you how to build a classified website with listings that people can pay for using a few tools from Crocoblock.
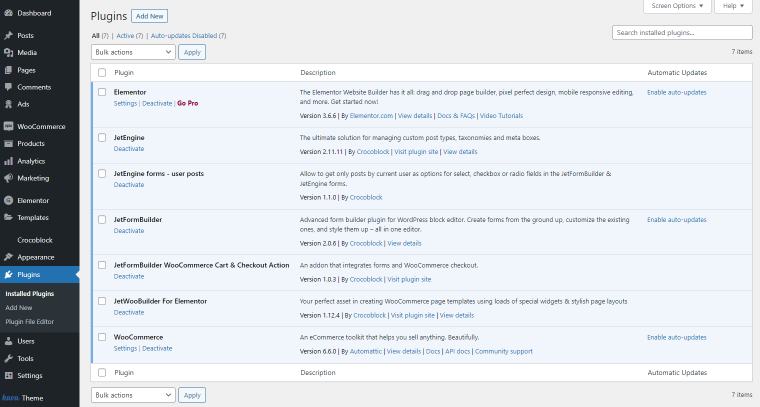
Here are the major Crocoblock plugins and add-ons you will need to complete this project:
- JetEngine: You will use it to create the actual listing items and query them from the database.
- WooCommerce: The plugin that helps you sell products (even digital products such as the subscriptions you will be selling). More on this in a bit.
- JetWooBuilder: This plugin will help you customize the cart, checkout, and “Thank You” pages of your WooCommerce-enabled website.
- JetFormBuilder (JFB): The king of form-building, which basically lets you create all the forms to collect user and post data, modify the user data, link with WooCommerce, and let people pay you on the site.
- WooCommerce Cart and Checkout Action: This is a JetFormBuilder add-on that connects the plugin to WooCommerce and lets them work seamlessly together.
- User posts as options: You can find this free add-on on Crocoblock’s DevTools page. It helps you get all posts belonging to the current user. This is important because a user will sponsor only their own posts.
- BONUS: Paypal Recurring Payments: This is optional, but you can use this in place of WooCommerce Cart and Checkout Action to take payments directly to PayPal (if you do not want to use WooCommerce).
My Assumptions
I assume that:
- you know how to create a custom post type and meta boxes using JetEngine;
- you have a basic understanding of how WooCommerce works, and you can create products and sell them on a basic website;
- you understand how JetFormBuilder works and can use it to a certain extent;
- you have a basic knowledge of WordPress and Elementor.
Phase One: Creating the Custom Post Type and Custom Meta Boxes
Assume that we are creating a website where people can list their used cars for sale and may want to pay to “sponsor” the cars they listed on the site. The cars, in this case, are a Custom Post Type (CPT).
Assume that they have certain details about the car that they want to include in the information that people see, such as the mileage, the price, who to contact for the car, etc. To add these details in an organized way, they need to create meta boxes that will hold this information.
Step 1 – Create a custom post type.
Create a custom post type in JetEngine and name it “Cars.” That’s all you need to do about that.
Step 2 – Create one meta box for additional fields in the Cars CPT.
Go to JetEngine again and create a meta box. The meta box should be assigned to the Cars CPT. You can call the meta box “Additional Car Fields.” This meta box will carry all the additional fields you want to include in the description of each car post. I mentioned some of them two paragraphs ago. But you should compulsorily add the following meta fields because they will serve as a backbone for this whole ‘sponsored posts’ thing:
- Sponsored End Date: The meta field type is Datetime. Please make sure to toggle on the option that says “Save as timestamp.” It will hold the date after which this post will no longer be sponsored.
- Last WooCommerce Order Key: This meta field type is Text. It will hold the WooCommerce order key. I will explain why this is important soon.
Step 3 – Create another meta box for additional user fields.
Return to JetEngine and create a meta box. This meta box should be assigned to the User and visible on the “Edit User & Profile” pages. It will appear in the profile of each user on the site. You can name the meta box “Temporary Cart.” Why? Because it will carry temporary information and act like a cart for the user who wants to sponsor their own product. This meta box will carry the following meta fields compulsorily:
- Sponsored Post Period: This meta field is a Number field. It will hold the amount of time in a timestamp for which the vendor intends to sponsor a post. Please note that it is not a date field, and you will understand why soon.
- Date of Last Sponsored Post Purchase: This meta field is a Date meta field. Make sure to toggle on the Save as timestamp option when creating this field. It will hold the date on which the person last sponsored a post.
Phase Two: Creating the WooCommerce Placeholder Product
I installed WooCommerce for just one reason.
We need to let users make a payment. Since WooCommerce is the best plugin to do just that, we installed it. What’s more? We can connect it with JetFormBuilder and let people choose how much they want to pay. That’s all.
Step 1 – Create a product.
To make this work, we will create a placeholder product. You can name it “Sponsored Product.” We call it a placeholder product because a product has to be paid for before you can make a payment with WooCommerce. This will be that product.
Pro tip
You can put whatever you want in the product’s Price field. It doesn’t matter. When you set the price in the JetFormBuilder form, it’ll overwrite whatever you have there. It will not update the product price either.
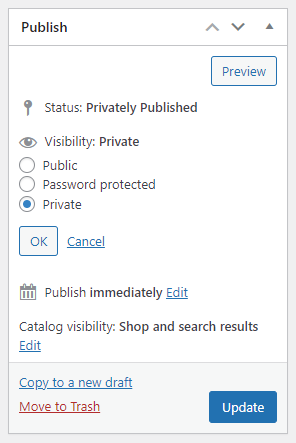
Step 2 – Make the product private.
In the right sidebar of the product edit page, find and set the product Visibility to “Private” in the Publish section. You should do this because if you are already using WooCommerce, the placeholder product will be excluded from the list of products visible in your site’s shop.
Phase Three: Creating the First JetFormBuilder Form
I assume you understand how to create a JetFormBuilder form and use it as a front-end form that can add content to your site and update it.
Since my aim is to show you how to let people sponsor their already-created posts (in this case, the cars), we will only focus on the forms that help them do just that. Let’s assume you have already created the forms that help people submit new cars. Here is how to let them sponsor those cars.
Step 1 – Create a form to let people select how much they want to pay.
Recall that the vendors on this site must have previously created their “Cars” posts. Now, they want to sponsor and make them appear to more people. So, create a new JetFormBuilder form, adding the following fields:
- Number of Days: This is a Number Field block that will let the vendor add the number of days for which they want to sponsor their car post.
- Amount to be paid: This is a Calculated Field block that will output the total amount the vendor will pay to let the chosen car be sponsored for the number of days entered above. Note that you can decide to hide this field if you want to. For me, I want them to see exactly how much they will pay as soon as they enter the number of days. So, here is the formula to include in the Calculated Field: %FIELD::number_of_days%*1000
To make this look good, add a dollar sign or whatever currency sign you use to the Calculated Value Prefix field in the Field Settings.
NOTE
I used the figure “1000” because I want people to pay $1000 daily for sponsored posts. So use what amount suits your use case here.
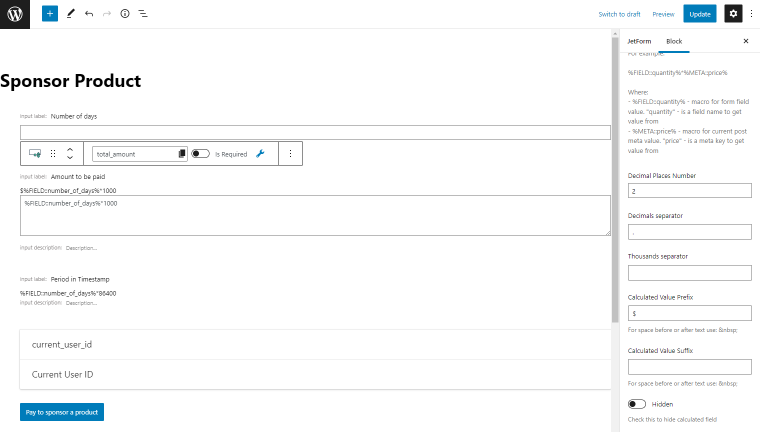
3. Period in Timestamp: This is a Calculated Field block that will calculate how long this post will be sponsored for in a timestamp. This time, you want to multiply the number of days selected by the value of each day in the timestamp. To understand this, you must know that one full day in the timestamp equals “86400.” So, here is the formula we will include in this Calculated Field:
%FIELD::number_of_days%*86400
You want to remove decimals from this form field by changing the Decimal Places Number field value to “0” (zero). You do not want any decimals. A timestamp is always a whole number. Also, the user does not need to see this field, so go to the Field Settings and enable the Hidden toggle.
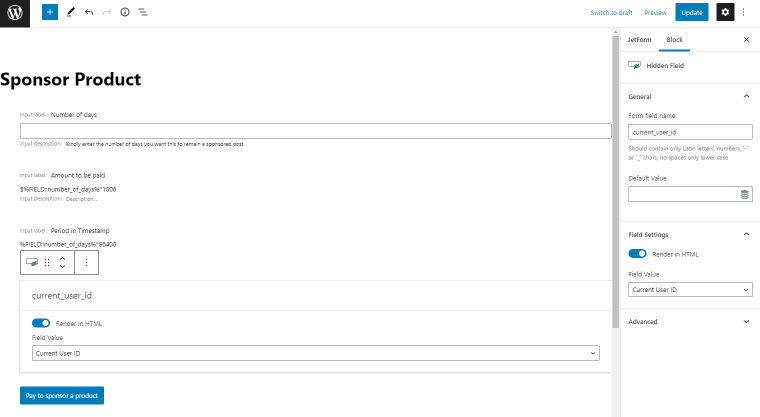
4. User ID: This is a Hidden Field block that will store the current user’s ID. It is necessary because the user ID will be used to update their Temporary Cart. Recall Phase 1 – Step 3?
5. Pay to sponsor a product: This is a regular Action Button block; the text in the Field Label can be any you wish.
Step 2 – Add a post-submit action to update the current user.
You should add a post-submit action called “Update User.” This action will update the user’s Temporary Cart found in their profile so that the amount of money and the period selected will not be lost as the vendor progresses to the next page.
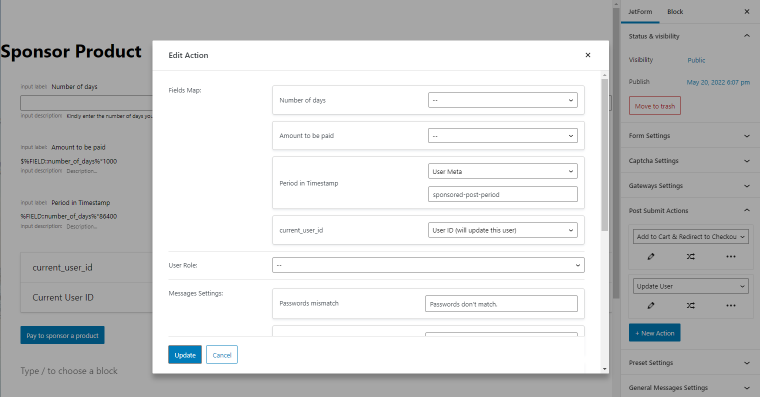
Edit this post-submit action and map the following form fields to the corresponding fields as follows:
- User ID – Connect it to the current user ID. This will update the current user.
- Period in Timestamp – Connect it to the Sponsored Post Period meta field. (Refer to Phase One–Step 3).
Save this post-submit action by clicking “Update.”
Step 3 – Add a WooCommerce Cart and Checkout Addon.
I assume you must have installed this JetFormBuilder add-on. Now, you will be able to add a new post-submit action called “Add to Cart & Redirect to Checkout.” This add-on will allow you to point to your placeholder product (refer to Phase Two–Step 1), and it will let you set additional data to add to the order if you want to do this.
Edit this post-submit action, filling in the following fields as follows:
- Get product ID from – Select “Manual Input.”
- Input Product ID – Here, input the product ID of the placeholder product. You can find that product ID in the Products > All Products and hover over the placeholder product to copy the ID.
- WooCommerce Price field – Here, select the “Amount to be paid” Calculated form field. (Refer to Phase Three–Step 1, Point 2).
- OPTIONAL: WooCommerce Order Details > Set Up – Here, you can add the period for which this car post will be sponsored. This is only for record purposes, and if you do not want to add it, that is totally fine. Give it any label you want, and link it to the “Number of Days” Calculated form field.

Step 4 – Create a page and add this form.
You should create a page for the vendors and name it “Sponsor a Car.” Add this form you just created to the page, and make the page accessible to the vendors however you want to do it. I will leave that to you. Just be sure that the vendors can start the process here.
Recap: Now, when a vendor submits a form, two things happen. The first is that their profile gets updated with the period they are about to pay for, but that does not change anything yet; this information is just stored like they put something in a cart until they make the actual payment. And secondly, the amount the vendor is to pay is transferred to the WooCommerce checkout page, and this vendor can now proceed to make the payment for the period they chose.
Phase Four: Setting Up the Thank You Page
Now a vendor has been redirected to the checkout page and made a payment. But the vendor has not selected a car to sponsor. I could not let them select the car until they paid. So it’s a great time to let them do it – right here, on the Thank You page. After they select the car, they will complete the process, and that will be all.
Step 1 – Create a JetFormBuilder form that lets a person select the Car to sponsor.
This last form is tricky, so pay complete attention.
At this point, you must have installed the sixth tool mentioned at the beginning of this article, User posts as options. We will work with it now. So, create the following form fields:
- Car to sponsor: This is a Select Field type. It will be used to fetch all the current published cars of the current vendor.
- Under Fill options From, select “Generate Dynamically”;
- Under Generate Function, select “User Posts”;
- Under Field Name, enter the CPT name. It is not the label but the post type name. To find it, click on the Cars CPT from the wp-admin menu, and once the page loads with all the listed cars, look into the URL of your address bar and find the part that says ‘?post_type=xxx’. Copy that xxx part and paste it here. That is your field name.
- timestamp_now: This is a Hidden Field. You need to know what the current date is in the timestamp.
- Render in HTML should be toggled ON;
- Under Field Value, select “Current Date”;
- Under Format, enter “U.” Just that letter alone. It gets the current date in the timestamp.
NOTE
You should write the names of all hidden fields as I have shown: no spaces. Separate the words with an underscore.
3. order_key: This is a Hidden Field. You want to fetch the order key for this particular order. The order key is a unique key randomly generated by WooCommerce after any order is made. It shows in the URL of the Thank You page like this: ?key=wc_order_cy8KthhW1SAU2
Now, you need that. So, set up this Hidden Field as follows:
- Render in HTML should be toggled OFF;
- Under Field Value, select “URL Query Variable”;
- Under Query Variable Key, enter the word “key.”
NOTE
You should enter the word “key” in small letters and without quotation marks.
4. sponsored_post_period: This is a Hidden Field. You need to fetch the period that the person paid for. But wait, where do you get that from? The Temporary Cart! (Refer to Phase One – Step 3, Point 1). Now, set this field up as follows:
- Render in HTML should be toggled ON;
- Under Field Value, select “Current User Meta”;
- Meta Field to Get Value From should be set to the meta field name of the
- Sponsored Post Period. (Refer to Phase One – Step 3, Point 1).
5. make_period_zero: This is a Hidden Field. You will understand its purpose in a bit. Set it up as follows:
- Render in HTML should be toggled OFF;
- Field Value should be set to “Manual Input”;
- Under Value, enter “0” (the figure zero as a number).
6. vendor_user_id: This is a Hidden Field. It gets the ID of the current vendor. Set it up as follows:
- Render in HTML should be toggled OFF;
- Under Field Value, select “Current User ID.”
7. end_of_post_sponsor_period: This is a Calculated Field. You need to know when this sponsored post will stop being a sponsored post. So, let’s calculate it now. Assuming you used all the field names the way I said you should, here is the formula you will now enter into this field:
%FIELD::timestamp_now%+%FIELD::sponsored_post_period%
All we did was add the time the vendor paid for to the time we are right now. Voila! What we have is a timestamp value equivalent to the end date of the post’s sponsor period. Also, the user does not need to see this field, so go to the Field Settings and enable the Hidden toggle.
NOTE
For this seventh field to work correctly, you must go to the form field settings and change the Decimal Places Number to “0” (that is, the figure zero as a number).
We have all our fields ready. Now, it is time to set the post-submit actions that will seal it up.
Step 2 – Add a post-submit action to update the Car Post.
Remember that we added certain compulsory meta fields to the car post? (Refer to Phase One – Step 2). Let’s update those meta fields now. Add the Insert/Update Post post-submit action to this form. Edit that action and do the following:
- Under Post Type, select “Cars” or whatever CPT you are letting the vendor sponsor.
- Under Post Status, select “Keep current status (when updating post).”
- Map Car to Sponsor to the Post ID (will update the post) field.
- Map order_key to the Post Meta of the WooCommerce order key meta field. (Refer to Phase One – Step 2, Point 2).
- Map end_of_post_sponsor_period to the Post Meta of the Sponsored End Date. (Refer to Phase One – Step 2, Point 1).
That’s the first post-submit action done. It gets the post ID of the car to be sponsored, then it updates it and adds the order key and the date the sponsored post will stop being sponsored. We need that to query the sponsored posts, for sure.
Step 3 – Add another post-submit action to update the Current User.
I added a field in this form called “make_period_zero” that probably made you wonder what it was for. Simply put, we do not want a person to submit this form, then return to the Thank You page and keep sponsoring more cars just because the “sponsored_post_period” still fetches a value from their user profile. So, we are being smart now. If they use up the period they pay for, we don’t want them to use it again.
Now, add the Update User post-submit action to this form. Edit that action and do the following:
- Under vendor_user_id, select “User ID (will update this user).”
- Map make_period_zero to the User Meta, and enter the meta field name of the Sponsored Post Period field found in the user profile. (To recall, refer to Phase One – Step 3, Point 1).
- Map timestamp_now to the User Meta, and enter the meta field name of the Date of Last Sponsored Post Purchase field found in the user profile. (To recall, refer to Phase One – Step 3, Point 2).
That’s the second post-submit action done. It simply returns the value of the Temporary Cart to zero and keeps the date of purchase of the last sponsored post in the user profile, just for record purposes.
Step 4 – Add another post-submit action to take the vendor away from the Thank You page.
Now, when this process is complete, you need to send the vendor away from the Thank You page to another page where the vendor is assured that the Car they just sponsored is now being viewed by people, and they will make more sales. In Phase Five below, we’ll deal with creating this page. For now, let’s assume it is already created and add the post-submit action below.
Add a new Redirect to Page post-submit action to the same form. Edit it and make the following changes:
- Under Redirect to, select Static Page.
- Under Select Page, select the “Car Sponsored Successfully” page we will create in Phase Five below.
Step 5 – Create the actual Thank You page.
With JetWooBuilder, you can create a Thank You template and make it look awesome. Plus, you can add the form we have just created to that Thank You page because it is just after purchase that a vendor will sponsor their post there. If you are not sure how to create a Thank You page, learn it from a Thank You page creation tutorial.
Recap: So, if a vendor selects a Car to sponsor now, that car becomes part of the sponsored posts on the site, and the vendor is redirected to another page where they are assured that their Car has now been sponsored for it to reach more people.
Phase Five: Creating the Last Page of This Funnel
You want to say, “Hey! Your car is now sponsored.” But how do you do that?
Step 1 – Create a Car Sponsored Successfully page.
Style it the way you want in Elementor and add whatever text you want to that page.
Step 2 – Save the page.
Save it! And if you have not already done so, go back to Phase Four – Step 4, and link this page with the Redirect to Page post-submit action.
We are at the end of the road. Now, it is time to query all the posts that are still sponsored on the site. Take note that what we want to do is to query all posts that are still within the period the vendors paid for. Once that period is now in the past, we do not want these posts to show anymore. So, let’s do it!
Step 1 – Create a Query Builder query.
Just go to JetEngine, and select Query Builder. Now click on “Add New.” Give the new query a name of your choice. I choose to call it “Query of Sponsored Posts.” Edit the fields as follows:
- Query Type: Select “Posts Query.”
- In the General Tab:
- Under Post Type, select the post type that vendors are sponsoring. Mine is “Cars.”
- Under Post Status, select “Publish.”
- Leave the rest as is.
- In the Meta Query Tab:
- Add a new Meta Query Clause. Under Field key/name, enter the meta field name of the Sponsored End Date meta field. (To recall, refer to Phase One – Step 2, Point 1).
- Under Compare, select “Exists.”
- Leave Value empty.
- Under Type, select “Timestamp.”
- Leave Clause Name empty.
NOTE
We just specified that it should only query posts where the Sponsored End Date exists.
4. Still in the Meta Query Tab:
- Add another Meta Query Clause by clicking on “Add new,” and under Field key/name, enter the same field name as was in the first meta query clause.
- Under Compare, select “Greater or equal.”
- Under Value, click on the dynamic field icon and select “Today.”
- Under Type, select “Timestamp.”
- Leave Clause Name empty.
NOTE
We just specified again that it should only query posts where the Sponsored End Date is in the present or the future but not in the past.
5. Still in the Meta Query Tab:
Check the bottom of that page and set Relation to “And.” This will ensure that the conditions we set in Point 3 and Point 4 above are both considered when querying the posts.
Step 2 – Save the Query Builder Query.
You are done creating this query, and now all listings you base on this query will output only sponsored posts that are still in their validity period. Save it.
In this phase, you may want to create a listing based on the query from Phase Six and just let it show at the top of your regular listing items on your archive pages.
But what about spicing it up? You can inject the sponsored posts so that they just show amidst your regular listing items. Do this by going to JetEngine and activating the Listing Grid Injections module. Since Crocoblock has already explained how to use Listing Grid Injections, you should check it out. Use that to do it the Facebook way, and you can now build a platform where people pay to sponsor their posts, and you can do it like a professional!
I hope this helps you to achieve what you want. If you have any questions or simply want to know more, feel free to reach out to me. Thank you for reading, and happy development!