JetEngine provides vast opportunities to work with REST API. This article will go through examples of their use cases and, of course, a bit of theory.
Table of Contents
What Is REST API?
Let’s start with the basics. API stands for Application Programming Interface, which allows software components to “communicate” with each other. API is about the communication of two parties called “client” and “server,” one of which sends information, and another receives it. To make this communication efficient, there should be clear rules and structure.
REST API is the most popular, flexible, and efficient API type today. Basically, it became a standard for Web API in general. Talking about standards, one of the most important advantages of it is that it’s stateless – the server does not remember the user’s state between requests – each request contains information that identifies the user (for example, a token obtained through 0Auth authorization) and all the parameters required to perform the operation.
REST API is an API built on the REST specification guidelines. REST (or RESTful) stands for REpresentational State Transfer, and these are the general principles of organizing the interaction of an application/site with a server using the HTTP protocol.
How REST API works
REST API uses HTTP requests to URLs that return custom responses. There are four most common methods:
- GET – receiving data from the server;
- POST – adding new data to the server;
- PUT – editing the existing data on the server;
- DELETE – deleting data on the server.
For more information, read the article about REST API essentials.
WordPress REST API
WordPress REST API makes a site accessible by other applications; it’s a default feature introduced in the 4.7 version. To be specific, WordPress REST API provides REST endpoints (URLs) for posts, pages, taxonomies, and other WordPress data types. Actually, REST is one of many APIs that WordPress provides. Follow this link if you’d like to find out more about other WordPress APIs.
With the WordPress REST API, developers can build custom applications, integrate WordPress with external services, create mobile apps, decouple the front end from the WordPress back end to create a headless WordPress architecture and perform a wide range of operations programmatically.
The API endpoints are designed to be extendable, allowing plugin and theme developers to add their own custom routes and functionality to the API. This flexibility makes it a powerful tool for extending WordPress and building advanced applications on top of the platform.
WordPress REST API functionality
As we know, WordPress REST API’s primary job is to generate content in JSON format and send it to third-party sites and apps, but that’s not the full list. This is what else REST API can do:
- Allows to edit, delete or add new content items remotely.
- Provides access to templates, themes, and plugins inside of WordPress.
- Provides access to websites and applications outside of WordPress.
- Allows to customize and extend core REST API functionality using special plugins.
Go to the REST API Handbook to find out everything about the WordPress REST API.
JetEngine as a WordPress Rest API Plugin: Use Cases
JetTalks episode to uncover the use cases of working with JetEngine REST API. Here’s the full version, but remember that it’s a bit outdated and shows the previous version of JetEngine and the legacy forms. However, you can get the idea:
Below is a shorter version of the steps Andrew has provided in the video with the new instruments and non-legacy JetEngine UI.
Use case #1. Exchanging data on the back end using the POST request
As we know, REST API lets sites and applications interact with each other and share and display data and content. A trivial example is the WordCamp central site and its major events’ separate websites like WordCamp Europe 2020 or WordCamp Mexico 2020. The central site contains general information and a timetable, while the event sites have detailed information about a specific event and its promo. At the same time, each event site transmits data to the general site through the API. This is how an event visitor base assembles to make personalized email newsletters.
Our first case is about using REST API Form Notifications.
Let’s create something similar and also have two sites:
- The Central site. It will have all the information about the participants of the event. It can be the main company’s website, for example.
- The Event site. Let’s say it’s a promo landing that will collect participants’ information which they submit via a form.
The plugins we need to install:
- For the Central website, install JetEngine, then go to JetEngine > JetEngine and activate the Custom Content Types module;
- For the Event website, install JetFormBuilder and JetEngine. Then go to JetEngine > JetEngine and activate the REST API listings module.
Step 1. Creating CCT and the item endpoint on the Central site
We will use our very own handy feature REST API Endpoints for the Custom Content Types. First, we will work with the Central site, where our information will be collected and received using REST API.
- Go to JetEngine > Custom Content Type and create a CCT; I will name it “Participants.” Add all the meta fields that the form (on the remote Event site) will have.
- Here, we need to activate the “Register create item REST API Endpoint” option. After the activation, you will see the link that appeared. We will use it later in the form on the Event site to send the data to the Central site.
- If you don’t want everyone to be able to add CCT to your website, don’t forget to edit Access Capability and restrict the access. In most cases, “edit_posts” will work fine. If you need more options, you will see the link to the documentation with the list of WordPress core capabilities you can copy and paste.
This is what the CCT edit screen will look like:
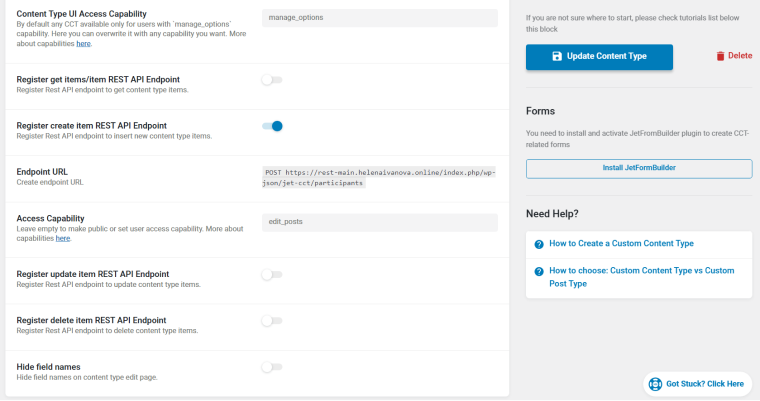
Now, we can send data to our Central site via the REST API.
Step 2. Creating a form and establishing the REST API connection on the Event website
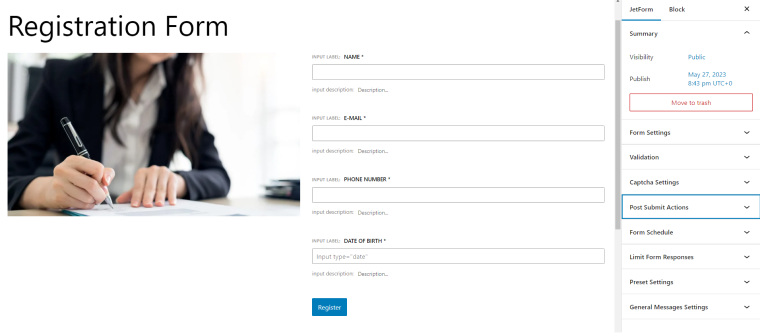
Now we will work with the Event website. Go to JetFormBuilder > Add New and add the form with the fields that match names / IDs of the CCT’s meta fields on the Central site you’ve created to collect the information from forms.
NOTE
If the field names of the form fields and the CCT meta fields are different, the data from the form will not get retrieved to the CCT (because CCT will not “understand” where to get the content from). But labels can be different.
Here is a tutorial explaining how to create a JetFormBuilder form. For proper stylization, use our free JetStyleManager plugin. But if you use Elementor to display your form on the front end, you can use the JetForm widget, which has many stylization options.
This is our form:
Now, it’s time to do the REST API “magic.”
First, ensure you have installed JetEngine on the Event site and activated the REST API listings module. This module will add the REST API request option to your form’s “Post submit action” list.
- Go to the JetForm > Post Submit Actions tab and choose REST API request.
- Click on the pencil icon, and you will see the pop-up with settings.
- Go to the Central Site to the CCT where you’ve activated the Create REST API item and copy the link (REST API endpoint) from there.
- Paste it to the REST API URL field.
- Now, we need to set up the Authorization. To do it, switch the Authorization toggle to the “Application password” authorization type (you can choose another one, but this is the easiest one). Now, go back to the Central site > Users, select a user with enough capabilities (I’ve just chosen the Admin), and scroll down to the Application Passwords section. Name the password, and it will generate a password itself.
- Copy it, go back to the Event site, and paste it in the USER:PASSWORD STRING field under the Authorization Type. Don’t forget to add the username (not a password). For example, admin:sNiM hCHD yZ3R iyTl U6tN TWdC.
- Save the settings and update the form.
Step 3. Placing the form on the front end
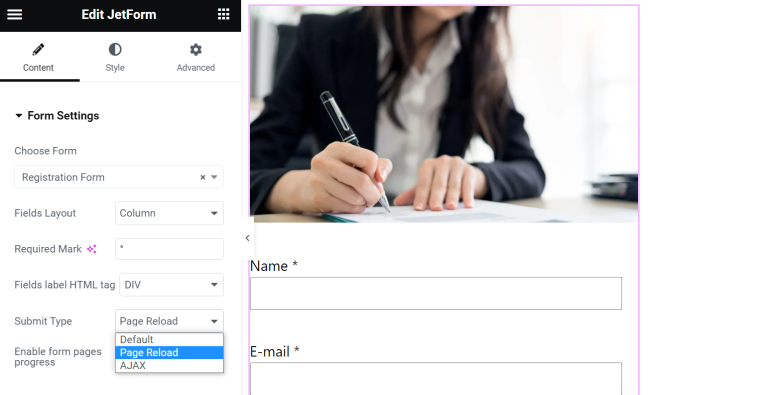
Now, just add your form to the page of the Event site where users will fill it. If you use Elementor for building your pages, simply choose the JetForm widget, select the form from the list, and do all the stylization, as well as extra settings. For example, the Page Submit type (it should be the same as in the form editor – either AJAX or Page Reload).
If you use Gutenberg or another form builder to create your pages, just use a form’s shortcode and do the stylization in the form editor UI using the free JetStyleManager plugin.
Use case #2. Displaying data on the front end via the GET request
In the previous example, we discussed the case when the data was collected on the back end of the Central site. You can certainly display it on its front end with the standard JetEngine Listing Template.
But let’s imagine we want that list of participants to be displayed on the third site. For example, the Central site has collected submissions from different promo sites, and now we finally need to show that full list on another site dedicated to the attendees.
Let’s call this site Participants, and the task is to display there the list of people from the Central site. The Participants site should have JetEngine with the REST API Listings module activated.
The practical case of using such an example is this page on WordCamp Finland. Users who submit the form appear on the public page, and their data appears thanks to API.
And this case will be about using REST API Listing functionality itself.
Step 1. Registering GET items/item REST API Endpoint on the Central site
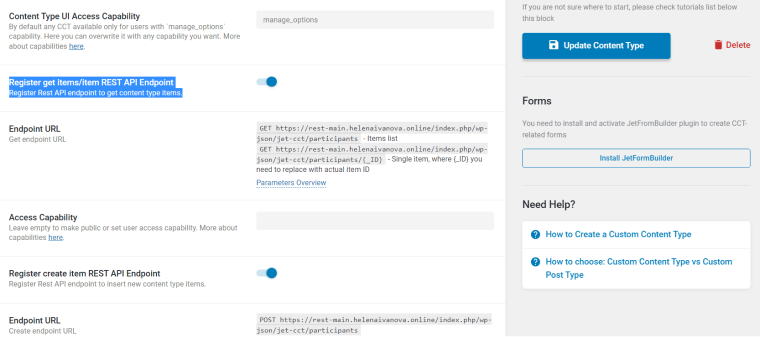
For the previous example, I’ve already registered the REST API endpoint on the Central site to create a new CCT. Now, I will need to use GET items, so I will go to JetEngine > Custom Content Types > Participants (the content type for those who’ve registered via the form on the Promo site) and activate a toggle that reads “Register get items/item REST API Endpoint.”
Two links will appear – one for the items list and another for a single item. I will need a link for a list.
Step 2. Adding a new REST API Endpoint URL on the Participants site
- After registering the endpoint and getting the API URL on the site that will be a data source, I need to insert this URL somewhere on the Participants site so that content will be retrieved. To do it, go to the Participants website > JetEngine > JetEngine, where you will see a REST API Endpoints tab. Click “Add new,” name it as you want and insert the URL for the items list you’ve just generated on the Central site.
- The Item Path input can be left empty if your JSON doesn’t have a nested structure. There’s a link and some tips right in the dashboard that will guide you through.
- The Authorization section works exactly the same as in the previous example (I will not use it now in my video).
- Click the “Send Request” button and make sure you see green messages that it’s connected. It’s very important to click this button not only to check the connection but also to get a sample item that will be used later for creating a listing template, so don’t skip this step.
- If everything works well, hit “Save.”
Step 3. Creating a Listing Template to display items from the remote site
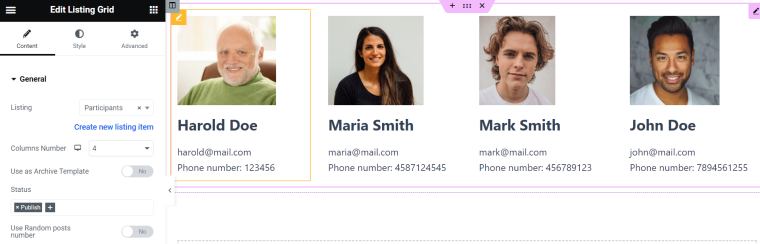
Now, it’s time to display the information on the front end with the help of the listing template that will later be used in the Listing Grid. The procedure is the same as for any other Listing.
- Go to JetEngine > Listings > Add New. Choose REST API Endpoint as a Listing source. Then choose the endpoint you’ve created in the previous step. Name the listing and edit it either in Elementor or Gutenberg.
- After that, create the template design for one item that will be repeated in the Listing Grid by placing a Dynamic Image widget/block for images, a Dynamic Field widget/block for displaying meta fields, or most other objects. You might also need other JetEngine widgets/blocks and use native Elementor/Gutenberg blocks that support dynamic content, such as Icon List, Toggle, etc.
- Style everything the way you want it to look on the final page (fonts, colors, sizes, paddings, borders, etc.).
Step 4. Creating a Listing Grid
Now, you can go to your final page, where the participants will be displayed, and add the Listing Grid widget/block. Select the listing created in the previous step. Add all the additional settings. Enjoy!
📢 Useful tips
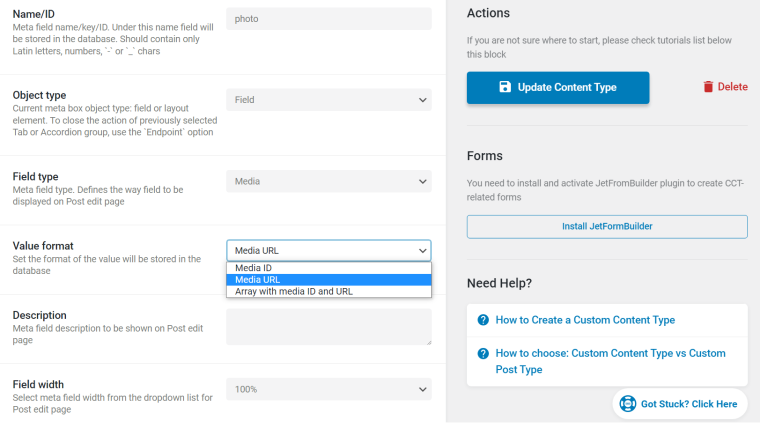
- For this example, I’ve changed the Date of Birth field to the Photo field on the Promo site with a form and on the Central site accordingly. But transferring images via REST API is a bit challenging. You need to choose the “Media URL” value format; otherwise, it will not be displayed properly in the listing.
- If you change anything in the structure of CCT on the Central website (any site the data is received from), go to JetEngine > REST API Endpoints and hit “Send Request” once again, so the site will fetch the updated data, and you will be able to see it in the Listing Template Preview.
If you change the meta field name, format, structure, etc., on the “parent” site and don’t do it, it will still work, but you will not see this data while creating your Listing Template. - You can see a JSON just by inserting Endpoint URLs into your browser’s address bar. JSON is human-readable, and you will be able to understand whether all the fields you wanted to fetch are retrieved correctly – it’s quite handy.
Useful Links for Working With JetEngine REST API
📚 For now, some articles from the Crocoblock JetEngine documentation listed below are legacy. However, the idea is still the same:
- Adding and editing the CCT items via REST API.
- Displaying CCT using REST API.
- Displaying array elements from REST API Endpoint using the Sub Query add-on.
- To learn how to get and update Relations via REST API, check the knowledge base.
- Connecting WooCommerce using JetEngine REST API features.
- Creating a Single page for the REST API item.
The video below shows how to create a Single Page layout using the data transferred with the help of REST API and JetEngine and its latest UI:
FAQ
Yes, definitely. WordPress supports it, and it’s a core feature.
Yes, check out JetEngine from Crocoblock. It’s a powerful plugin for working with dynamic content, and REST API functionality is one of its modules. It gives a lot of options and freedom in working with REST API and displaying the content on the front end.
Bottom Line
Using JetEngine for working with REST API is really convenient and gives many opportunities to use and display the content received from the remote site. I hope you enjoy it and make good use of this feature.