PhpMyAdmin is a popular tool that allows website owners to manage the database of their WordPress website. In our WordPress phpMyAdmin tutorial, you’ll learn how to start leveraging it to help manage your website.
In this article, we’ll introduce you to what phpMyAdmin is and how it works. 👨💻
Then, we’ll showcase ten WordPress phpMyAdmin use cases, including creating new WordPress users, changing passwords, deactivating themes/plugins, and more.
Let’s dig in…
What is phpMyAdmin?
So – why do you need a WordPress phpMyAdmin tutorial? 🤔
Well, despite their simple interface, WordPress websites consist of a complex set of data like pages, posts, tags, categories, comments, login credentials, settings, and configurations along with data from the plugins and themes installed on your site.
All this data is stored in an organized system called the database.
Luckily you don’t have to create a database manually. It’s automatically created by WordPress when you first install the CMS on the site.
What are MySQL and phpMyAdmin?
WordPress uses MySQL (a database management system) to create databases and that’s why a WordPress database is often referred to as a MySQL database.
The MySQL database is too complex for a regular website owner to operate so you need an administrative tool to access and operate the database.
PhpMyAdmin is a free and popular administration tool that allows you to browse, modify, add, delete, export, or import the MySQL database.
Pretty much all WordPress hosts offer phpMyAdmin as part of their hosting dashboards, whether they’re using cPanel or a custom dashboard.

What are database tables, rows, and columns?
We mentioned earlier how the WordPress database is an organized system. In this system, all your website’s data is saved in the form of tables. Each table contains a unique set of data displayed in rows and columns.
For instance, the wp_user table on the database of my demo site has three rows displaying information about the site users. Each row is further divided into a couple of columns containing specific information about the users:
- ID
- user_login
- user_pass
- user_nicename
- user_email
- user_url
- user_registered
- user_activation_key

When a database is first created, it contains a set of core tables. As you add more posts, and pages, create new users, configure new settings, and install new plugins and themes, more and more tables are added to the database.
Now that you know what exactly is the phpMyAdmin and what role it plays in your WordPress website, let’s look at the different ways to use this tool to operate your site in our WordPress phpMyAdmin tutorial.
WordPress phpMyAdmin tutorial: Using it to manage your site
PhpMyAdmin can be used to carry out a ton of functions.
Our WordPress phpMyAdmin tutorial will show you how to use it to manage your site’s database. You will learn how to…
Before you take any of these steps, we recommend that you make a backup of your website. The database contains critical data from your site. In case you accidentally delete a table, row, or column, you can use the backup to restore your site to normal.
👉 Before we get to the specific use cases, let’s talk about how to access phpMyAdmin.
How to access phpMyAdmin
How you access phpMyAdmin will depend on which WordPress hosting provider you’re using.
If your host offers cPanel, you can get started by opening your hosting account and locating cPanel.

In cPanel, look for phpMyAdmin and select it.
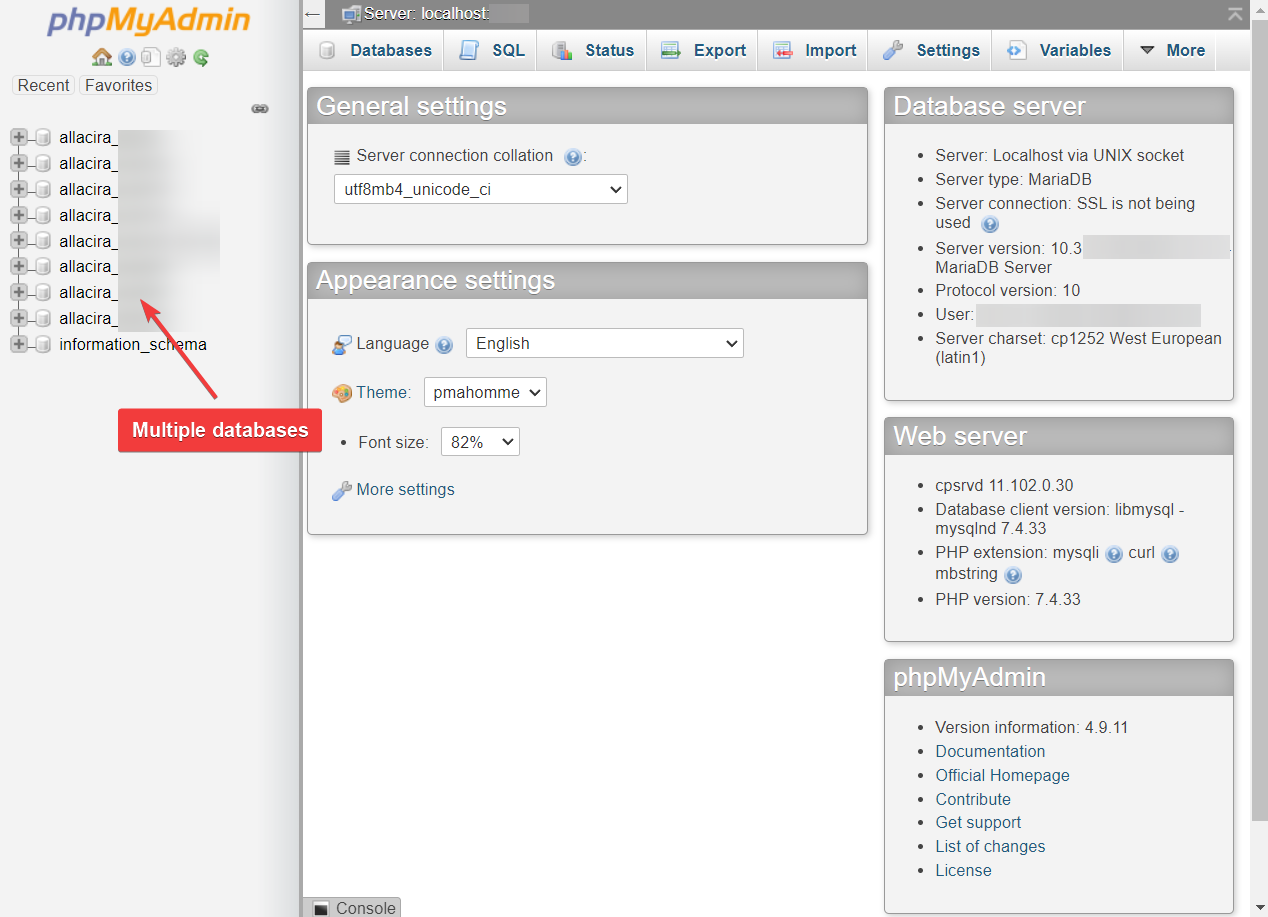
On the left side of the phpMyAdmin, you will notice one or more databases.
A single website has a single database. If you are hosting multiple websites in your hosting account, you might see multiple databases.
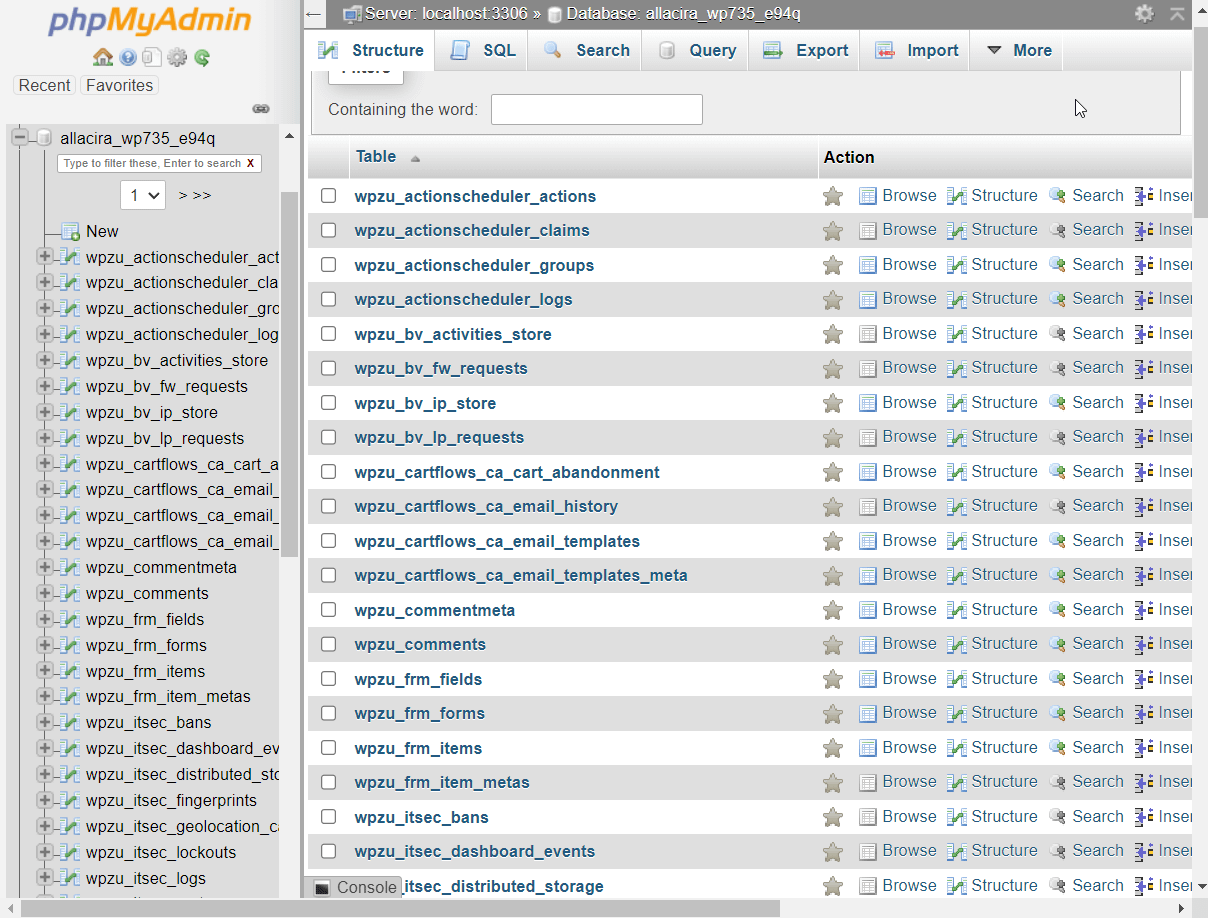
Select your site’s database and the right panel of your screen will be immediately populated with tables.
Now, let’s get into using this database access to perform specific actions. 🗃️
How to add a new WordPress admin user with phpMyAdmin
If you get locked out of your WordPress site, one common fix is to create a new WordPress admin user via phpMyAdmin.
To add a new admin WordPress user with phpMyAdmin, navigate to the wp_users table.
Some web hosts change the prefix of the table for security reasons. Just look for the table that has “_users” as the suffix.
For example, on our test site, it’s wpzu_users.

Next, in the wp_users table, select the Insert tab and fill in the following details: username, password, email address, date, and time for the user to be registered.
Make sure that the value for the “user_status” field is set to zero and in the “user_pass” field, select MD5 from the Function drop-down.

Leave the other fields empty and hit the Go button.
Go back and check the wp_users table. You should be able to see the new user added to the table.
Make a note of the value in the ID column.

Next, go to the wp_usermeta table and select the Insert tab. Fill in the following values:
- user_id: Enter the ID you copied in the previous step
- meta_key: Write wp_capabilities
- meta_value: Write a:1:s:13:”administrator”;s:1:”1″;
That’s it. Go to the end of the page and hit the Go button.
You have now added a new admin user to your WordPress website.
You can log in using those credentials and you’ll be able to fully control your site.

Change a username
Go to wp_users and select the Edit button located adjacent to the username you want to change.

Enter the new username in the user_login field. Leave every other field as is and hit the Go button.
You have now changed the username of your WordPress website.

Reset a user password
Go to wp_users and select the Edit button located adjacent to the username whose user password you want to change:
- Go to the user_pass field and enter the new password that you want to use.
- Use the Function drop-down and select MD5. This is needed to properly and securely store the password.
- Click Go.
Congratulations! You have successfully changed your user password from the WordPress phpMyAdmin.

Back up database
If you are planning to take manual backups of your database, then go to phpMyAdmin, select the database you want to backup, and hit the Export button.
Next, you will need to select an export method. The quick method will download the entire database and the custom method allows more control over the backup process. It lets you to select which tables to export, and compress the backup into a zip file, among other things.
Choose any of the export methods and hit the Go button.
The MySQL database will be downloaded to your local computer.

Import or export database
We already showed you how to export the database in the previous section. Here we will show you how to import a database using phpMyAdmin.
Before you start the process, you should have a database downloaded to your local computer. Then, go to phpMyAdmin and select the Import button. Upload the database using the Choose File option.
Leave all other fields as is and hit the Go button.

The import should take a couple of seconds. After the process is complete, phpMyAdmin will show you a success message.
Boost site performance
A WordPress website becomes bulky as you add users, posts, and pages and install new plugins and themes to your site. Some of these data (like from uninstalled plugins and themes) are unnecessary and tend to slow your site down. You can remove them and clean your database using a simple command in WordPress phpMyAdmin.
Select the database in your phpMyAdmin. Then scroll down and select the Check all / Check tables having overhead option.
Next, from the menu located beside Check all, select Optimize table. This will clean up the tables as well as boost your database performance.

📌 Side note: Some plugins help you optimize the database without you having to access phpMyAdmin. We have tested those plugins and written about them in these two guides: best database maintenance plugins and the best WordPress database management plugins.
Change WordPress database prefix to secure your site
In some situations, phpMyAdmin can help secure your website against hack attacks like SQL injection.
In MySQL injection attacks, hackers target the database and steal information like usernames and passwords which they use to break into your website.
You can make it more difficult to perform these types of injection attacks by changing your database tables’ default prefix (i.e., wp_) to something else (for example wp8p_).
If you want to do this on a live WordPress site, we highly recommend backing up your site before making changes. Doing this incorrectly will make your site stop working temporarily, so it’s good to have a backup.
To change the database prefix, go to cPanel, then select File Manager and click on the public_html folder.
Inside the public_html folder look for the wp-config.php file. Right-click and select Edit.

The file will open in a new tab. In this tab, look for the phrase $table_prefix. It contains your database prefix. Just replace it with something else.
Hit the Save Changes button located at the top of the screen before you exit the window.

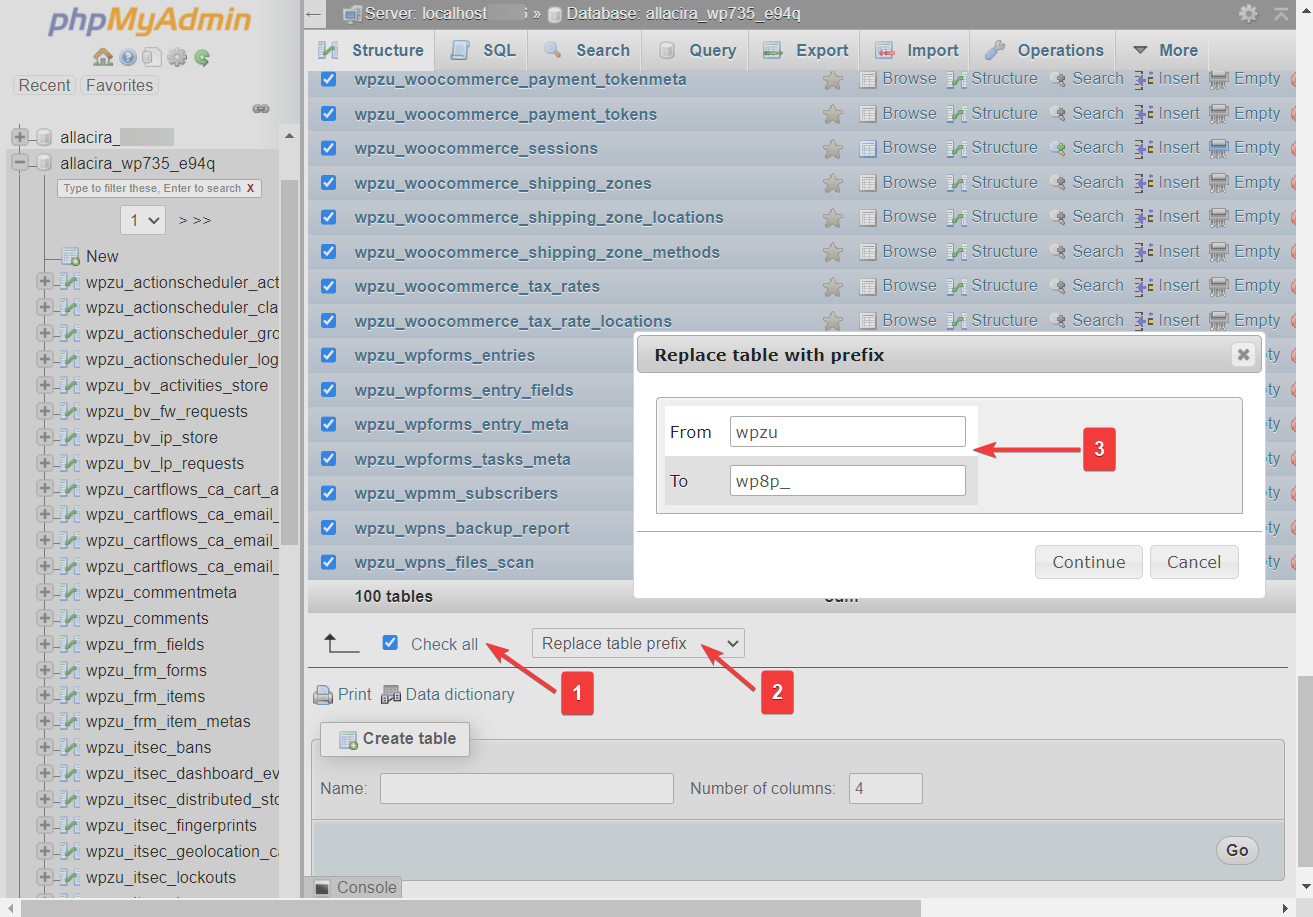
Next, open phpMyAdmin and select your database. Then, scroll down to the end of the page and click on the Check all option to select all the tables in your database.
From the dropdown menu, select the Replace table prefix and a popup will appear. Insert the name of the old and new database prefixes.
The database prefix for our demo site is wpu_. Be sure to insert the database prefix of your website in the From option.
After inserting the prefixes hit the Continue button and your database prefix will be changed.
Deactivate all WordPress plugins
If you’re debugging something on your site, you might have a situation where you need to manually disable all of your WordPress plugins without being able to access your WordPress dashboard.
Open your database and navigate to the wp_options table, scroll down to the active_plugins row, and select the Edit button of that row.
On the next page, go to the option_value box and delete all content. Then hit the Go button.

This will deactivate all the plugins installed on your site.
Change the WordPress theme
Go to the wp_options table, and find the rows called template and stylesheet. You will see the name of your active theme in these two rows.
To change your current theme you will need to replace the name of your active theme with the one you desire. You can do that by using the Edit button or double-clicking on the theme name.
Change the name in both the template and stylesheet rows and you would have changed your site’s theme.

Troubleshooting common database issues
Common database errors that you are likely to encounter on your WordPress website are:
- Error establishing a database connection
- No update is required, your database is already up-to-date
- Warning: require_once(path/to/file.php) function. require-once: failed to open stream: No such file or directory in…
In some cases, these errors can be caused by data corruption in your database. Luckily, phpMyAdmin offers a one-click solution for database issues. Here’s what you have to do:
Select your database, scroll down, and choose the Check all option. Then from the menu select the Repair table option and hit the Go button.
👨🎓 Learn more about how to repair the WordPress database.

Final thoughts on WordPress phpMyAdmin 🧐
PhpMyAdmin is a powerful tool that allows you access to your WordPress site’s database. It even helps you manage your website especially when you can’t access your site through the WordPress dashboard.
👉 In our WordPress phpMyAdmin tutorial, you learned how to perform a few key actions with phpMyAdmin:
- Add a new admin user
- Change username
- Reset user password
- Backup database
- Import and export database
- Boost site performance by optimizing the database
- Secure the site by changing the database prefix
- Deactivate installed plugins and change the active theme
If you still have any questions about how to use phpMyAdmin with your WordPress site, please let us know in the comments below.