
Are you wondering how to add a chatbot to a WordPress website? If that’s the case, then you’ve come to the right place.
Whenever you visit any website and find yourself lost in it, you’d always look for some assistant who can guide you through the website. And, there is nothing better than the customer support agents on the live chat.
However, sometimes the support team cannot be available all the time for your help and support. So, in order to fix this scenario, adding an Artificial Intelligence (AI) chatbot to your website can be a better alternative to it.
Hence, in this article, we’ll show how you can easily add a chatbot to your WordPress website. Here, we’ll walk you through some of the popular WordPress chatbot plugins and show you how you can use those plugins to add a chatbot to your website.
So, we hope that you all will stick with us till the very end of this article. Now, let’s get started!
What is Chatbot? Why Do You Need Chatbot on Your Website?
A chatbot is an AI-based computer program that simulates online conversation (either written or spoken) with human users. It acts as your digital assistant who can understand human capabilities.
It uses Natural Learning Processing and AI to understand human needs. And based on that response, helps end-users reach the desired outcome. In other terms, chatbots are simple computer programs that respond to your queries with a simple single-line solution.
Whether you want to or not, you might have probably interacted with a chatbot. For instance, when you visit any eCommerce website, you’ll see a window popping up on your screen asking if you need help.
So now here are some of the reasons why you need to have a chatbot on your website. Have a look.
- Chatbots can be available 24/7 to engage customers with immediate answers to the common questions asked by them.
- Helps any business website to gather information about their potential customers and use it to its advantage to increase sales.
- Chatbots can perform tasks frequently and at specific times which saves time.
- Easily save customer support costs of hiring more resources, infrastructure costs, etc.
- They can hold and communicate with multiple customers at once.
- Can expand their service to the global market by solving customer concerns and queries in multiple languages.
- Open a communication channel for customers to engage without the stress of interacting with another person.
These are a few of the benefits of using chatbots on your website. With that, in our next section let’s look at some of the best chatbot plugins that you can find for WordPress.
5 Best Chatbot Plugins for WordPress 2022
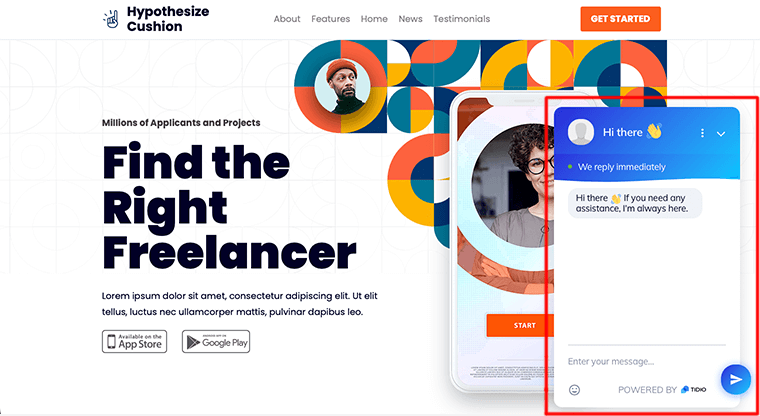
1. Tidio
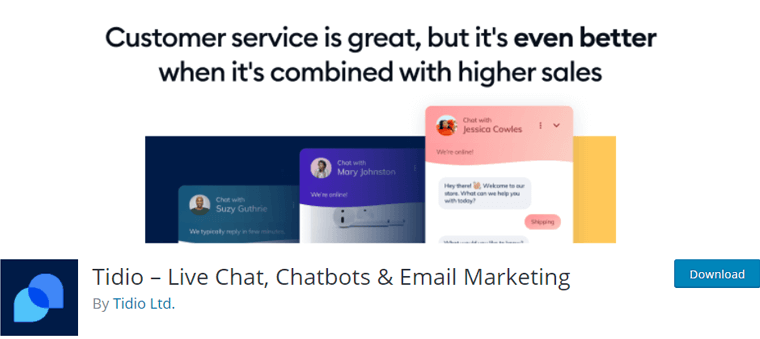
Tidio is an easy-to-use chatbot plugin for your WordPress website. It’s a free tool that comes with over a dozen templates for recovering abandoned carts, offering discounts and promotions, and collecting leads.
Likewise, it comes with a powerful drag-and-drop visual editor that lets you create chatbots from scratch (no coding required). It uses Natural Language Processing (NLP) technology that helps to quickly identify frequently used words and help your customers with simple inquiries.
Key Features:
- Comes with built-in chatbots that can automatically answer most common customer questions.
- Allows you to turn the live chat widget into smart pop-ups that can be triggered by defined action and fully customized.
- Provides quick responses to speed you up answering most common questions via live chat.
- Let’s combine chatbots with live chat so that no customer will ever be left without an answer.
- Also, you can trigger conversations by defined actions, or customize triggers to reach out at the right moment.
Pricing:
Tidio is a SaaS (Software as a Service) platform that comes with paid plans. You can buy one of its plans and integrate it into your WordPress website.
However, the best part is that the integration plugin is available free of cost on WordPress.org.
Whereas its premium plans can be purchased from its official website. And it comes in three premium plans –
- Communicator – $19/month; $190/year; with live chat + unlimited communications, up to 5 operators, and 24/5 live chat support.
- Chatbots – $39/month; $390/year; with chatbots + conversions with 40,000 users and 24/5 live chat support.
- Tidio+ – $289/month; $2890/year; with live chat + unlimited communications, custom number of operators, 24/5 live chat support, and 24/7 emergency phone support.
2. ChatBot
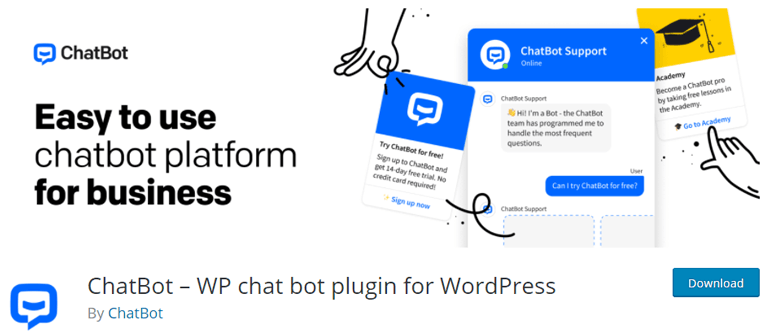
ChatBot is a powerful all-in-one platform that allows you to build and launch conversational chatbots without coding. You can easily make chatbots using their drag-and-drop chatbot builder.
Besides, it comes with pre-built templates that you can use as a starting point to get your AI chatbot quickly. Plus, you can add teammates to your ChatBot account and bring your team together to create better customer interactions.
Key Features:
- Includes a chatbot testing tool that allows you to test your story while you build it within the Chatbot web app.
- Comes with a customizable chat widget that lets you launch AI chatbots on your website in a couple of clicks.
- ChatBot Academy helps you master your bot-creating skills and complete your first chatbot with ease.
- Provides a powerful tool to retarget customers on Facebook, collect data, and spend money wisely on Facebook ads.
Pricing:
ChatBot is also a SaaS (Software as a Service) platform that lets you integrate one of its plans with your WordPress website.
Although, its integration tool doesn’t come with any free version. However, it offers you 14-days of free trial without any credit card information required.
In its premium version, you’ll get three pricing plans along with a custom plan called Enterprise.
- Starter – $42/mo billed annually; $50 on month-to-month term; 1 active chatbot, 1,000 valid chats/mo, 7-day training history, and data security.
- Team – $126/mo billed annually; $149 monthly; 5 active chatbots, 5,000 valid chats/mo, unlimited training history, team collaboration, version history, and data security.
- Business – $424/mo billed annually; $499 monthly; unlimited active chatbots, 25,000 valid chats/mo, unlimited training history, team collaboration, version history, and security assistance.
3. WPBot

WPBot is a free chatbot plugin for WordPress that allows its users to create bots within its live chat interface. It’s a plug n’ play AI website chatbot that you just need to install and will respond according to the website users.
Moreover, it comes with an advanced search algorithm that allows natural language phrase matching with user input. Indeed, it comes with a notification builder that lets you add multiple site notifications to show above the ChatBot icon.
Key Features:
- Allows you to adjust the phrase matching accuracy according to your need.
- You can add hyperlinks in response message content using HTML markup.
- Let’s create simple text responses easily from your WordPress backend.
- Allows you to add images from your WordPress media library or Giphy animated gif images easily from the ChatBot language center with the floating image options.
- Also, you can create different retargeting messages for different pages and collect user emails for newsletter subscriptions.
Pricing:
You can download the free version of the WPBot plugin from WordPress.org and its official website as well.
However, for more additional features, you need to upgrade to a premium version where the pricing plans are:
- Personal – ($29 for each 1 year); install on 1 site, 1-year auto upgrade and support, and lifetime usage.
- Master – (for $88.00); install on upto 100 sites, lifetime auto upgrade, priority support, and no renewal.
- Ultimate – (for $199.00); install on upto 100 sites, lifetime auto upgrade, priority support, live chat addon, white label, and WhatsApp integration.
4. Smartsupp
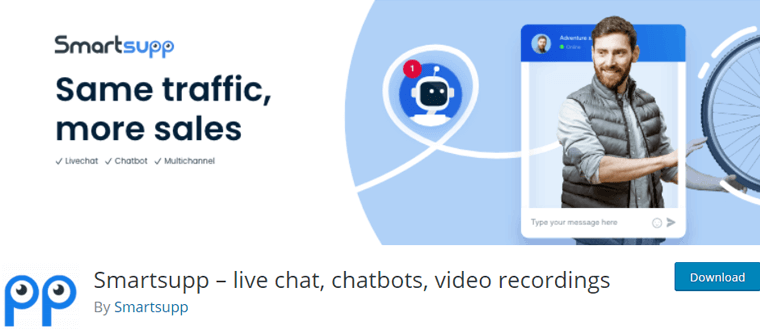
Smartsupp is another efficient plugin for WordPress that acts as your shopping assistant while shopping online. It combines the power of both live chat and chatbots to save your time and help you turn visitors into loyal customers.
You can automate repetitive questions or be personal where it’s relevant and know more about your visitors. Moreover, it gives access to a real-time visitor list with eCommerce data and helps you proactively start a conversation to make a sale.
Key Features:
- You can video record your conversion and see how your visitors are browsing your webshop or website and where they are getting lost.
- Offers human customer service in 7 different languages.
- Allows you to customize the look of the chat to match your brand colors and add your brand logo to the chat.
- With their mobile apps for iOS and Android, you can chat with your customer from anywhere.
- Let’s measure the impact chatting has on conversions in Google Analytics.
Pricing:
Smartsupp is a freemium WordPress plugin which means it has both free and paid versions. You can download its free version from WordPress.org.
Meanwhile, its premium version has two pricing options:
- Standard – $19.5/month in yearly term; $25.5/month in monthly term; 10K video recording per month, 5 automatic messages, 1 chatbot, and 1-year conversations history.
- Pro – $48/month in yearly term; $60/month in monthly term; 50K video recording per month, 10 automatic messages, 1 chatbot, and 3-year conversations history.
5. Crisp

Crisp is a free and easy-to-use plugin that includes live chat, real-time notifications, a chatbot, and an availability schedule. It helps you simplify your customer support by offering a wide range of features.
Similarly, it allows you to create a personal and modern conversational experience using GIFs and videos. Indeed, with Crisp, you can co-browse with your website visitor without any other plugin. Also, it lets you connect the Crisp Live Chat to social networks like Messenger and Instagram.
Key Features:
- Can share files, images, and documents directly from the chat widget.
- An inbuilt fun game called CrispBird that helps to keep your visitors engaged when you’re offline.
- Allows visitors to access help articles and resolve issues directly from the Live Chat.
- Enables you to translate your chat messages to your customer’s language in real-time.
- Also, you can build advanced chatbot scenarios to automate your customer onboarding.
Pricing:
Crisp is a SaaS (Software as a Service) platform that integrates with your WordPress website. Its integration plugin is available free of cost on WordPress.org.
Whereas the premium version offers two different pricing plans:
- Pro – $25/month; includes unlimited history, audio messages, private notes, block users, and email.
- Unlimited – $95/month; includes a knowledge base, analytics, video chat, touting/assign, status page, and user ratings.
How to Add a Chatbot to Your WordPress Website?
We just looked at a few of the best WordPress chatbots plugins. These are quite popular ones that allow you to integrate chatbots on your WordPress site.
Anyway, now we’ll look at how we can add chatbots to our WordPress site using one of these plugins. For now, we’ll go with Tidio to see how we can add chatbots to our WordPress site.
Step 1: Install and Activate the Plugin
To install the plugin, first, you need to log in to your WordPress dashboard and then navigate to the Add New button within the Plugins menu.
Following that, at the top right side of the page, you’ll see a search field box. There you’ll need to type “Tidio” and look for the plugin.
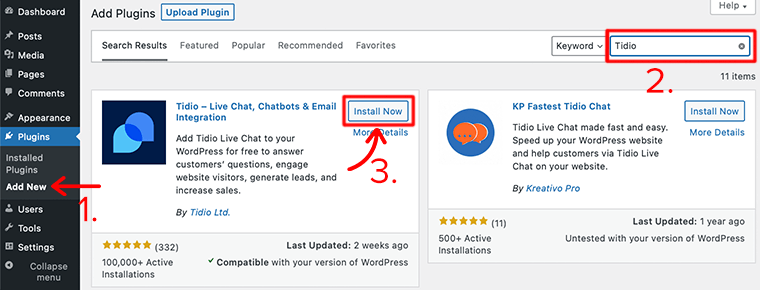
Once you’ve found the plugin, click on the Install Now button. After the installation is completed, click on the Activate button and you’re done.
So in this way, you install and activate the free version of the Tidio plugin on your WordPress website.
Similarly, you can also install its premium version by purchasing its plan from its website. To learn more on how to install and activate the premium plugin in WordPress, check out our step-by-step guide on how to install a WordPress plugin.
Step 2: Create a Tidio Account
Now that you’ve successfully installed the plugin to your WordPress, if you go back to your Plugins section, you’ll see the Tidio Chat option added to the menu list.
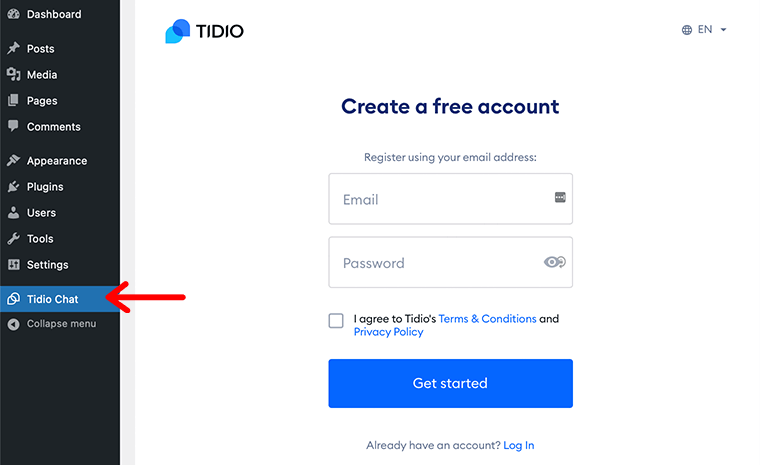
Once you click on that option, it’ll first ask you to create a free Tidio account to be able to use the plugin. If you haven’t registered your account before, then this can be a good time to do this.
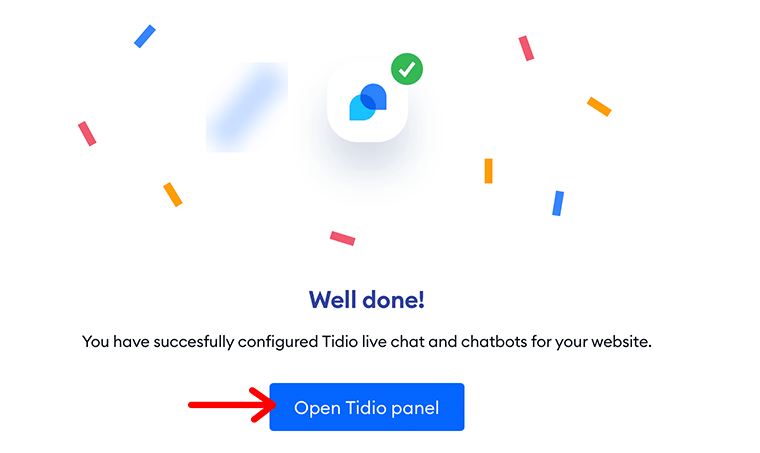
Once you’ve registered your account, it’ll ask you to choose a project that you want to integrate with the Tidio account. After you’ve selected the project, it’ll take you back to your WordPress dashboard. This means you’ve successfully configured Tidio live-chat and chatbots for your website.
With that click on the blue Open Tidio Panel button to begin the initial setups of your live chat.
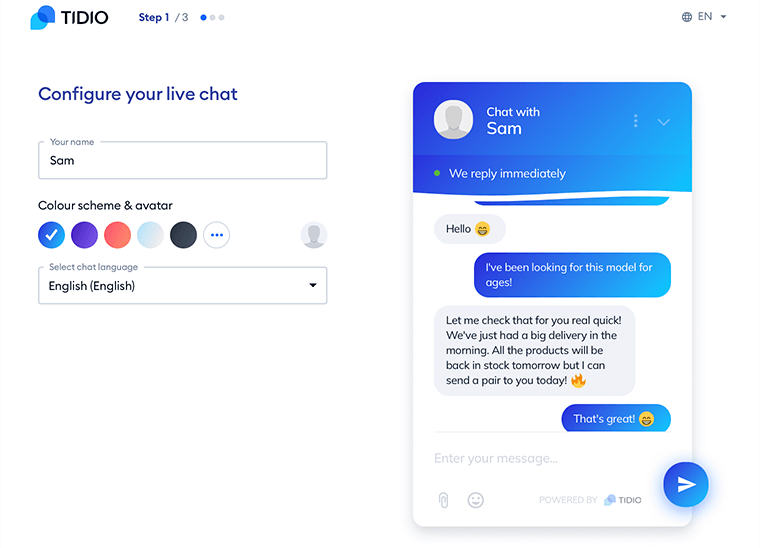
Step 3: Configure the Initial Setup of Your Live Chat
Followed by clicking on the button, it’ll start the basic configuration of your live chat. On its first configuration page, it’ll ask you to choose the name, and color scheme, and select chat language.
After that, on the next page, it’ll ask you for some more additional information to know about your website. So that, it can help you to improve your experience and help achieve better results. Such as the purpose of the chatbot, the number of support agents, and your industry type.
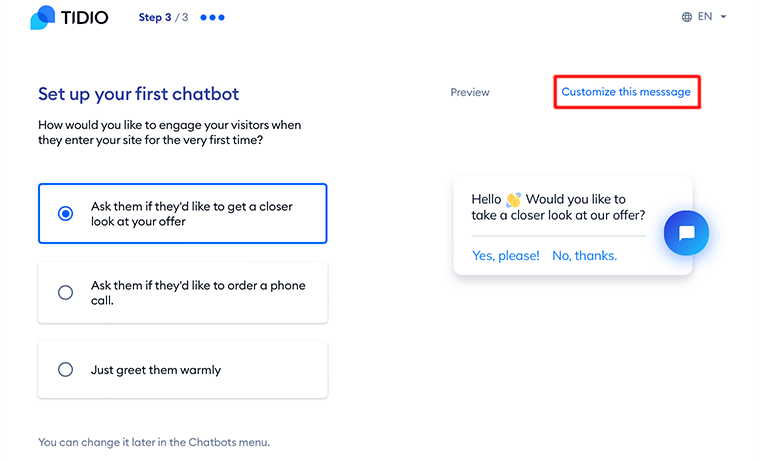
Lastly, it’ll ask you how you would like to welcome your visitors when they first visit your website. You can choose the option from the list and can also customize that message the way you want to.
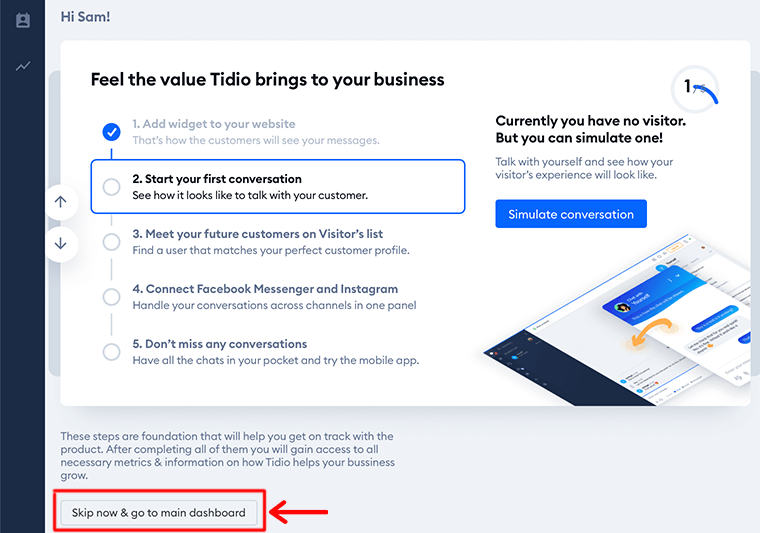
Once you’ve configured all the settings, you can now click on the Continue button located at the bottom of the page. On clicking that button, it’ll take more setting options you can configure at the very beginning. Or else you can skip now and go to the main dashboard.
Step 4: Setup a Chatbot for Your Website
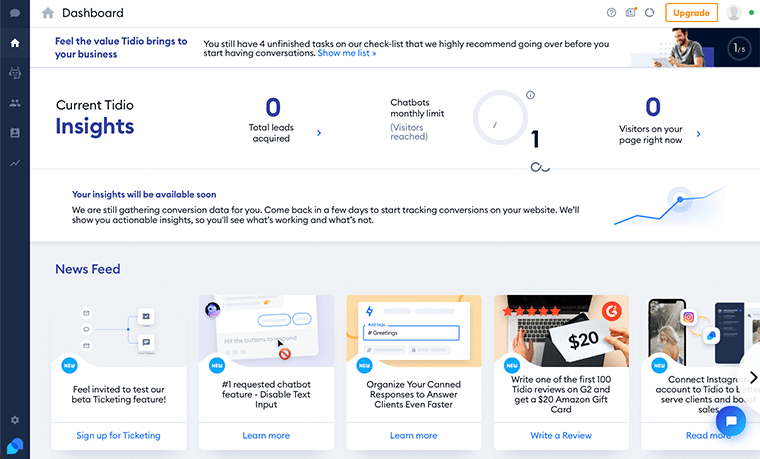
Now that we’ve completed configuring the setting, it’ll redirect us to our official Tidio dashboard which looks like this:
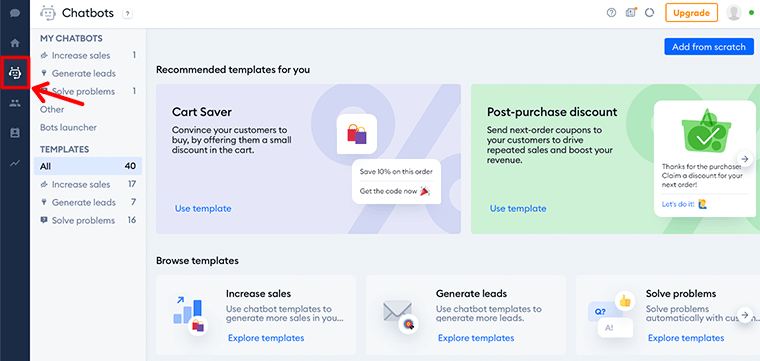
Now that to add a chatbot to your website, click on the chatbots 🤖 icon (third option from the top) from the left sidebar. After that, it’ll take you to the recommended chatbot templates panel. Here you’ll find the recommended templates based on the provided information in the registration process.
Followed by it, you can browse templates, customize them, and enable them on your website.
Now from there navigate to the My Chatbots tab, bots launcher, or all the templates view on the left side menu.
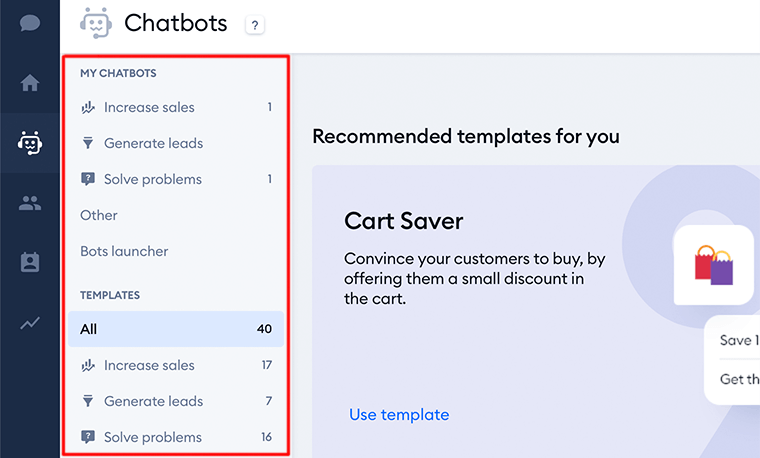
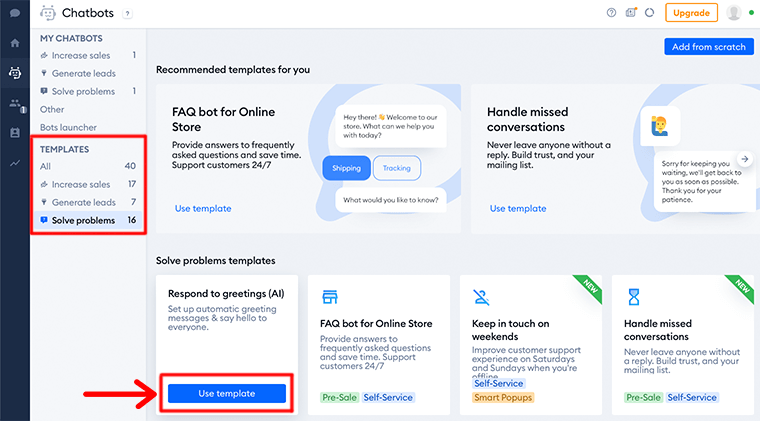
Under the Chatbots Template section, you can look for the templates based on the goal you want to achieve. You can choose a chatbot from the following categories:
- Increase Sales
- Generate Leads
- Solve Problems
Or else you can few all the templates under one roof with the All section. Now once you find a template you’d like to use; hover the mouse over the template and click on the Use Template button.
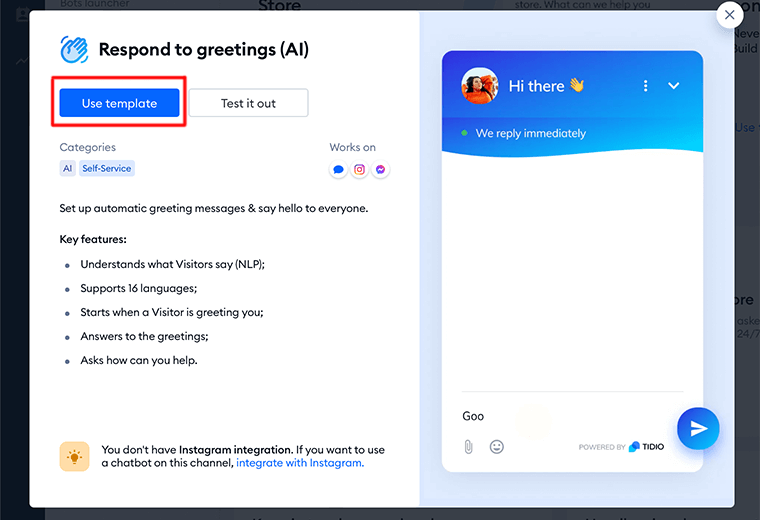
This will then pop up a window asking you to click on the Use Template button or the Test it out button to test it before adding it.
When you click on the Use Template button, it’ll take you to the Visual Chatbots Editor. Here you can edit the pre-defined text inside the chatbots. All you need to do is click on each node (actions, trigger, conditions) and edit the texts from the right-hand editing window.
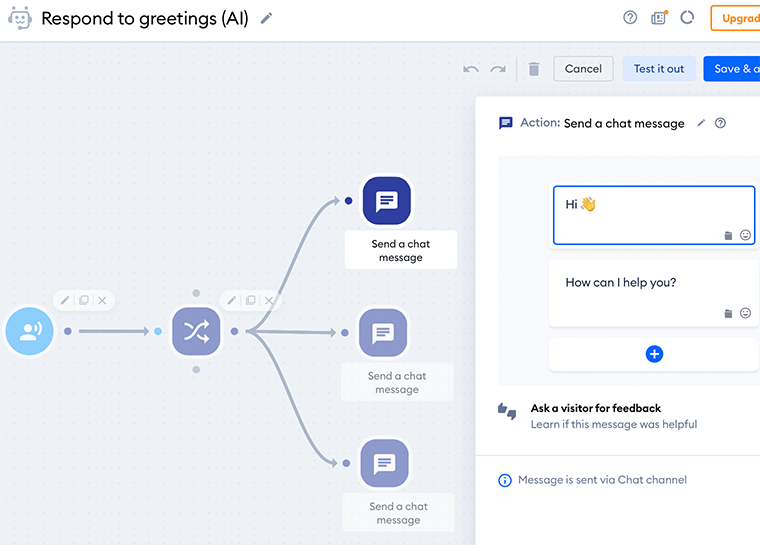
Once you’ve edited the chatbot message the way you want, you can click on the Test it out button before you go live with it. Following that, you can click on the Save & Activate button.
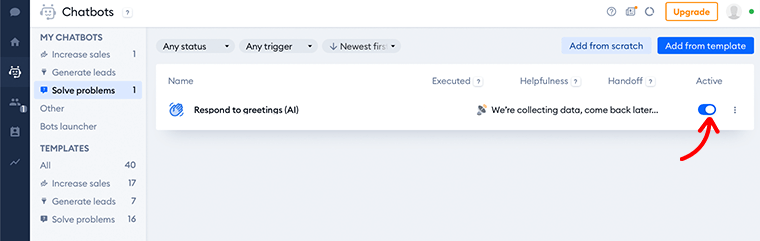
After that, it’ll redirect you to the My Chatbots list and you can find there your very first chatbot created for your website. Just make sure that the Active toggle bar is enabled so that it can be visible on your website.
Step 5: Final Result
Lastly, once you’ve activated the toggle bar, make sure you visit your website and see whether the chatbot widget has been added to your website or not. You’ll find the widget at the bottom right corner of your website.
Therefore, in this way you can easily add a chatbot to your WordPress website. Further, if you want to customize your chatbots, you can do it later too.
In this way, we showed you how you can add a chatbot using a Tidio plugin on your WordPress website. Similarly, using other chatbots plugins, you can do the same thing. Just make sure that you follow their instructions and guides from their Knowledge Base to be on the right track.
Frequently Asked Questions – FAQs
A chatbot is an AI-based computer program that interacts with humans via a chat interface.
Chatbots act as your digital assistant that helps you to connect with customers in a personal way without the expense of human representatives. Plus, chatbot-based virtual assistants can handle simple tasks and allow humans to focus on other important responsibilities.
Conclusion
Well, that’s all for now!
In this article, we’ve shown how you can add a chatbot to your WordPress website. We hope that’ll help you to know all the steps to add a chatbot to your WordPress website.
So, if you’ve any queries or suggestions regarding this article, then let us know in the comment below. Besides, you can also share your experience of adding chatbots to your WordPress website.
You can also check out our article on the best WordPress survey plugins for your site and the best WordPress lead generation plugins.
Also, don’t forget to follow us on Facebook and Twitter for more useful updates.