Wondering how to add keywords and meta description in WordPress? Then, you’ve entered the right place.
Both keywords and meta descriptions are crucial elements of a WordPress website for better ranking on search engines and gaining traffic.
So, if you’re curious to learn how to add keywords and meta description in WordPress, read the article until the end.
What is Keyword and Meta Description in WordPress? (A Brief Overview)
Before knowing how to add keywords and meta description in WordPress, let’s briefly overview them first.
Keyword/focus keyword is the search term people enter on the search engines to find the answer to their queries. A keyword can be a single word, a bunch of words, or even a phrase.

For instance, if you want to look for a vacation resort, your keyword can be ‘Best Resort for Vacation.’

Likewise, a meta description is like the trailer of your posts. It’s a short description that gives insight to your visitors on what to expect from your posts.
Therefore, it should be clear, concise, and appealing to your visitors.
Why is It Important to Add Keywords and a Proper Meta Description in WordPress?
Adding Keywords and meta description allows Google and users to understand your content better.
Without the proper keywords added to the content, search engines won’t be able to display the relevant results to users’ queries. It means users won’t be able to find your content.
Thus, adding correct keywords is vital in driving traffic to your site.
On the other hand, a meta description is a brief description of your pages/posts. In Google search results, meta descriptions are displayed below the content’s title.

So, writing a compelling meta-description can trigger your audience to read your content, improving the click-through rate.
And when you have a good click-through rate, there’s a better chance of ranking your posts higher.
That’s why adding keywords and meta description in WordPress is essential.
Luckily, several Search Engine Optimization (SEO) plugins enable you to add keywords and meta descriptions in WordPress easily.
So, let’s discuss some of the best WordPress SEO plugins to add keywords and meta descriptions now.
Best WordPress SEO Plugins to Add Keywords and Meta Description in WordPress
1. Rank Math
Rank Math is an amazing WordPress SEO plugin offering every functionality required to improve SEO and attract more traffic.
Most importantly, this SEO plugin is powered by AI (Artificial Intelligence) to help you create SEO-friendly content.
Contrary to other plugins, Rank Math lets you optimize unlimited keywords. Also, it has LSI (Latent Semantic Indexing) keyword tool integrated to give you multiple keyword variations for focus keywords.
Besides, you can add an effective meta description that shows up in the search results. Further, it also has an internal link suggestion feature for current posts to improve ranking in SERPs.
Major Rank Math Highlights
- Easy-to-follow setup wizard
- Integrated with Google Analytics and Google Search Console
- Full control over your site with a role manager
- Lightweight code for an amazingly fast-loading site
2. Yoast SEO
With over 5 million users worldwide, Yoast SEO is one of the most power-packed SEO plugins to help your site stay ahead of competitors. It provides everything you need to manage your site’s SEO.

It comes with an SEO analysis tool to help you write SEO-friendly content. Likewise, the readability analysis ensures that your content is understandable, and it also provides room for improvement.
On top of that, you can preview how your listings look, both on the desktop and mobile, with the Google Preview option.
Also, optimizing your site structure is a breeze with cornerstone content and internal linking features.
Major Yoast SEO Highlights
- XML sitemaps to help Google understand your site structure easily
- Schema blocks to show FAQ and How-to content directly in the search results
- Full support for languages like English, German, French, Dutch, Spanish, and more
- Prevent the ‘404: page not found’ error with a redirect manager
3. All in One SEO (AISEO)
All in One SEO is one of the most comprehensive WordPress SEO plugins to improve your website’s SEO ranking.

With this easy-to-set-up SEO tool, you’ll be able to set up features such as meta title, meta description, keywords, XML sitemap, etc., in less than ten minutes.
Further, it supports various webmaster tools like Google Search Console, Bing webmaster tools, Yandex webmaster tools, Google Analytics, etc. Thus, enabling you to measure your SEO results and progress.
AISEO also integrates seamlessly with popular social media platforms like Facebook, Twitter, Pinterest, etc. Thus, your website preview is optimized for search engines and social media networks.
Major All in One SEO Highlights
- Supports SEO redirects including, 301, 302, 307, 404, etc.
- Automatic image SEO for higher ranking of images
- Local business SEO module to improve your local business SEO
- Rich snippet schema for improving SEO rankings
4. SEOPress
SEOPress is a simple, fast, yet powerful WordPress SEO plugin to improve your ranking and traffic. It’s now powered with AI to help you generate meta titles and descriptions automatically.

That’s just the tip of the iceberg. You can further analyze your content with unlimited keywords to optimize it for search engines.
Additionally, you can create your custom XML and HTML sitemaps to better index your content in search results.
Besides, the Google Preview option lets you see how your posts look in Google search results.
Major SEOPress Highlights
- Seamlessly integrates with WordPress themes and page builders
- Optimize images for better SEO
- WooCommerce SEO to improve sales of your eCommerce site
- Allows import/export of settings from site to site
5. Premium SEO Pack
Premium SEO Pack is a premium SEO plugin with advanced SEO features for your WordPress site. From optimizing images and links to setting up custom page titles and meta descriptions, the plugin has it all.

Further, with this SEO plugin, you can generate three types of sitemap. They are General, Image, and Video sitemaps. Thus, Google can easily find your web pages.
Most importantly, Premium SEO Pack comes with an exclusive Mass Optimization module. With this module, you can optimize all your posts, pages, and custom taxonomies in just one click of a button.
Additionally, mass optimization of meta titles, meta descriptions, and meta keywords is also possible. Thus, with Premium SEO Pack, you can optimize your website in no time.
Major SEO Pack Highlights
- CSS and Javascript minification for a faster-loading website
- Enables you to add rich snippets as shortcodes
- GTmetrix module to determine the performance of your site
- Offers different redirection options like 301, 302, 307, 403, 404, etc.
How to Add Keywords and Meta Description in WordPress? (Step-by-Step)
And now, it’s time to learn how to add keywords and meta description in WordPress.
We’ve explained two ways to add keywords and meta description using popular plugins Rank Math and Yoast SEO. So, you can use any of the preferred methods.
Now, let’s dive into the step-by-step process.
A. Using Rank Math
First, we’ll learn how to add keywords and meta description in WordPress using the Rank Math plugin. All you have to do is follow the step-by-step process as follows:
Step 1. Install and Activate the Rank Math Plugin
Before anything else, you must first install and activate the Rank Math plugin on your site.
For this, go to Plugins >> Add New from your dashboard.
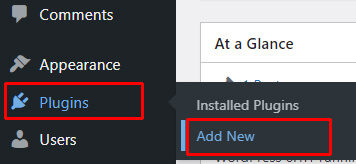
Now, search for the plugin from the Add Plugins page by typing Rank Math in the search bar.
When the plugin displays, click the Install Now button to install it. The plugin is installed immediately.
After that, click the Activate button to activate the plugin on your site.
Soon after the activation, you’ll be asked to connect your website with a free Rank Math account.
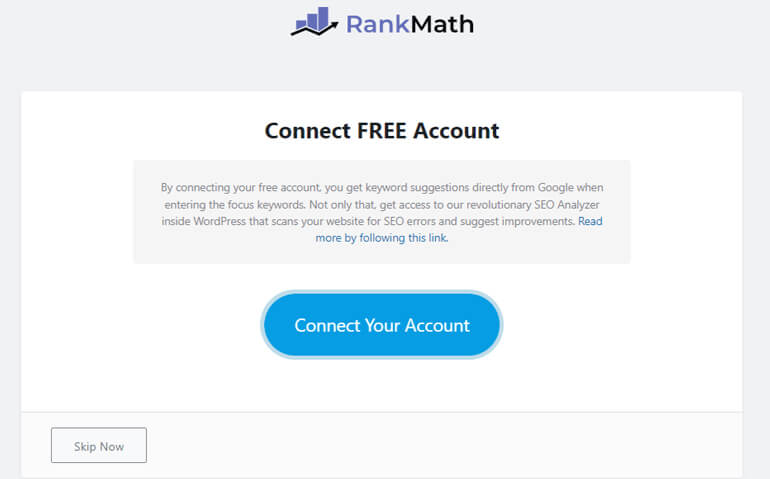
Connecting your site with Rank Math has many benefits. For example, you can get Google keyword suggestions, in-depth analysis, and more.
However, it’s completely optional. So you can also skip this process by clicking on the Skip Now button.
After that, it displays the setup wizard, which we’ll discuss in the next section.
Step 2. Configure the Rank Math Plugin
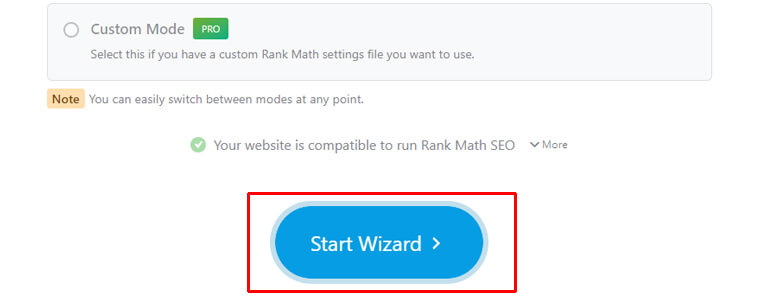
The next step is to configure the Rank Math plugin. But before starting the configuration, choose from the Easy or Advanced mode at your convenience.
If you want to make basic changes and let Rank Math do most of the work, choose Easy mode.
Contrarily, if you want to take full control of your site’s SEO, then choose an Advanced mode.
Additionally, for the premium Rank Math users, Custom Mode is also available.
Once you select an ideal mode, click on the Start Wizard option.
Now, you’ve to go through five steps of the setup wizard process as follows:
- Your Site: Here, fill in your site’s details, like the website’s name, alternative name, etc. You can also add a logo for Google and the default social share image.
- Analytics: This step lets you connect your site to the Rank Math account for several benefits. However, it’s not mandatory.
- SiteMap: From here, you can enable/disable XML sitemaps to help search engines index your content. Besides, you can select which type of posts or pages you want to include in your sitemap.
- Optimizations: This step enables you to automate a few of the SEO tasks such as making external links no follow, redirecting attachment pages, etc.
- Ready: From here, you can enable the auto-update of the plugin. Afterward, you can return to the dashboard or the help page. Likewise, you can also configure advanced options like role manager, 404 redirects, and schema markup.
Once you configure important Rank Math plugin setting options, you can start adding keywords to your posts and pages.
Step 3. Add Keywords to the Posts and Pages
Adding keywords to the pages and posts requires a similar process. So, here we’ll illustrate how to add keywords to the posts. You can also follow a similar method to add keywords for your pages.
First, open the existing posts where you want to add the keywords. For this, you can go to Posts >> All Posts and hit the Edit option to open up the post.
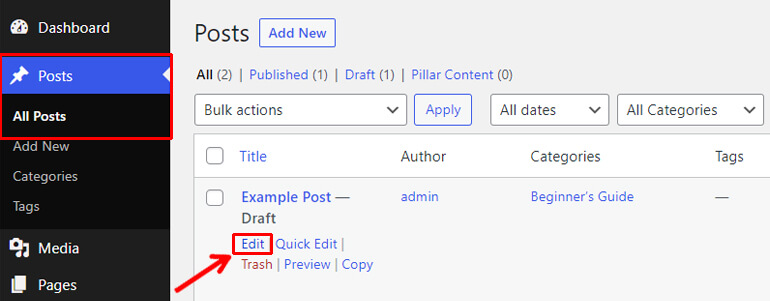
Contrarily, you can also navigate to Posts >> Add New to add a new post.

After adding content, you can optimize it with Rank Math to get the maximum traffic.
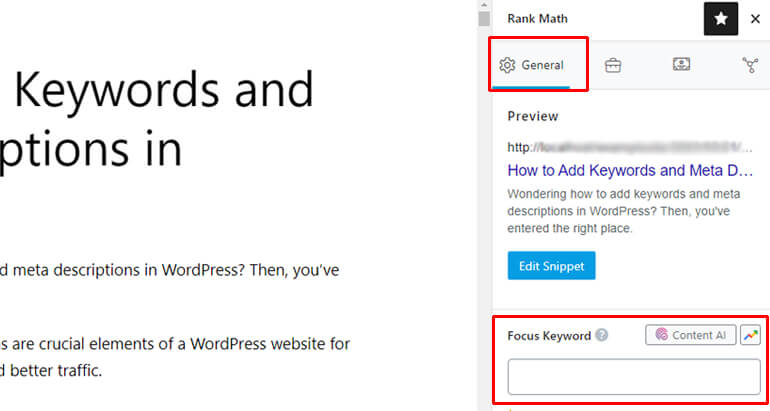
So, click on the SEO Score button at the top right corner.
This will open up the Rank Math toolbar divided into four separate tabs as follows:
- General: This tab lets you edit snippets, set focus keywords, analyze basic SEO, title & content readability, etc.
- Advanced: It lets you set meta robots like index, no index, no follow, no archive, no snippet, etc. Plus, you can also set canonical URLs.
- Schema: From here, you can configure schema markup.
- Social: This tab lets you set up Open Graph and Twitter Cards information.
Thus, you can easily add your keywords from the General tab.
As seen in the image above, you can insert the keywords you want to rank for in the Focus Keyword section.
The first keyword you add is a primary keyword. It’s denoted by an asterisk (*) sign at the left corner of your primary keyword. And the rest of the keywords you add are secondary keywords.
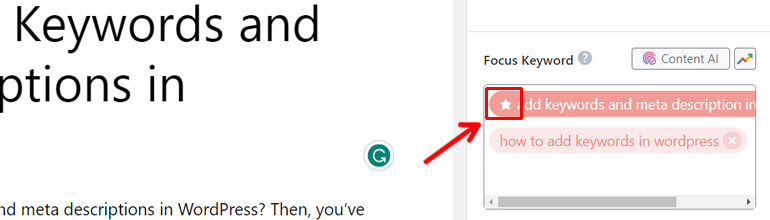
The free version of Rank Math allows you to add up to five keywords to optimize your post around them. If you want to choose unlimited focus keywords for your posts, you need to upgrade to the pro version of the plugin.
Once you enter your focus keywords, they’ll change the colors to depict how well the post is optimized for the given keywords. Mainly, there are three color representations:
- The red color indicates that the post isn’t optimized well for the keywords.
- The yellow represents that the post is moderately optimized for the keywords.
- The green color means the post is well-optimized for the keywords.
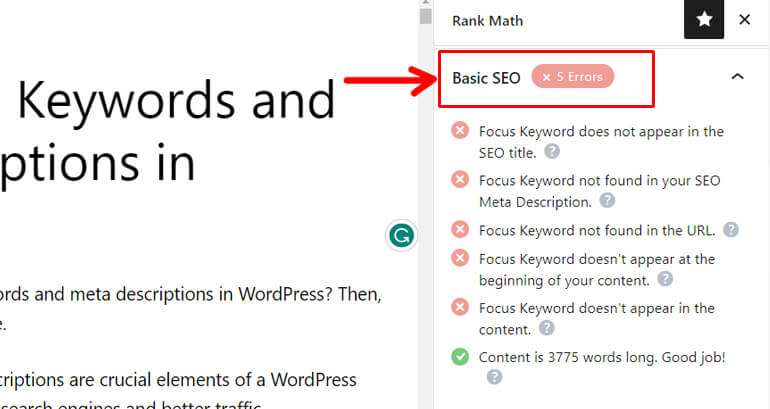
Thus, there are several tests that you must pass before you get a good SEO score overall. These tests are divided into four major categories as follows:
I. Basic SEO
Like its name, this section provides basic or foundational SEO tips for optimizing your post. Some tips that you will find in this section are as follows.
- Using primary focus keywords in SEO title
- Incorporating primary focus keywords while writing a meta description
- Adding primary keywords in the URL
- Using the primary keywords at the beginning of the content
- Distributing focus keywords evenly in the content
- Optimizing the length of the content
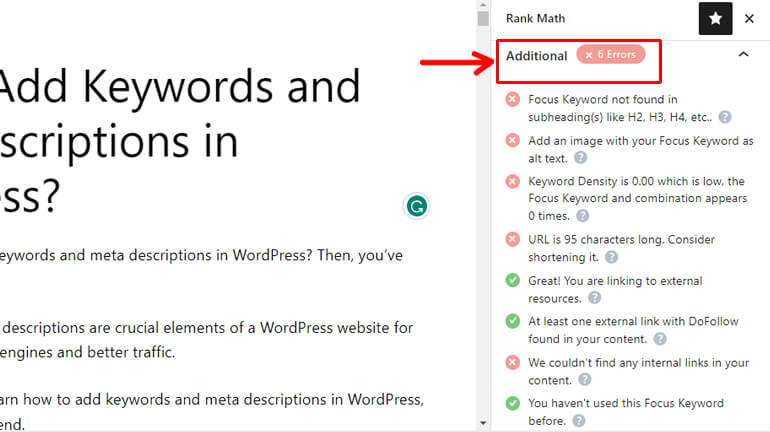
II. Additional
The additional section provides additional actionable tips for better SEO impact. These actionable tips are given below:
- Adding primary and secondary focus keywords in the subheadings
- Inserting focus keywords in the image alt attributes
- Maintaining good keyword density where possible
- Keeping the URL short
- Linking out to external resources
- Linking to external resources using a followed link
- Linking to internal resources
- Using unique focus keywords that haven’t been used before
- Using Rank Math’s Content AI for optimizing posts for the given keywords
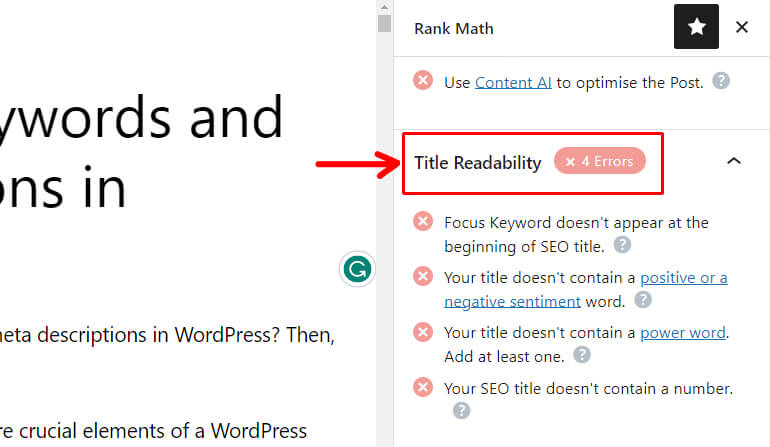
III. Title Readability
This section tests how readable and engaging your post title is. Different tests performed under this section are as follows:
- Use of a focus keyword at the beginning of the title
- Use of positive or negative sentiment in the title
- Addition of a power word
- Use of a number in the post title
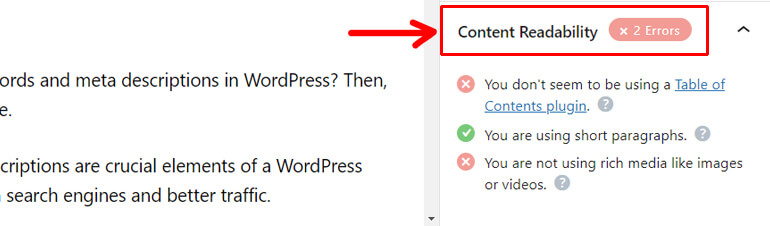
IV. Content Readability
The last one is the content readability section. It helps you improve the content and lets you present it in a delightful way to your readers.
So, this is how you can add keywords in WordPress and optimize your post with them for ranking higher.
In the next step, we’ll learn how to add meta description in WordPress.
Step 4. Add a Meta Description to the Individual Posts and Pages
From the same General tab, hit the Edit Snippet button at the top.
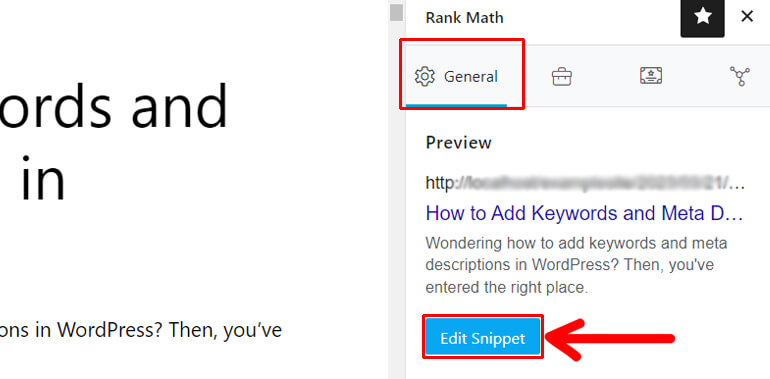
After that, just below the SEO Title and Permalink addition section, you’ll find the Meta Description box where you can enter the meta description for your posts/pages.
As you can see, Rank Math limits the meta description to 160 characters. Besides, it also shows the exact pixels (px) that your meta description will cover on the search results page. The maximum limit provided by Rank Math is 920px.
Thus, it’s easy to achieve the optimal length for your meta description with the Rank Math plugin.
Besides, the Title and Meta Description section also supports variables. So, you can utilize those variables from the drop-down list as per your need.
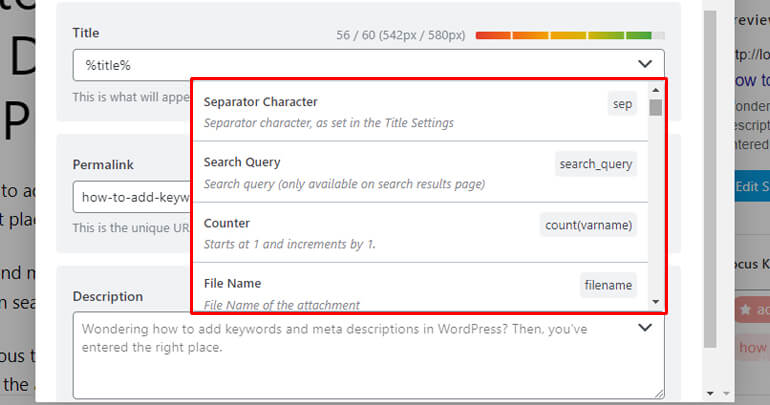
Some of the variables supported by Rank Math are
- Separator Character
- Search Query
- Counter
- File Name
- Site Title
- Site Description
- Current Date
- Current Day
- Current Month
- Current Year, etc.
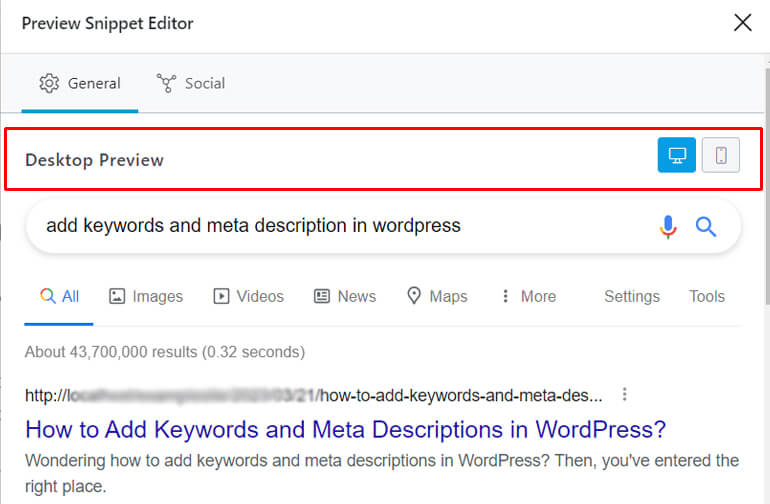
Above all, you can also get a desktop and mobile Google Preview to see your post’s appearance in search engine results.
Step 5. Add Meta Description to the Homepage
Rank Math also lets you easily add meta titles and description to the homepage.
For this, go to Rank Math >> Titles and Meta.
Then, click on the Homepage tab. After that, you can add the title tag for your homepage and enter a meta description.
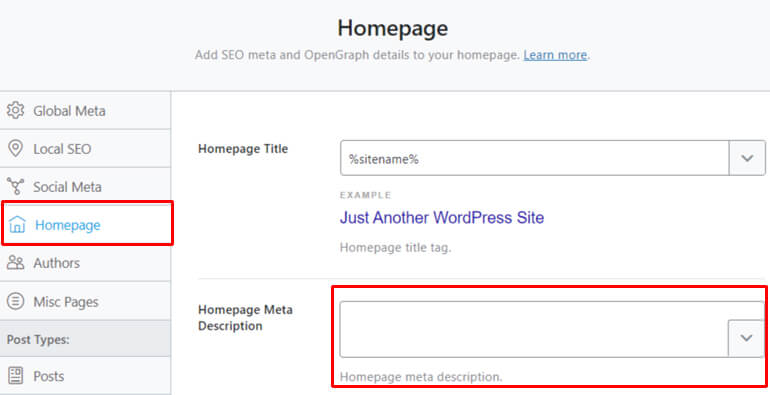
Further, you can also utilize different variables from the drop-down list to create dynamic meta descriptions.
Thus, Rank Math is a great SEO plugin to add keywords and meta description in WordPress. And if you have any doubts regarding this, you can check out the Rank Math review.
B. Using Yoast SEO
Now, it’s time to learn how to add keywords and meta description in WordPress using the popular Yoast SEO plugin. Without further ado, let’s begin.
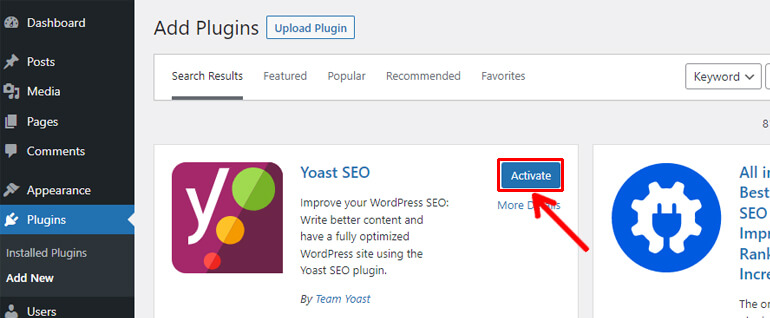
Step 1. Install and Activate the Yoast SEO Plugin
To begin adding keywords and meta descriptions in WordPress with Yoast SEO, you’ll first need to install it.
So, just like before, go to Plugins >> Add New, then type Yoast SEO in the search bar. Click the Install Now button once the plugin displays.

After that, activate the plugin on your site by clicking the Activate button.
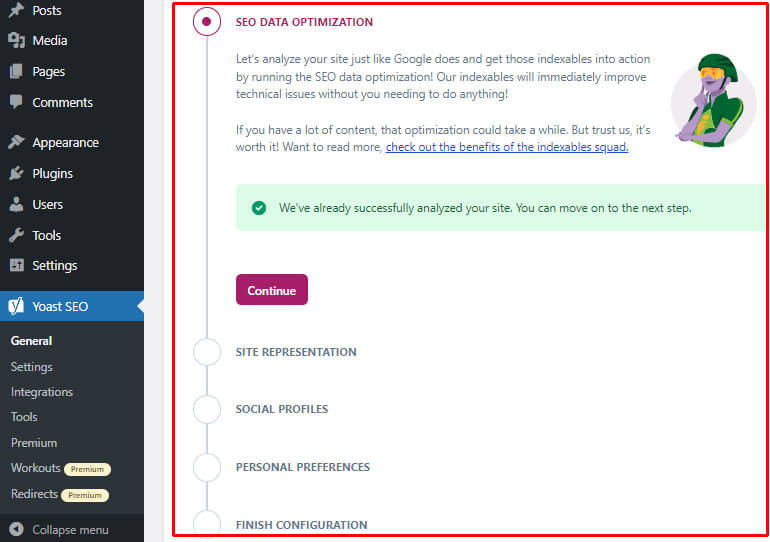
Step 2. Configure the Yoast SEO Plugin
Soon after activating Yoast SEO, you can either Start First-time Configuration or Skip to the dashboard.

However, we recommend going through the setup wizard to configure important settings.
There are a total of five steps in the Yoast SEO setup wizard. They are listed below:
- SEO Data Optimization: This step analyzes your site and runs SEO data optimization.
- Site Representation: Here, you need to fill in the details about your site, like the website’s name, organization name, and organization logo.
- Social Profiles: This step requires you to fill in your organization’s Facebook and Twitter profiles to optimize metadata for those platforms.
- Personal Preferences: Here, you can agree or disagree to let Yoast track your site’s data. Also, you can sign up for the Yoast newsletter to remain updated with the latest SEO news and guidance.
- Finish Configuration: This step completes the configuration process. So, you can visit your SEO dashboard.
Next, you can proceed to add keywords to your posts and pages.
Step 3. Add Keywords to the Posts and Pages
Before anything else, open the pages or posts you want to optimize for your target keywords as mentioned before.
Alternatively, navigate to Posts/Pages >> Add New to add a new post/page.
Now, scroll down to the bottom of the post/page to find the Yoast meta box. The meta box divides the SEO settings into four tabs as follows:
- SEO: You can add focus keywords, SEO titles, slug, meta descriptions, and view SEO analysis from this tab. Also, Google Preview allows you to quickly view how your listings look on desktop and mobile devices.
- Readability: It allows you to view readability analysis and get suggestions for improvement.
- Schema: You can describe your page using schema.org from this tab.
- Social: You can configure Open Graph and Twitter Cards information from here.
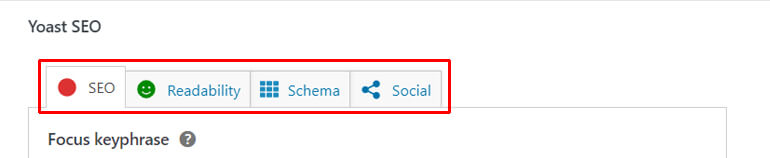
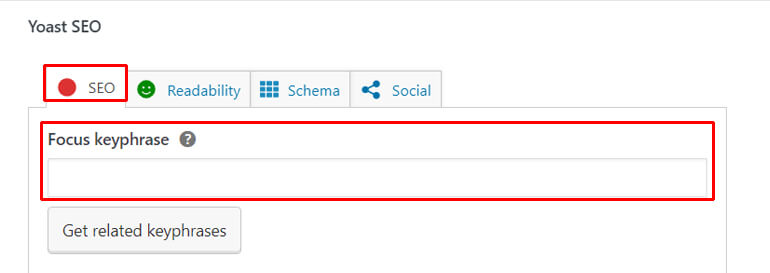
Hence, you can easily add your focus keyword from the SEO tab.
Similar to Rank Math, Yoast also portrays how well your content is optimized for the given focus keyword with three different colors:
- The red color depicts your content as poorly optimized for your keywords.
- The orange color indicates that your content optimization is okay but can be improved.
- The green color suggests good optimization of content for the added keywords.
Besides, Yoast also provides several analysis results as follows:
- Keyphrase Distribution: Suggests whether the keyphrase is evenly distributed throughout your content.
- Outbound Links: Helps optimize outbound links in the content.
- Images: Suggests if you’ve added enough images to make your content engaging.
- Internal Links: Helps optimize internal links in the content.
- Keyphrase in SEO Title: Checks the use of keyphrases in your SEO title.
- Keyphrase Density: Keeps you aware of whether you’ve used enough keyphrases in your content.
- Keyphrase in Subheading: Checks the usage of keyphrases in the subheadings.
- Keyphrase in Introduction: Inspects the use of focus keywords in the introduction part.
- Keyphrase Length: Inspect the length of your focus keyword.
- Previously Used Keyphrase: Checks if the used keyphrase is unique or not.
- Keyphrase in Slug: Investigates the incorporation of the focus keyword in the slug.
- Keyphrase in meta description: Inspects whether the keyphrase appears in the meta description or not.
- SEO Title Width: Suggests whether the SEO title length is appropriate.
- Text Length: Suggests if your text length is sufficient.
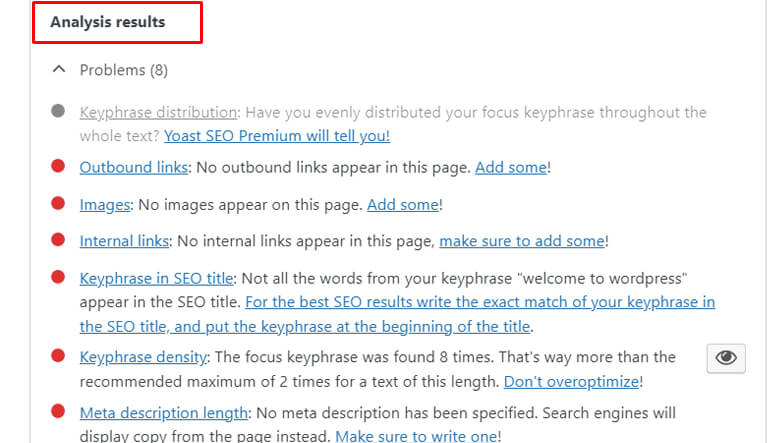
Thus, you can add your keyword and view the analysis results to improve your existing content.
Unfortunately, the free Yoast plugin only allows optimizing one focus keyword. If you want to add more related keywords, you need to opt-in for the Yoast premium plan.
Step 4. Add a Meta Description to the Posts and Pages
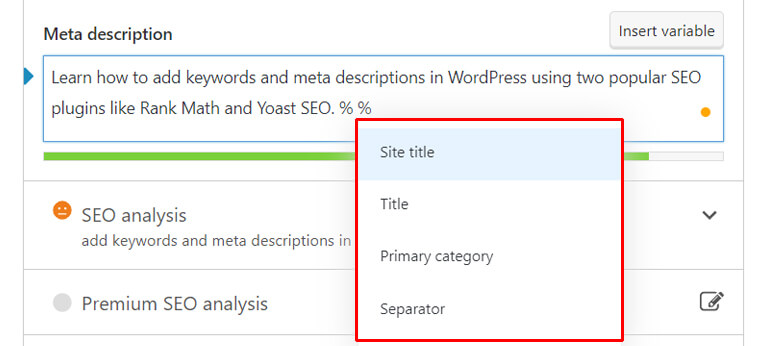
A meta description of the posts and pages can be added from the SEO tab of the meta box.
As you scroll down, you can see the box where you can add your meta description.
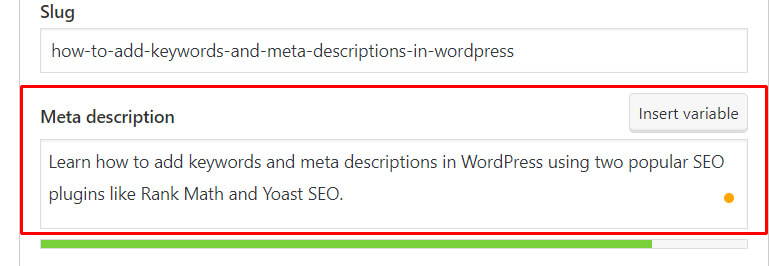
Yoast also allows you to insert variables like site title, title, primary category, and separator.
One of the perks of using Yoast SEO is that it lets you determine the quality and ideal length of the meta description from the color indication bar just below the description box.
As for the keyword, the bar must turn green to ensure that you have a meta description of optimal length. Orange indicates the short description, and red indicates it’s too long.
Step 5. Add Meta Description to the Homepage
Adding a meta description to the homepage using Yoast SEO plugin is also straightforward.
For this, go to Yoast SEO >> Settings.
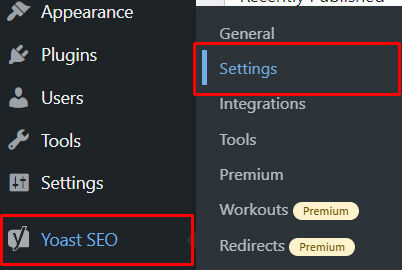
Then, under the Content Types tab, click on the Homepage.
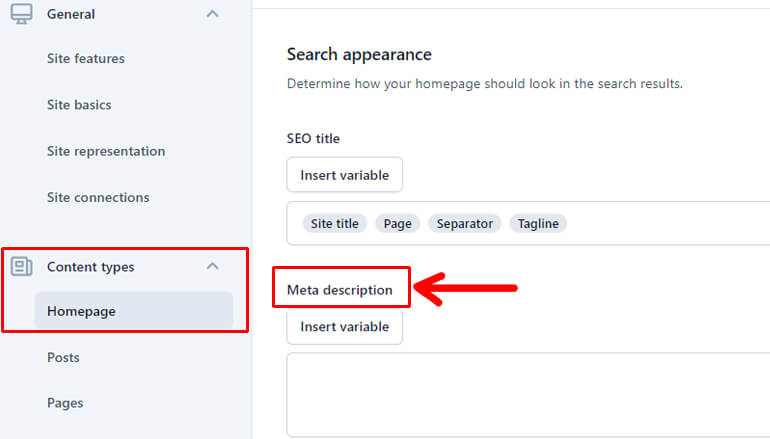
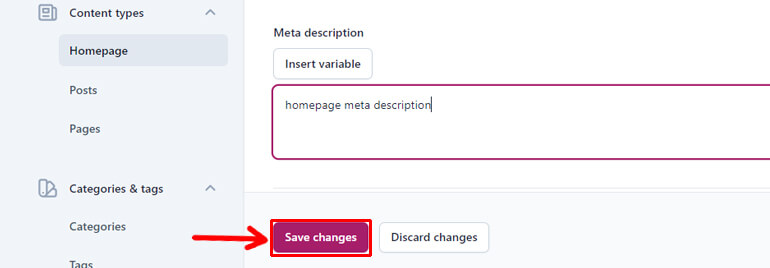
Now, enter your homepage meta description. While adding the description, ensure you do complete justice to the purpose of your site.
Finally, don’t forget to click the Save changes button at the bottom of the page.
Note: If you’re confused whether Yoast is the best SEO plugin to add keywords and meta description for your site, clear your confusion with this Yoast SEO review.
Tips to Write Effective Meta Description
Just knowing how to add meta description in WordPress isn’t enough. You should also know how to craft a quality meta description to convince users to read your posts.
So, here are some useful tips to help you write an effective meta description.
1. Incorporate Focus Keyword (Without Keyword Stuffing)
While writing a meta description, make sure to incorporate the focus keyword into your description.
It’s important to add keywords as Google highlights such keywords that stand out to catch the attention of your visitors.
However, you should distribute the keywords evenly without stuffing them because using keywords many times doesn’t make it any better.
Thus, the idea is to incorporate your focus keyword naturally.
2. Keep Its Length Optimal (Up to 155 Characters)
The ideal length for the meta description is up to 155 characters because any text beyond that is likely to be cut off in the SERPs (Search Engine Results Pages).
So, the length of your meta description should be within the character limit of around 155. Yet, it should explain clearly what to expect from your post.
3. Make It Unique and Compelling (Keep It Clear What to Expect from Your Site)
Your meta description should summarize the content of your posts/pages so that visitors can know what exactly to expect from them.
It must be unique and should convince readers to click through your page/post.
4. Add Call to Action
Including actionable words in your meta description can work wonders to persuade users to take action.
You can add several Call To Action (CTAs) like Learn More, Read This Now, Try It Free, and so on to make your meta description actionable.
Final Thoughts
While keywords are integral to SEO copywriting, meta descriptions are important for persuading users to click through your content.
Thus, one must know how to add keywords and meta description in WordPress to gain more traffic and rank higher on search engines.
We hope that our article has been helpful to you in adding keywords and meta description. If yes, don’t forget to share your experience with us.
For more helpful articles like how to change theme in WordPress or delete a theme in WordPress, you can also visit our blog page.
Lastly, don’t forget to follow us on Facebook and Twitter for the latest updates about WordPress’s relevant blog articles.
Disclaimer: Some of the links in the post may be affiliate links. So if you purchase anything using the link, we will earn affiliate commission.
