Would you like to know how you can clear your cache in WordPress? Your web hosting server and the caching plugin may be serving cached content, making it difficult to view any changes you have made to your website immediately.
One of the first steps to resolve WordPress issues is to clear your WordPress cache. This article aims to provide you with information on how to clear the cache in WordPress properly, as well as on browser cache, web hosting cache, and the best WordPress caching plugins.
What is Caching in WordPress?
Static versions of your website will be stored in a cache as part of a caching solution. As a result, WordPress can skip running heavier PHP scripts each time your site loads.
In order to improve WordPress speed performance and user experience, the caching process is used.
Caching solutions for WordPress are available in a variety of forms. You can check the best WordPress caching plugins with a detailed review of them if you are not familiar with all caching plugins.
These plugins allow users to control which files and media are stored in the cache, when it expires, and when it is cleaned. Depending on your provider, WordPress caching may already be installed on your hosting account.
The caching solutions of managed WordPress hosting providers like WP Engine, for example, are run by these companies. You can check our pick of best WordPress hostings for more information.
In addition to the WordPress firewall plugins on your site can also be sped up by the caching feature of your web application firewall.
Additionally, many modern web browsers allow you to store cached versions of pages on your computer.
What Does “Clearing Cache” Mean?
A website caches data when you access it, whether you use a desktop computer, tablet computer, or mobile device.
This cache will speed up the loading of websites on your device. With this cache in place, you can browse websites more quickly on your next visit.
Even though this is a handy feature, it does take up some space. Thus, clearing your cache means deleting any saved data, such as images or sitemaps, to create more space on your server or browser. However, you must be careful in changing the WordPress cache settings.
The Difference Between Server Cache and Browser Cache
Caches can be divided into two types, server and browser caches. Both are used to accelerate the loading of a web page by saving data. Still, they accomplish this in a slightly different manner.
The location of these two caches distinguishes them from one another. As its name suggests, a server cache is generally kept on a separate server, which your web host may manage.
Various types of data are stored in this cache, including software updates and individual search queries.
On the other hand, data stored by a browser cache is saved on your hard drive and is more readily accessible.
Website owners need to improve the Cacheability of their websites. You will be able to load your pages more quickly, which is a critical component of an excellent User Experience.
On the other hand, as an internet user, you should be familiar with how to clear your cache when needed.
Method 1: How to Clear Cache in Your WordPress Caching Plugin?
It is easiest to delete the WordPress cache by using a caching plugin. In this section, you will find information about some of the most popular caching plugins and instructions to clear cache in WordPress automatically and manually.
Clear Cache in WP Rocket Plugin
Several WordPress caching plugins exist on the market, but WP Rocket is the best. The most significant advantage of using WP Rocket is that it proactively builds your WordPress cache in the background, ensuring that your users always receive a cached version of your website.
This plugin also provides a simple method of clearing cached files. Follow these steps to use it:
- Go to Settings in WordPress Dashboard.
- Go to WP Rocket.
- Click on the Clear Cache button in the plugin dashboard.
Your cached files will now be cleared automatically by WP Rocket.
Clear Cache in WP Super Cache Plugin
Another popular WordPress caching plugin is WP Super Cache. It allows you to quickly and efficiently clear all cached content within your website.
Follow these steps to use the plugin:
- Go to Settings.
- Go to WP Super Cache.
- Click the Delete Cache button.
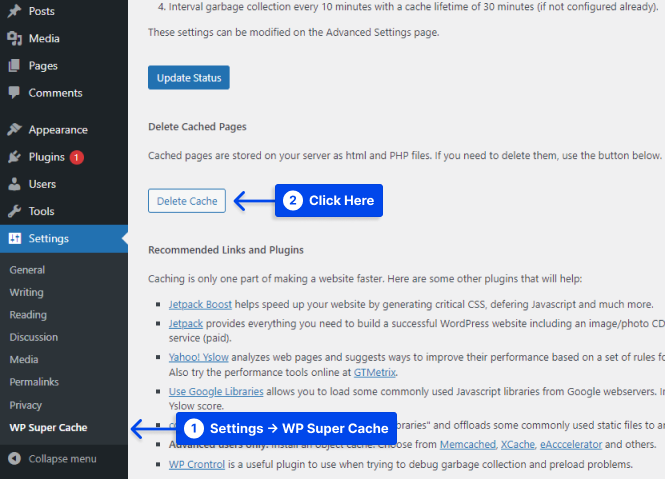
All cached files will now be removed from your website by WP Super Cache.
Clear Cache in W3 Total Cache Plugin
The W3 Total Cache plugin for WordPress is one of the most widely used caching plugins. The plugin also offers the option of clearing all caches at once, as with the other plugins mentioned above.
Follow these steps to use the plugin:
- Go to Performance.
- Click on Dashboard.
- Click on the empty all caches button.
W3 Total Cache will automatically delete your site’s cached content.
Clear Cache in WP Fastest Cache Plugin
Another popular caching plugin is WP Fastest Cache, which offers several optimizations and caching features, such as minification, cache preloading, and GZIP compression.
With this plugin, you can access an intuitive dashboard and a caching solution that relies on mod_rewrite for maximum performance.
Cache timeout can be enabled to avoid the hassle of manually clearing the cache. Additionally, the plugin can automatically delete all cache files when a new post or page is published.
By doing this, you can prevent outdated data from appearing on your WordPress website. To perform automated cache purging with this plugin, follow these steps:
- Go to your WordPress Dashboard.
- Go to WP Fastest Cache.
- Check the box next to the Cache System setting. When you enable this, the plugin will clear your cache regularly.
- Also, check the New Post and Update Post settings to clear cache files whenever a post or a page is published.
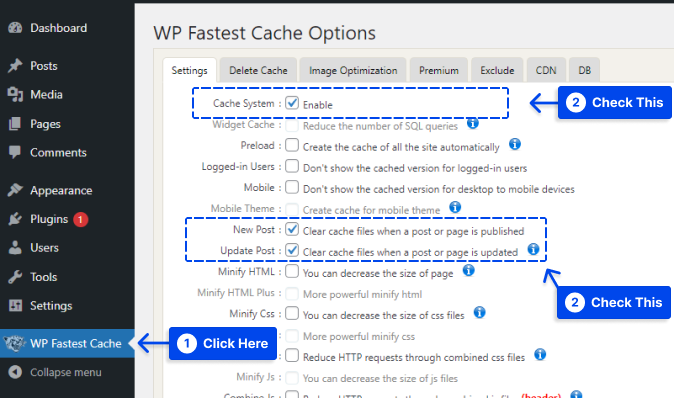
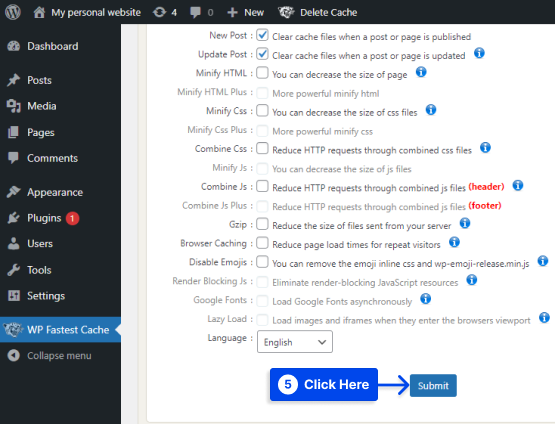
You can enable more features by going ahead and checking the box on each setting.
- Click on the Submit button to save changes.
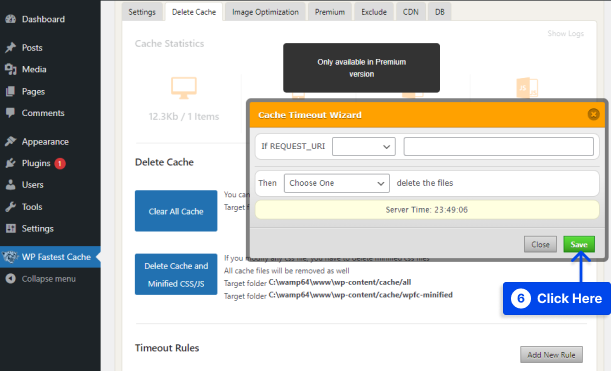
Also, follow these steps to clear your WordPress site’s cache manually:
- Go to WP Fastest Cache and choose the Delete Cache tab.
- Click on the Clear All Cache button.
- Click on the Delete Cache and Minified CSS/JS button if you have just edited CSS or JavaScript files.
- Click on the Add New Rule button in the Timeout Rules setting at the bottom of the page to set an expiry time.
A pop-up window will allow you to configure the condition of pages or posts you want to cache and how often you want to delete them.
- Click on Save to add the rule.
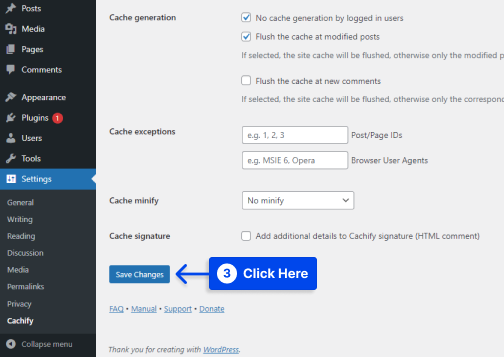
Clear Cache in Cachify Plugin
Unlike the other plugins mentioned in this article, there is no shortcut to delete the cache in the wp-admin toolbar using Cachify. You cannot manually clear the cache in this plugin.
Follow these steps to use this plugin:
- Go to Settings.
- Click on Cachify.
- Set your desired changes.
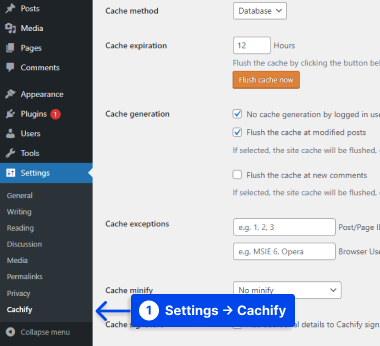
- Click on Save Changes.
Note: There are no options to delete the cache manually. So, you can only set the options introduced by the plugin and wait to delete the cache by it automatically.
Clear Cache in Swift Performance Lite Plugin
Follow These steps to know how you can clear your cache with the Swift Performance Lite plugin:
- Hover over Swift Performance on the top toolbar.
- Click on the Clear All Cache option in the dropdown.
After clicking this option, the plugin will clear your website’s cache.
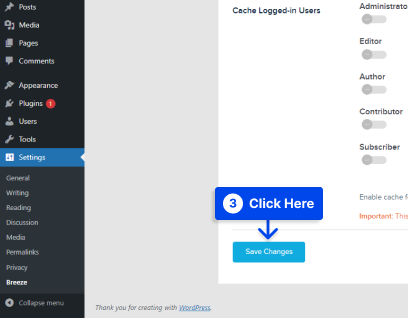
Clear Cache in Breeze Plugin
The Breeze plugin adds a new admin menu item to the WordPress admin toolbar, similar to most other plugins in this article.
Follow these steps to use this plugin:
- Go to Settings.
- Click on Breeze.
- Go to BASIC OPTIONS and set the desired settings.
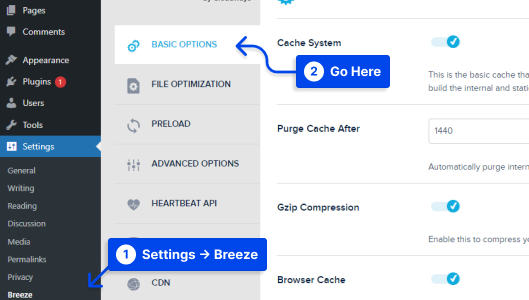
- Click on Save Changes.
You can also hover over Breeze on the top toolbar and see the primary options to set up. Once you have selected the option you wish to use to clear your WordPress cache, you are ready.
Method 2: How to Clear Your WordPress Cache Without a Plugin
There is a possibility that you will have to manually clear the WordPress cache if you do not use a caching plugin.
There may be some differences in this process depending on the web host you are using. Still, you will usually be able to access it through the admin area of the host.
Some web hosts additionally provide an option for clearing the cache when setting up a WordPress site in the dashboard. You have to contact your website hosting and ask them for information about it.
Method 3: How to Clear Your Cache Based on Browser
In every major web browser, cached data is automatically saved. Sometimes you may need to remove it to improve your browsing experience.
Let’s examine how to clear your cache on the most popular browsers:
How to Clear Cache in Google Chrome?
Follow these steps to clear the cache in Google Chrome:
- Open the Chrome browser on your computer.
- Click on the three dots located in the top right corner.
- Go to More tools.
- Click on the Clear browsing data.
It is also possible to use the combination of the Ctrl + Shift + Del keys.
- Choose a time range. Choose All time to delete everything.
- Check the boxes.
- Click on Clear data.
You should restart your browser as soon as the cache has been cleared.
How to Clear Cache in Safari?
Follow these steps to clear the cache in Safari:
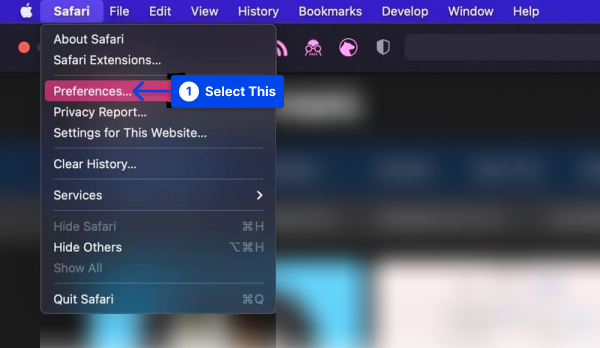
- Click Safari in the top left corner of the screen.
- Choose Preferences from the drop-down menu.
- Click the Privacy tab.
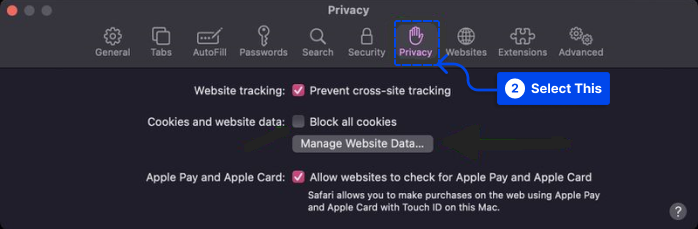
- Click on Remove All in the resulting popup window, then click Done .

How to Clear Cache in Firefox?
Follow these steps to clear the cache in the Firefox browser:
- Open Firefox browser.
- Click on Menu in the top right corner of your browser.
- Click on History.
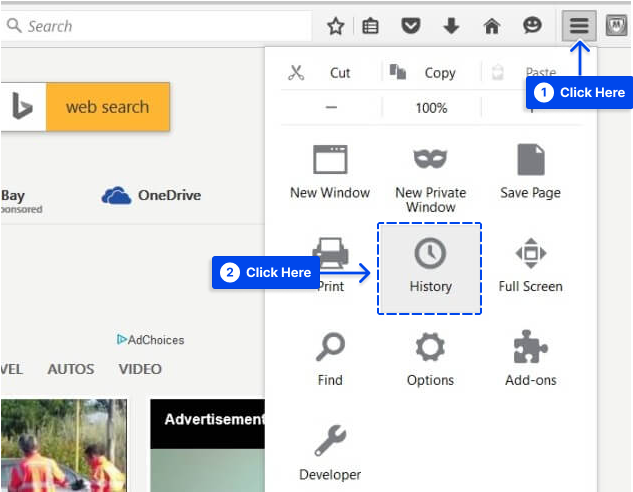
- Choose Clear recent history.
- Set a time range in the popup that appears. Select Everything to delete all cached data.
- Click on Details and select the types of data you’d like cleared.
- Click on Clear Now when you’ve made your selections.
- Once the data has been cleared, exit the browser and reopen it.
How to Clear Cache in Microsoft Edge?
Follow these steps to clear the cache in your Microsoft Edge browser:
- Click on the Menu icon in the top right corner of your browser.
- Choose Settings from the drop-down menu.
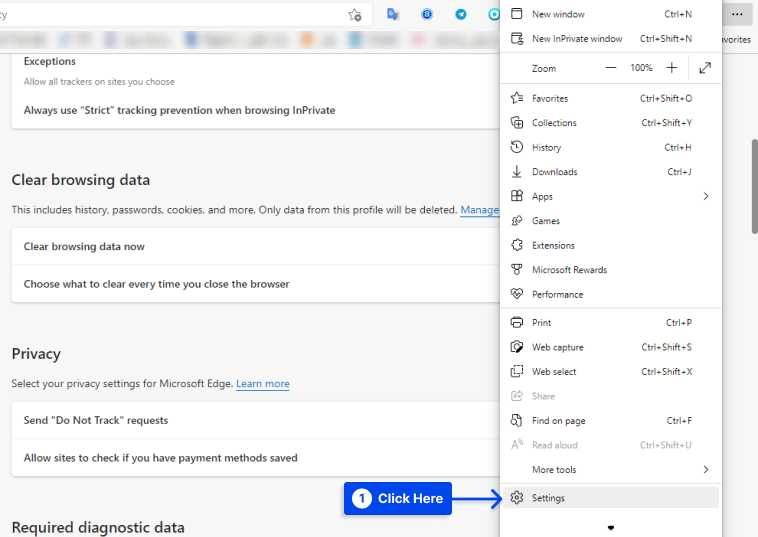
- Click on Privacy, search, and services.
- Click on Choose what to clear under the Clear browsing data section.
After the pop-up appears:
- Select a time range. Choose All time to delete everything.
- Check the boxes.
- Click on Clear now.
- As soon as the All Clear! message appears, close the browser and reopen it so you can use it again.
Method 4: How to Clear Cache in Your WordPress Hosting?
Most WordPress hosting providers offer built-in caching options that can help improve WordPress performance.
The following sections will help you clear the cache of some of the most popular WordPress hosting providers:
Clear Cache in WP Engine Hosting
Many managed WordPress hosting providers are on the market, but WP Engine stands out from the rest.
In addition, their caching solution is built-in, so the user is not required to install a caching plugin to use their service.
Suppose you have made changes to your website, but they are not displaying. In that case, you may want to clear the WP Engine cache from the WordPress administration area.
Follow these steps to use the WP Engine:
- Click on the WP Engine menu item in your WordPress admin bar.
- Choose the Caching menu option.
- Click on the Clear all caches button.
If you perform this action, WP Engine will automatically purge all caches for your WordPress site.
Clear Cache in Bluehost Hosting
The Bluehost hosting company is considered one of the best WordPress hosting providers and is officially recommended by WordPress.
With their built-in caching solution, you can instantly boost the performance and speed of your WordPress site.
With Bluehost, clearing your WordPress cache is as simple as logging into your WordPress administration area.
Follow these steps to use this:
- Go to the WordPress admin dashboard.
- Hover over the Caching button in the top admin toolbar.
- Click on the Purge All option.

You will now receive a notification from Bluehost when all files from your WordPress cache have been cleared.
Clear Cache in SiteGround
With a reputation for speed and excellent customer service, SiteGround is one of the most popular WordPress hosting providers.
The company offers a built-in caching solution to enhance the performance of your website. In order to clear the cache, you can do so from both the WordPress admin area and the control panel of your hosting account.
Follow these steps to clear your cache from your Siteground control panel:
- Log in to your hosting account dashboard.
- Under the site tool section, go to Speed, then Caching.
- Choose the Dynamic Cache menu option.
- Click on the menu icon next to your domain name.
- Click the Flush Cache option from the drop-down.
Clear WordPress.com Caching
You may need to clear your browser cache if you do not see the updates to your WordPress website when you visit it.
Suppose you have plugins enabled on your site. In that case, you may receive a recommendation to clear your WordPress.com site’s cache as part of a troubleshooting procedure.
It is necessary to contact WordPress.com Support and request a cache-clearing option to enable when you need to clear your WordPress.com site’s cache.
When this option is enabled, follow these steps to use it:
- Go to your WordPress dashboard.
- Go to Settings.
- Go to the Hosting Configuration tab.
- Click Clear Cache to start the process.
- Provide a brief explanation of why you are clearing the cache. By doing so, developers can log and identify areas in which their products can be improved.
- Click Clear Cache to clear your site cache.
Method 5: How to Clear Your WordPress Firewall Plugin Cache
You must clear another caching layer using a WordPress firewall such as Sucuri to protect your website.
Follow these steps to clear your Sucuri cache:
- Go to your WordPress admin panel.
- Go to Sucuri.
- Go to Firewall (WAF).
- Choose the Clear Cache menu option.
- Click the Clear Cache button.
Method 6: Clear Cache with Cloudflare
You may want to consider Cloudflare for clearing your cache as an alternative to using WordPress caching plugins.
It is a content delivery network (CDN) service with several features to improve the performance of your website, including cache control, fast cache purge, and web cache protection.
If your WordPress host does not automatically install Cloudflare for you, follow these steps:
- Create a Cloudflare account.
- You will need to add your domain name and wait for the system to identify your DNS records.
- Choose a plan level.
- The Cloudflare dashboard will display the required nameservers. Simply copy these values and update your nameservers from your hosting account dashboard.
Follow these steps once your domain has been pointed to Cloudflare to clear the cache on your WordPress site:
- Enter your Cloudflare dashboard and click on the Add a site button, then click the domain for your WordPress site.

- Go to the Caching option and click on Configuration.
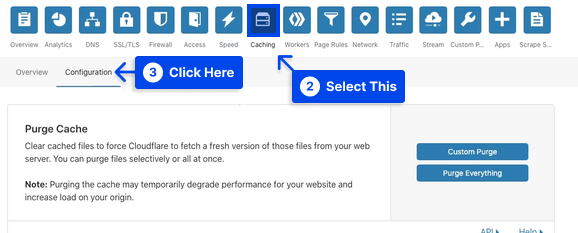
- Select your preferred method for clearing the cache.
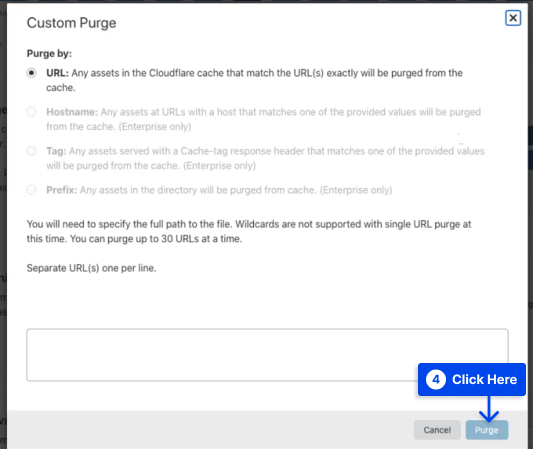
Click on the Purge Everything button to clear all cache files. Select Custom Purge and fill out the pages you want to purge if you want to select specific pages.
- Click the Purge button.
Method 7: Clear Object Cache using WP-CLI
Actions performed within the WordPress admin will automatically clear the cache most of the time. Still, you may have a situation where you need to clear it manually.
You can always clear your cache from within your WordPress dashboard, but you may want to use WP-CLI.
Follow these steps to use WP-CLI:
- Log in to your WordPress site with SSH.
- Go to your site’s home directory.
cd ~/sites/example.com- Run the following WP-CLI command to clear your cache:
wp cache flushThis WordPress clear cache command line will clear your site’s cache.
Conclusion
Clearing your WordPress cache is one of the first steps to resolving WordPress issues. This article explained how to properly clear the cache in WordPress with various methods and in different situations.
We hope this article satisfies you. You are welcome to share any questions or comments.
Our latest articles will be published on social media platforms like Facebook and Twitter. Please follow us on these platforms.