Do you want to prevent unauthorized access to the files and directories on your site? If so, you may be interested in learning how to disable directory listing in WordPress.
According to recent research, over 70% of websites are vulnerable to attacks due to outdated software or weak security protocols. By disabling directory listings in WordPress, you can add an extra layer of protection to your site and reduce the risk of unauthorized access to sensitive information.
Your website’s security needs to be protected from potential threats, so we will explore the risks that come with leaving directory listings enabled on your website and how to disable directory listings in WordPress.
Let’s get started and see how to disable directory listings on your WordPress site.
What is Directory Listing in WordPress?
Directory Listing in WordPress is a feature that displays the list of files and folders on your website’s directory. It can potentially expose sensitive information to hackers and should be disabled for security reasons.
This feature can be useful in certain situations, such as when you want to share files with others by making them accessible through a URL.
However, it can also pose a security risk as it allows anyone to access files and directories on your website. It is important to disable directory listing in WordPress to prevent unauthorized access to your files and directories.
Why Disable Directory Browsing in WordPress?
A great way to bolster your WordPress security is to disable directory browsing. This prevents anyone from navigating to files on your site.
In the wrong hands, this information can be used to exploit vulnerabilities and gain unauthorized access to your site. Here are some reasons why you should disable directory browsing:
1. Prevents Access to Sensitive Information: When directory browsing is enabled, anyone can easily view a list of all the files on your website. This includes any backups, database dumps, or configuration files that may contain sensitive information.
2. Eliminates WordPress Directory Listing Vulnerability: By disabling directory browsing, you eliminate a potential vulnerability exploited by attackers. Without access to the directory listing, attackers have less information to work with when attempting to find weaknesses in your site’s security.
3. Protects Your Site Against Brute Force Attacks: Brute force attacks are attempts to gain access to your website by guessing usernames and passwords. If directory browsing is enabled, attackers can easily access your login page and use brute force tactics to gain access. Disabling directory browsing makes it harder for attackers to find your login page.
In summary, disabling directory browsing in WordPress is an important security measure that helps protect your site from vulnerabilities and attacks. Don’t leave this door open for attackers; take the necessary steps to secure your site today.
How to Disable Directory Listing in WordPress (4 Methods)
Having directory listings enabled in WordPress can have a security risk since it allows visitors to see what’s inside your directories without logging in. However, it is possible to disable directory listings.
There are four methods you can use to disable directory listing in WordPress. It’s important to take this step to ensure the security of your website and protect your content from unauthorized access.
Depending on your website and the needs that you have, you may choose whichever method suits you best.
Method 1: Disable Directory Listing with htaccess
Changing the directory browsing options in WordPress, or any CMS, requires access to the root directory via FTP or a file manager like cPanel.
You can use FileZilla or other free FTP clients to access your website’s root to disable directory listing with the .htaccess file.
Most WordPress installations already contain a .htaccess file. It might be hidden, or you might have to make one.
You can simply create a .htaccess file with the following line of code in it:
Options All -Indexes
Important Note: Work with the .htaccess file carefully, don’t overwrite it, or else your permalinks will be lost.
If you already have a .htaccess file on your server, you may create a backup before opening the file, and then you can paste the following code at the end of it.
Options All -IndexesThis is how the .htaccess file should look like:
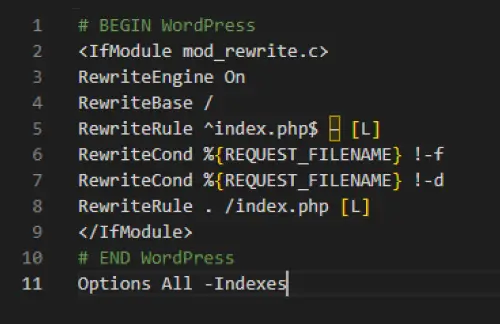
Note: Based on the different settings on your plugins and theme the rest of your codes in the .htaccess file might be different.
You’ll need to save the file, then upload it back to the same directory you downloaded it from. If something breaks, replace it with your backup and try again.
After you disable directory browsing, all the directories that you previously saw will redirect to a 403 Access Forbidden page or a 404 Not Found page.
While this method prevents users from finding your website listing directory, hackers might find it from your website’s source code.
To ensure your website is entirely safe, I suggest you use a protection plugin like WPShield Content Protector. This plugin can help you secure your website, and protect it from thieves and hackers.
Method 2: Disable Directory Listing in cPanel
The majority of hosts have a way to disable directory listings with cPanel. This is very simple and helps keep your site safe.
To disable directory listing, follow these steps:
Step 1: Log in to cPanel.
Step 2: Click on Indexes.

Step 4: To turn off indexing, click the directory name.

Step 5: Select the No Indexing option and save the changes.
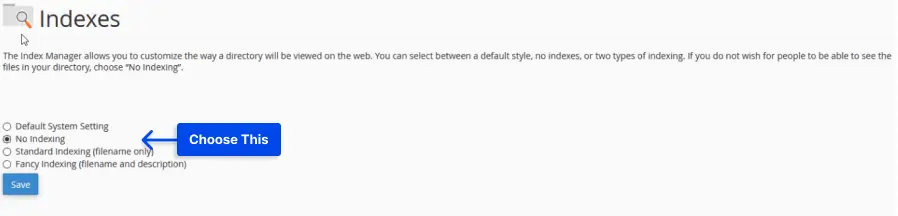
Now if you go to the URL, instead of a file list you should see a 403 error.
Method 3: Disable Directory Listing in Apache
If you want to completely disable the directory listing in Apache, you can add the -Indexes directive to the Options directive, or you can disable it per directory in the Directory configuration.
To disable directory listing with Apache, follow these steps:
Step 1: Open Apache’s configuration file with a text editor.
Step 2: Add the following line to the directory of your choice:
Options -Indexes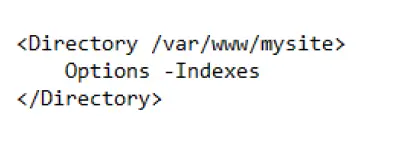
Method 4: Disable Directory Listing in IIS
In this section, we’ll cover how to disable directory listing in IIS. This is an important security measure because, by default, IIS displays the directory listing, which can potentially expose sensitive information to unauthorized users.
What Is IIS? IIS stands for Internet Information Services, it is a web server software created by Microsoft that is used to host websites and web applications on Windows servers. It is often used in conjunction with ASP.NET, but can also support PHP and other scripting languages.
To disable directory listing in IIS, follow these steps:
Step 1: Open Internet Information Services (IIS) Manager.
Step 2: Click on the Directory Browser option.
Step 3: Click on Open Feature in the right corner.
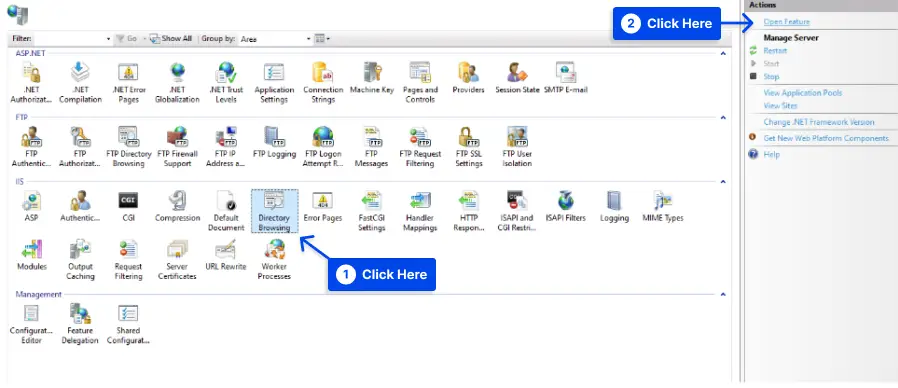
Step 4: In the Actions panel on the right, click Disable.
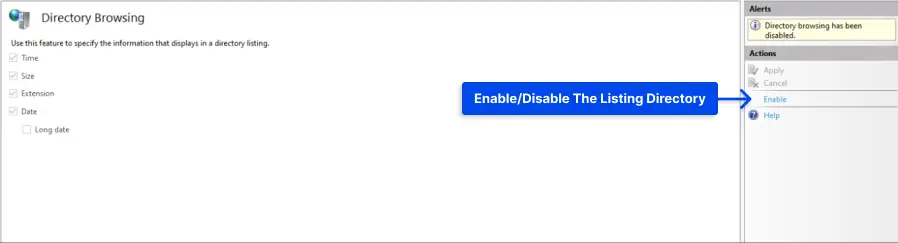
That’s it! By following these simple steps, you’ve successfully disabled directory listing in IIS for your website or virtual directory.
Important Note: Disabling directory listing is a crucial step in securing your website and protecting sensitive information; However, it doesn’t guarantee a secure website. If you are looking to protect your website use a protection plugin like WPShield Content Protector.
FAQ
Directory listing in WordPress is the process of showing the contents of a directory when there is no index file present. It can reveal sensitive information about your website’s files and folders to anyone who accesses it.
Disabling directory listing in WordPress helps protect your website’s files and folders from being accessed or exploited by hackers. It also prevents sensitive information about your website’s structure and directories from being revealed to the public.
You can check if directory listing is enabled on your WordPress site by typing your website’s URL followed by ‘/wp-includes/‘ or ‘/wp-content/‘ in your web browser. If you see a list of files and folders instead of an error message or a blank page, the directory listing is enabled.
You can disable directory listing in WordPress by adding ‘Options -Indexes‘ to the top of your website’s .htaccess file. You can access this file using an FTP client or through your web hosting control panel. Alternatively, you can use a security plugin that includes an option to disable directory listing.
Conclusion
We talked about the importance of disabling directory listing in WordPress to prevent any security risks. Additionally, we have provided you with a simple yet easy-to-follow tutorial on how to disable the directory listing in WordPress.
Thank you for reading this article, and we hope it was helpful for you. If you have any questions or problems related to this article, please feel free to leave them in the comment section below. Our team will be happy to assist you.
If you are interested in learning more about WordPress and its various features, check out the BetterStudio blog for more related tutorials.
Additionally, following BetterStudio on Facebook and Twitter would help you stay up-to-date with the latest WordPress tutorials and news.