Adding a cost calculator to your business website can be a great way to improve your bottom line. By allowing potential customers to quickly and easily determine how much your products or services will cost, you can make their decision-making process easier. As a result, they are more likely to choose you over your competitors.
There are several ways of adding basic cost estimation functionality to a website, such as using widgets or CSS. However, Stylemix Themes’ Cost Calculator Plugin for WordPress offers a more elegant, versatile way.
What is a Cost Calculator?
Cost calculators collect certain variables from website visitors to calculate the total price of a product or service.
For example, if your website sells windows, the input fields may include the dimensions of the window opening, type of frame material, double or single glazing, etc., all of which impact price. Once the visitor has input all the required data, the calculator automatically generates the cost of the window, thereby saving you from having to do it manually.
Typical Cost Calculator Applications
There are so many businesses that can make use of a cost calculator, and here are just a few typical examples:
- Lumber mills
- Salons, beauty parlors, and spas
- Vehicle and equipment rental agencies
- Graphic and web designer agencies
- Medical services providers
- Web hosting companies
- Professional services such as copywriting, bookkeeping, etc.
- Cleaning and housekeeping services
- Print services
- Plasterers, painters, bricklayers, etc.
- Flooring companies
- And many more…
The list is virtually endless, and nny business that manually prepares quotations and estimates can often benefit significantly from adding a cost calculator to its website.
Furthermore, these calculators aren’t necessarily restricted to cost calculations. For example, a health club website or fitness blog may have a BMI calculator, while a recipe site can use them for metric to imperial conversions.
Stylemix Themes’ Cost Calculator Plugin for WordPress

The Cost Calculator Plugin for WordPress by Stylemix Themes includes all the features needed to add attractive, full-featured cost calculators to your website quickly and easily.
A free version of the plugin is available. That boasts excellent starter features, including a powerful calculator builder, unlimited forms, various customization options, instant cost estimations, currency options, a user-friendly interface, etc.
However, I recommend the Pro version as it brings tons more useful features to the table, including:

Article Continues Below
- Conditional system
- Date picker, multi-range slider, image dropdown, and file upload custom elements
- WooCommerce integration
- Ability to add several calculators on a page
- Wide range of customization features
- Pre-built calculator form with instructions for a variety of industries
- Stripe and PayPal integration
- Contact Form 7 and Send Form integration
- reCAPTCHA security
- Calculator duplicate and import/export facilities
- Orders dashboard, including hassle-free order tracking
- Premium support
The table below details the current pricing for the Pro version:
| Max. Number of Websites | Annual | Lifetime |
|---|---|---|
| 1 | $29.99 | $99.99 |
| 5 | $79.99 | $239.99 |
| 25 | $199.99 | $599.99 |
Get Cost Calculator Plugin for WordPress Pro
Installing the Cost Calculator Plugin for WordPress
The free version of the Cost Calculator Plugin is available in the WordPress plugin directory, or you can get it via the plugin website. I’m not going to go through the entire process of installing and activating it, as it is the same as for any other plugin. However, if you’re unsure how to do it, the documentation covers the process.
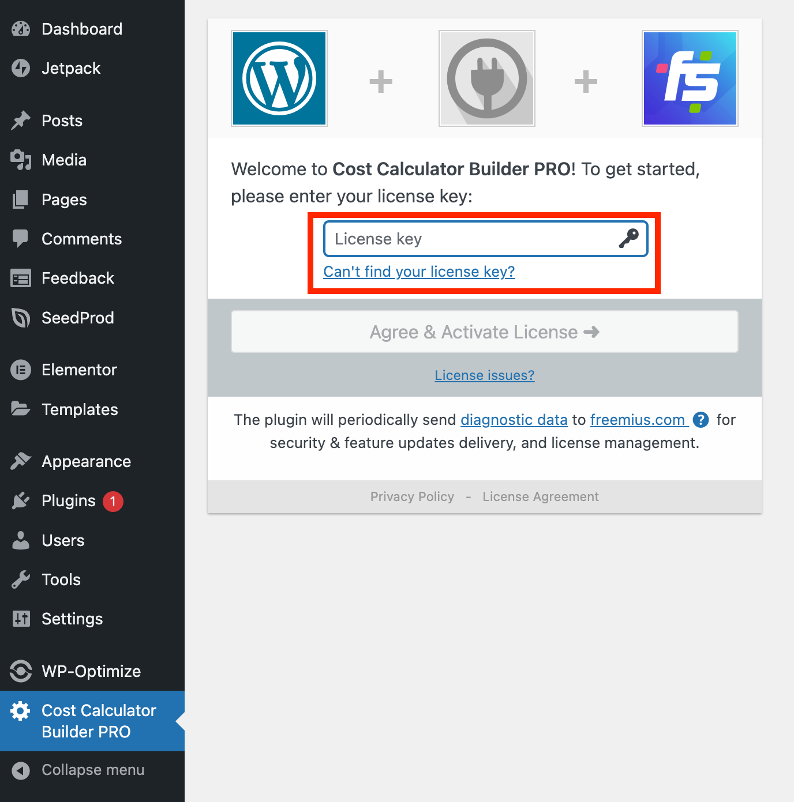
For the Pro version, you will need to purchase a license and download the plugin through the plugin website. Before installing it, it is important to note that you will need to install the free version first. If you attempt to install the Pro version alone, you will be prompted to install the free one first.
After activating the Pro version, you will need to enter the license key you received when you bought it:
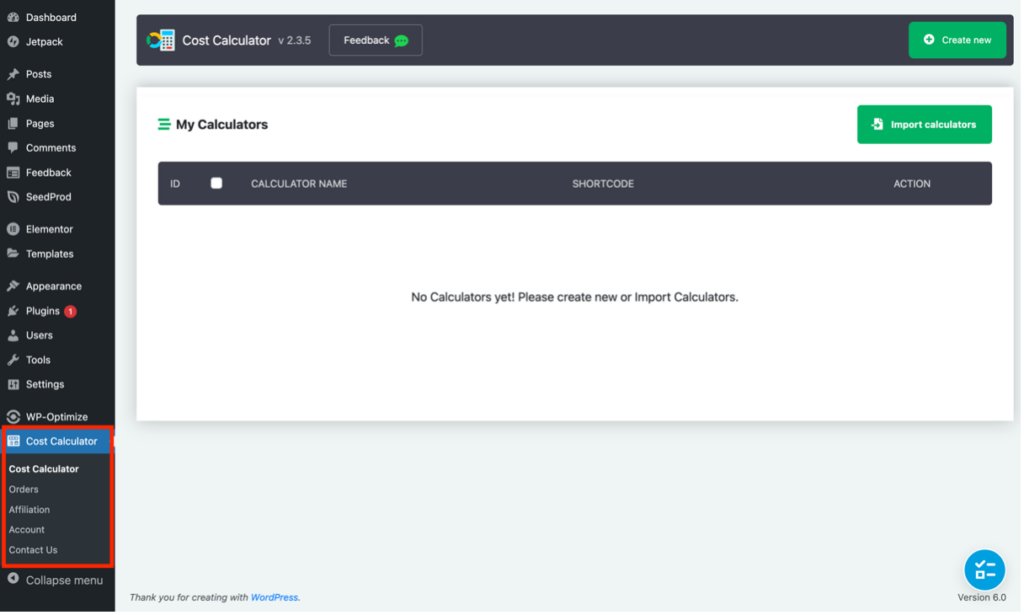
Once the plugin is installed and activated, a new menu item will appear in your WordPress panel – this is where you create your calculators:
Adding a Cost Calculator to a Website
I will now go through the process of adding a basic cost calculator to a website using the Cost Calculator Plugin. I say basic as the plugin is capable of much more than this article’s scope can cover. Therefore, I strongly suggest reading the plugin website and documentation to see what else it can do. Moreover, the developer has also created a library of helpful videos that includes some tutorials.
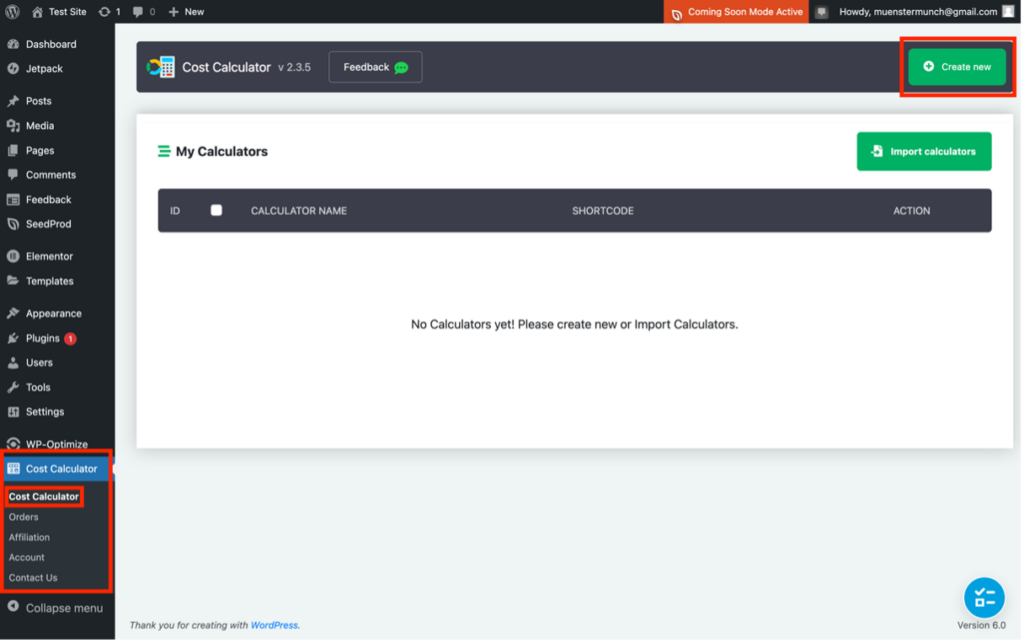
Step 1
In the new Cost Calculator menu item that appears in the WordPress backend, click cost calculator, and then click the green ‘Create New’ button:
Step 2
Under the ‘Calculator’ tab, enter a name for the new calculator and then hit the green button with the ‘+’ symbol:
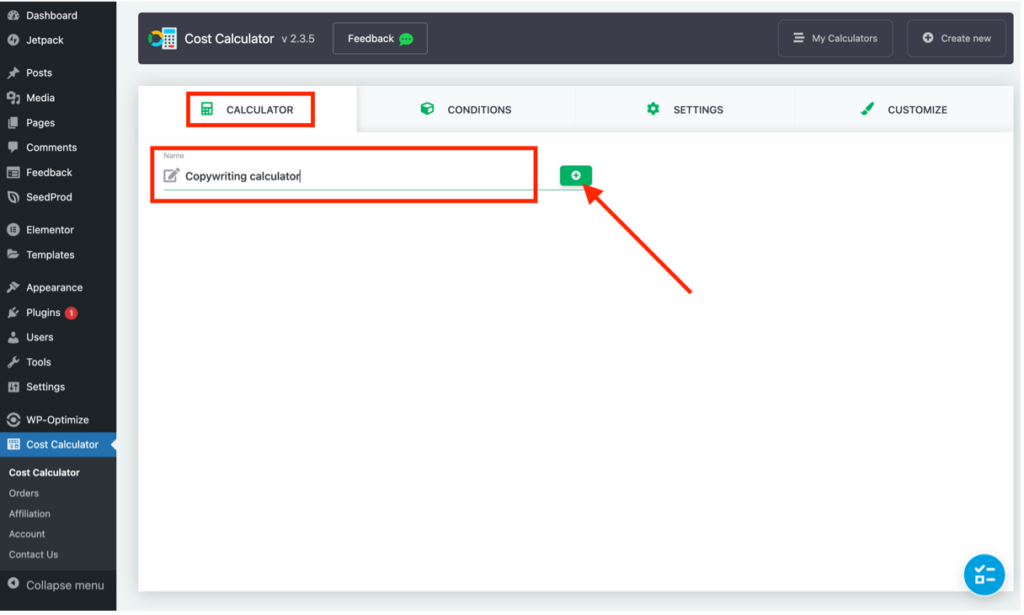
It’s okay to use any name, but I suggest making it relevant, so it is easy to remember.
Step 3
Next, a panel will appear containing a work area where the cost calculator will be built using drag-and-drop elements:
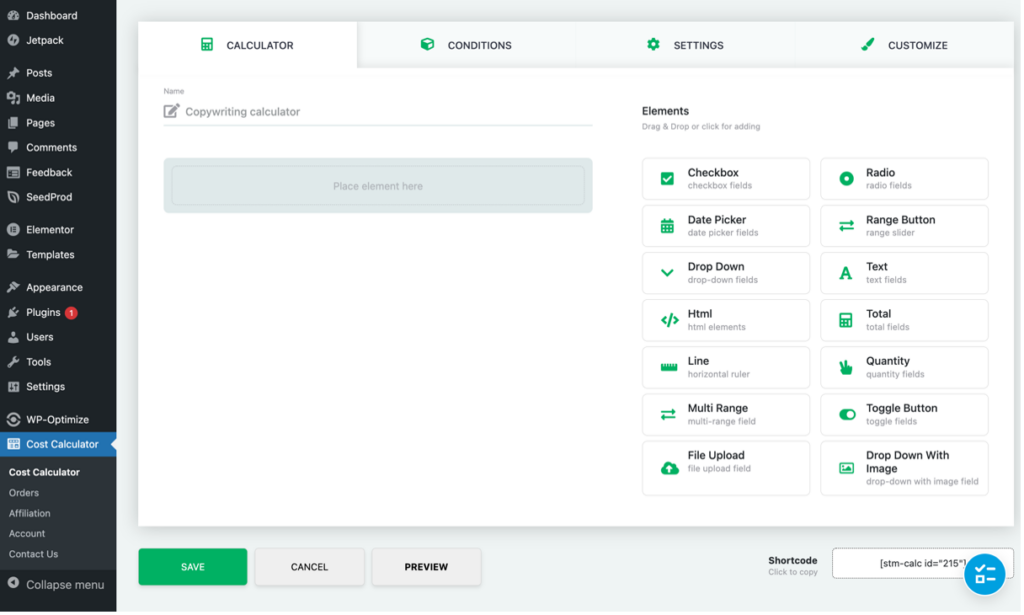
As you can see, on the right-hand side, there are various elements to play with, although the ones used ultimately depend on what the calculator is required to do.
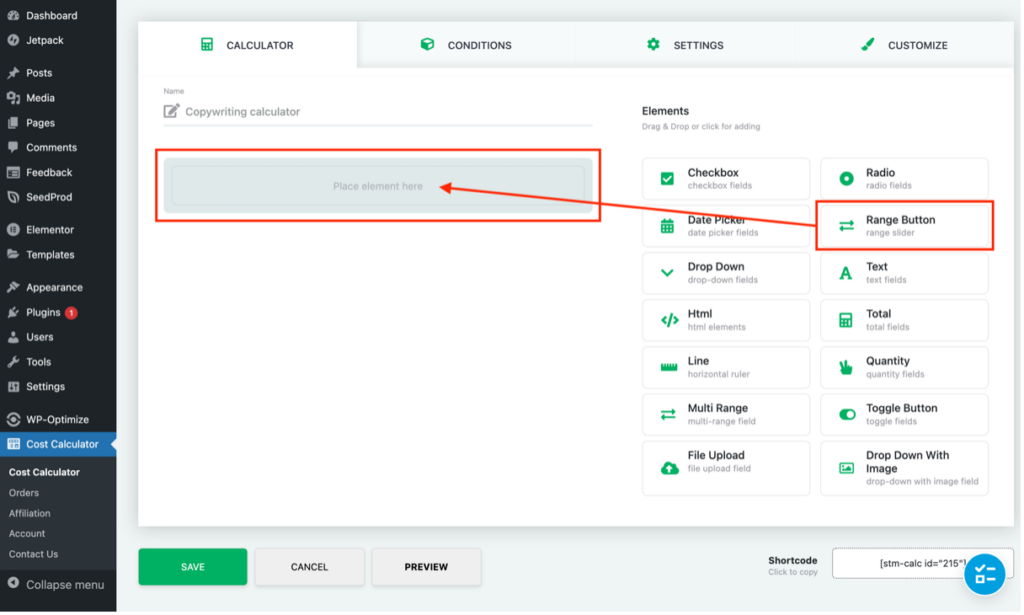
In my case, I want it to calculate the cost of copywriting services and will use a slider for the number of words. Simply drag and drop the Range Button (which is a range slider) from the list of elements on the right to where it says ‘Place Element Here’:
Step 4
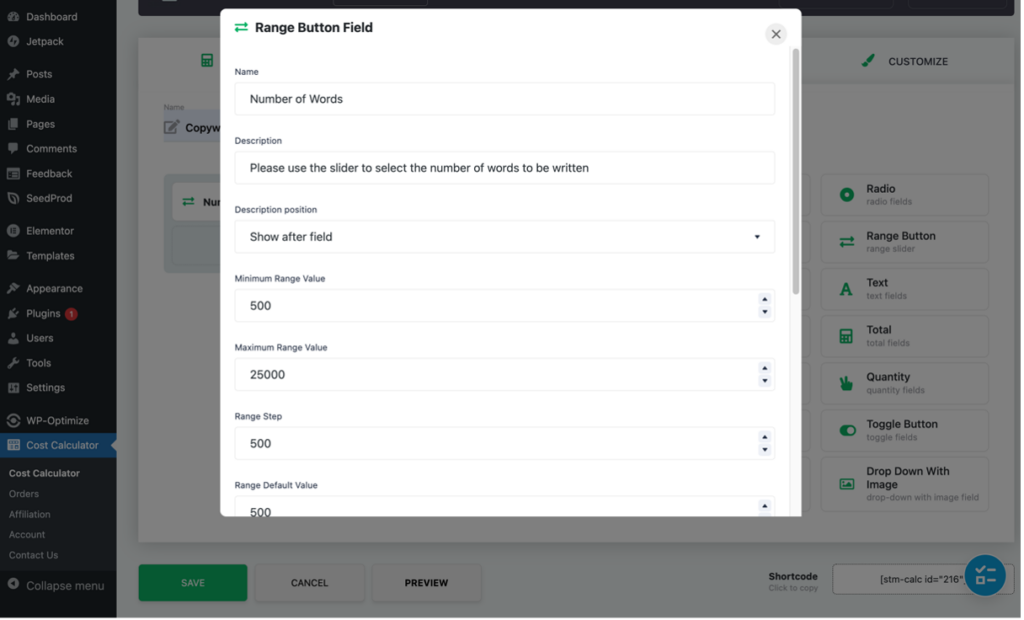
After dropping an element into place, a popup immediately appears containing various configuration options which will vary depending on the element selected. For example, in the case of the Range Button, it is necessary to provide things like a description of how to use the slider, the maximum and minimum range values, range step, etc. – other element types will show different configuration options.
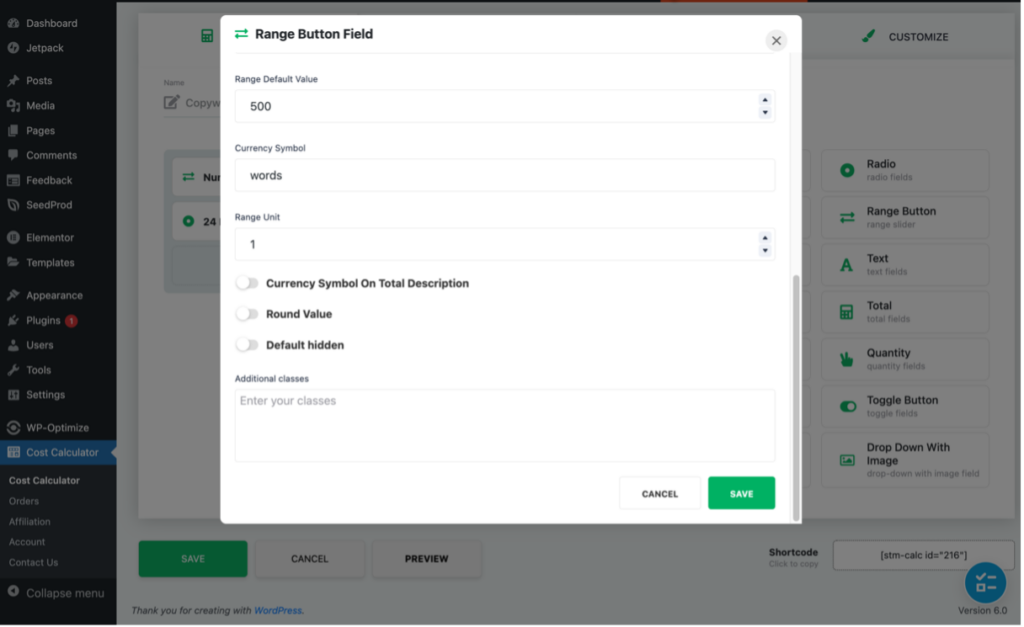
Below is the range button configuration for my copywriting cost calculator. I wanted the slider to start at 500 words minimum and go up to 25,000 maximum in increments of 500. You will note that I have put ‘words’ in the currency field as the range is to be words rather than $:
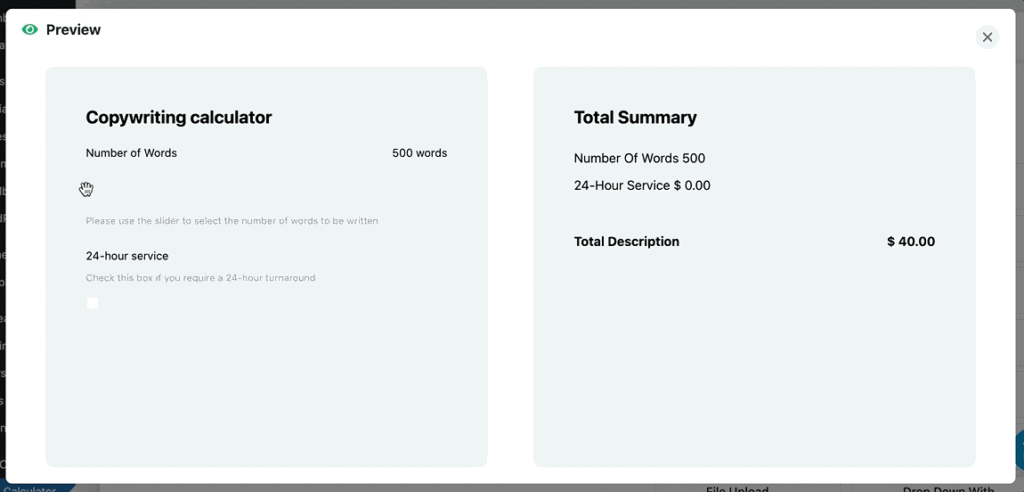
After entering the configurations for the chosen element, hit the green ‘Save’ button. To test the button and see how the cost calculator will look, simply hit ‘Preview’:
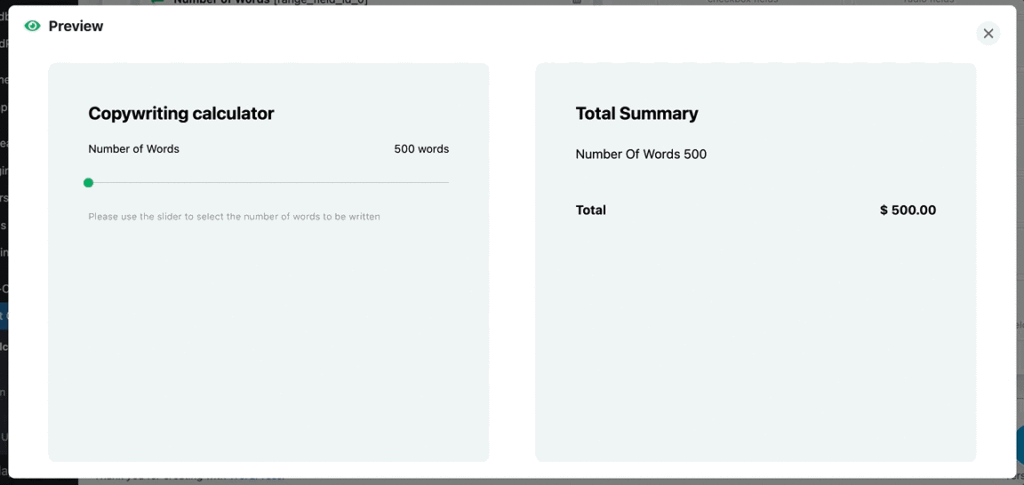
Don’t worry if the calculation in the Total Summary section is incorrect – that will be fixed later.
Step 5
Of course, it is possible to add many more elements to the calculator if needed. For example, I will add a checkbox that allows my customer to choose if they want a 24-hour turnaround for a $200 surcharge.
After dragging and dropping the Checkbox element into the calculator, I added the following configurations:
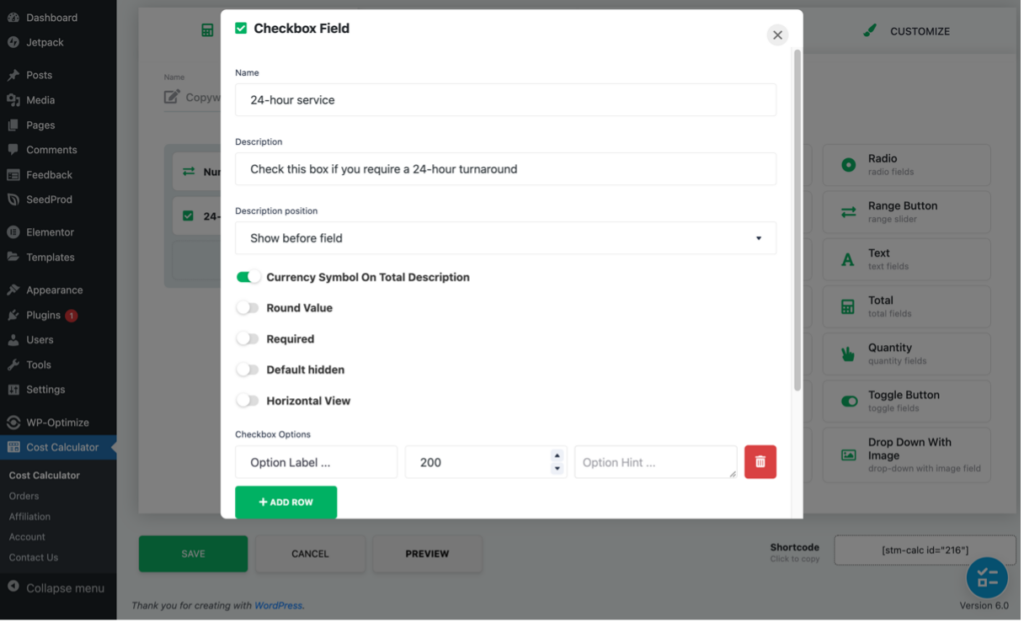
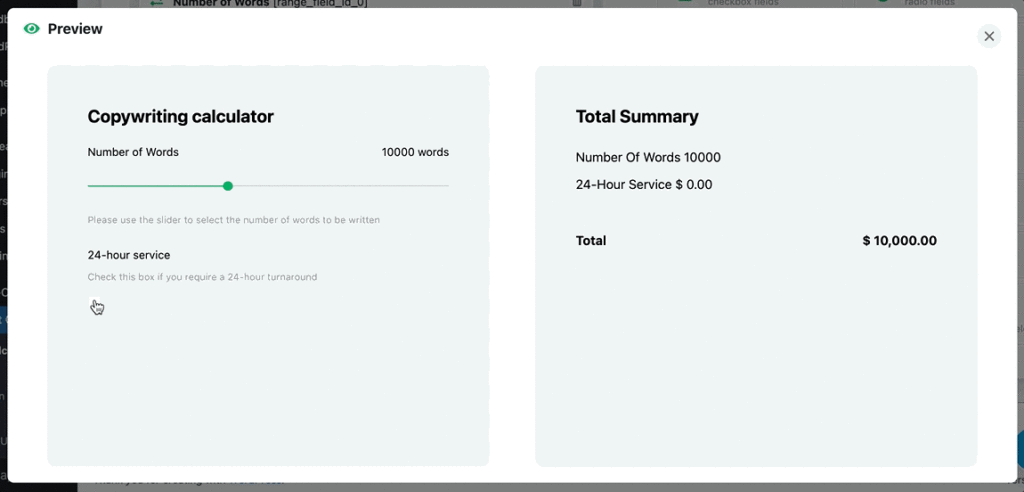
Here is the finished checkbox in action:
Step 6
Now the required elements have all been added, it is necessary to get them to calculate correctly in the Total Summary.
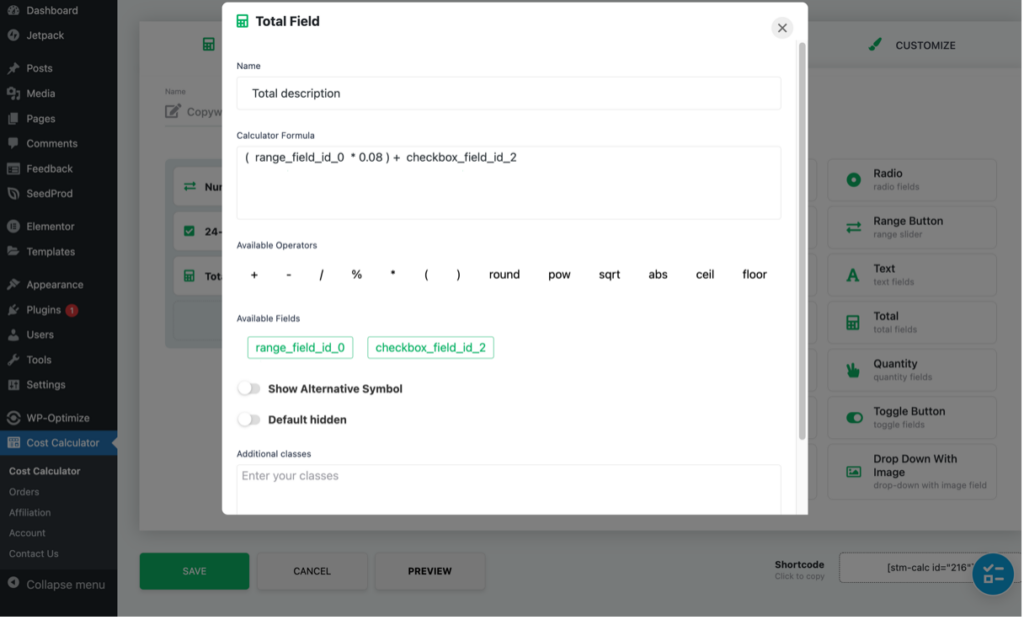
To do this, we use the Total element. Again, just drag and drop it into position, after which the configuration panel will popup:
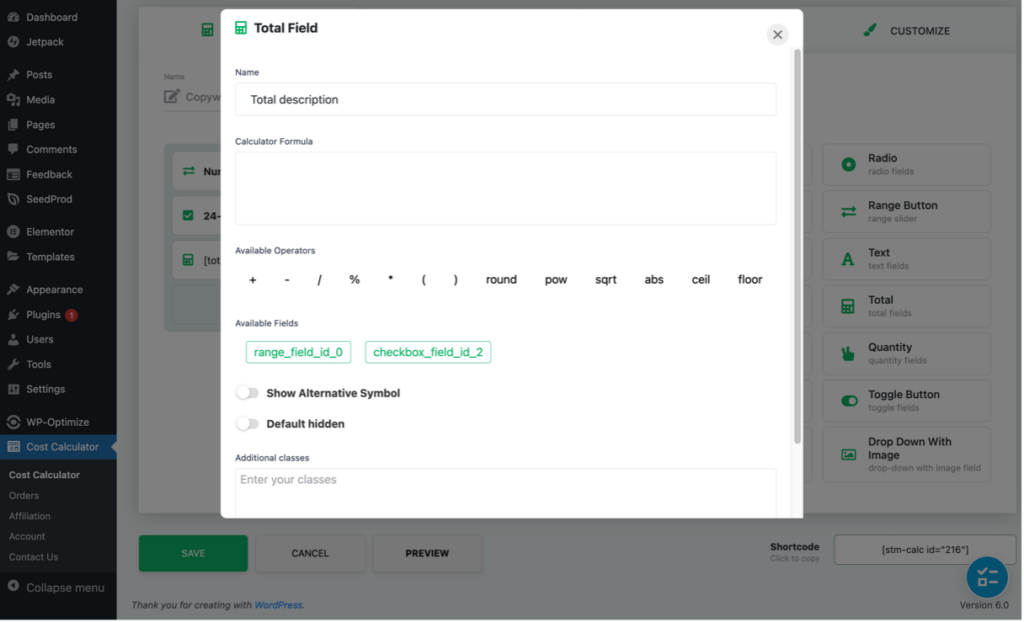
The calculation I need is:
(output from the range slider x my rate of $0.08 per word) + output from the 24-hour service checkbox
You will see under available fields two green buttons: ‘range_field_id_0’ and ‘checkbox_field_id_2.’ These contain the outputs from the Range Button and Checkbox, respectively. If other elements were added, those would also appear as green buttons here.
To build the formula, this is the sequence of actions I need to follow:
- Click ( in ‘Available Operators’ to open the parenthesis in the Calculator Formula field
- Click the green ‘range_field_id_0’ button to add it to the ‘Calculator Formula’ field
- Click * in ‘Available Operators’ to add the multiplication operator
- Type 0.08 (i.e., my rate per word) next to the *
- Click ) in ‘Available Operators’ to close the parenthesis
- Click + in ‘Available Operators’ to add the addition operator
- Click the green ‘checkbox_field_id_2’ button to add it to the ‘Calculator Formula’ field
This is what the finished calculation looks like:
Now all click ‘Save’ and preview the calculator to check everything is working okay:
The Total element is extremely powerful, as you can use the Available Operators to build complex calculations using the outputs generated by any of the other elements used.
Step 7
My basic calculator is now complete and ready to be inserted into my website, which is super easy to do.
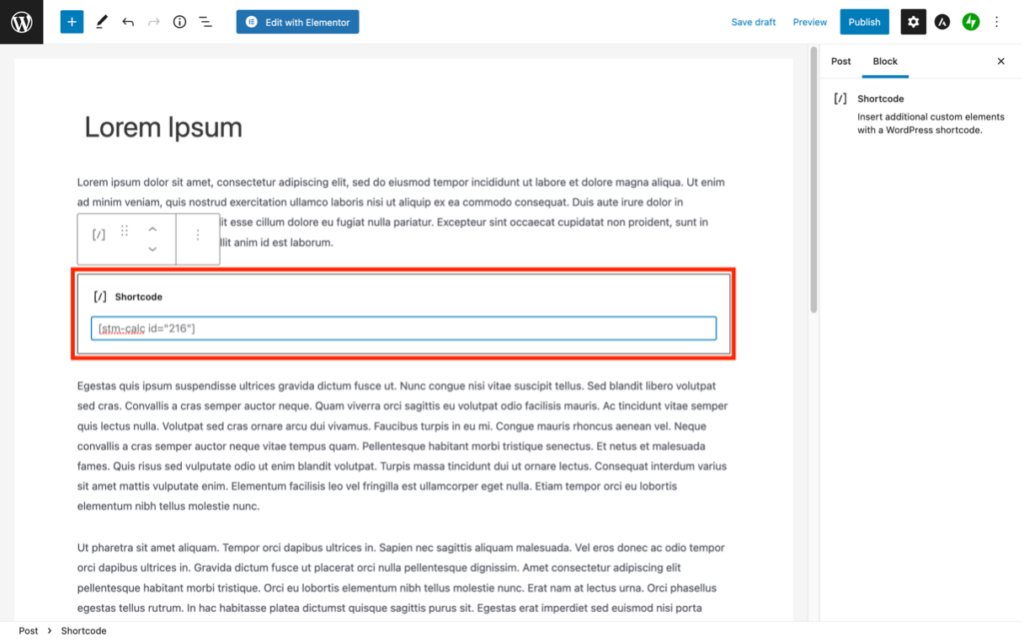
Simply click on ‘Cost Calculator’ in the WordPress admin panel menu. That will take you to the ‘My Calculators’ page, where you will find a list of all the created calculators (as I only built one, that is all my list contains.) Next, click on the shortcode against the calculator you wish to use – that will copy the shortcode to the clipboard:

Go to the WordPress post or page where you wish to place the calculator, and simply insert the shortcode wherever you need it using the ‘Shortcode’ block (or element if using Elementor):
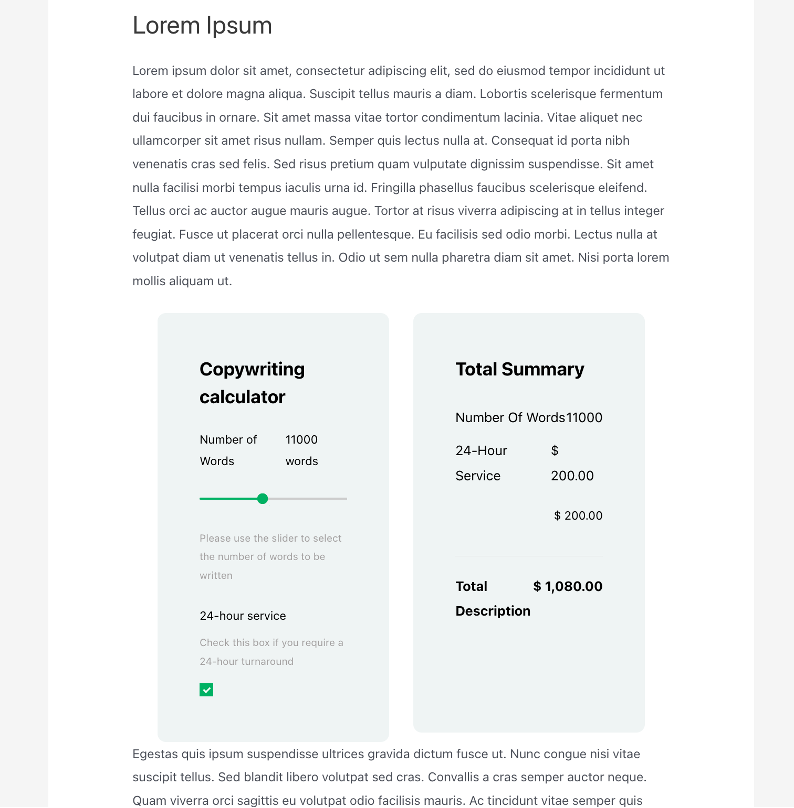
Publishing the page or post then sets the calculator live:
That’s Not All, Folks!
Of course, plenty of other things can be done to the calculator using the functions and options contained in the Conditions, Settings, and Customize tabs. Detailed information on those is available in the plugin documentation and video library. However, here’s a summary of the purpose of each tab:
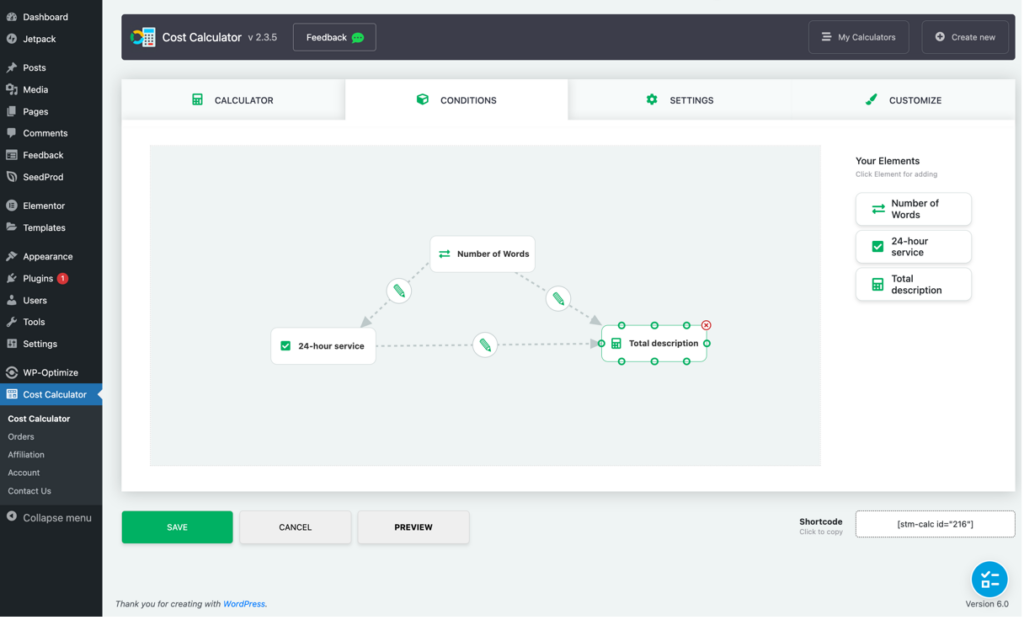
Conditions
While the Total element discussed earlier allows for creating complex mathematical equations, the Conditions tab – which is a Pro feature only – expands those further using logical conditions. For example, AND, OR, is/is not selected, is greater/less than, is/is not equal to, etc., are all available.
The available conditions depend on the elements in use, and creating relationships is easy thanks to drag-and-drop.
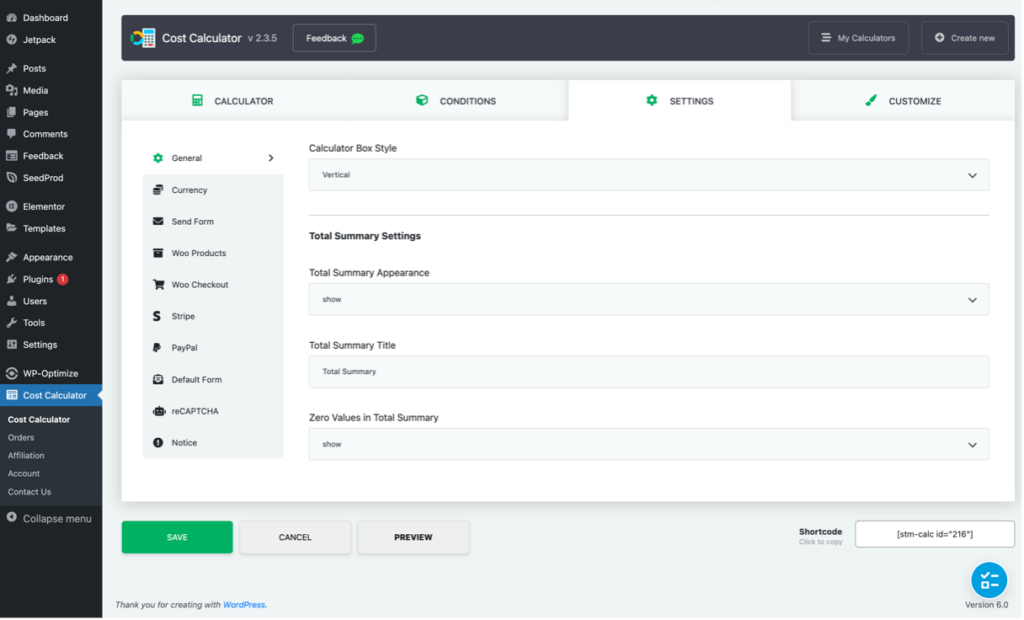
Settings
The Settings tab contains general global configurations, such as the currency symbol to be used, the wording required for the total summary, whether to display zero values or not, etc. It also includes the configurations for forms, WooCommerce, payment integrations, etc.
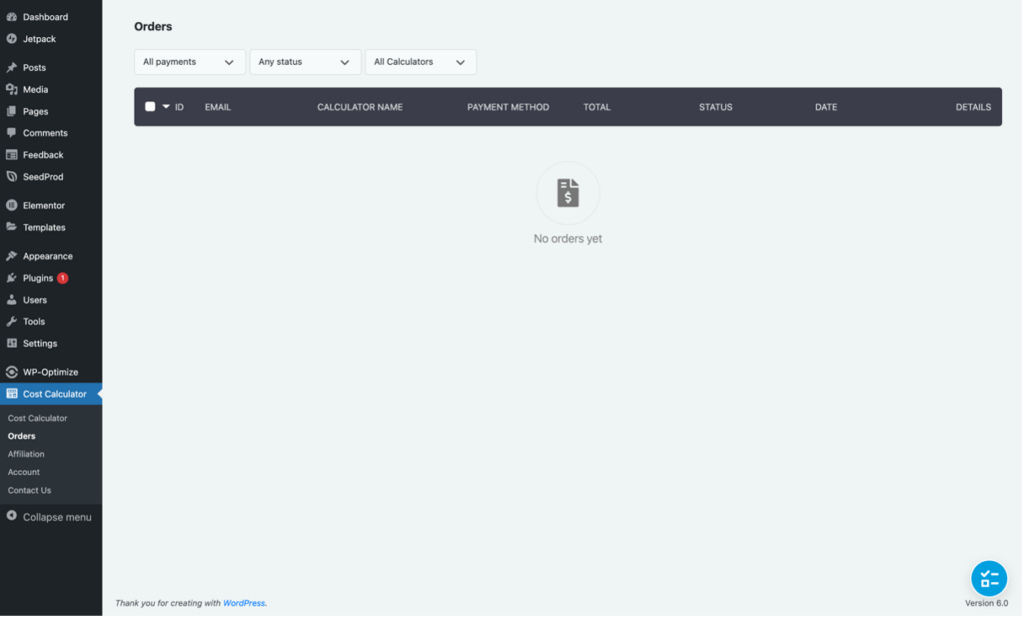
You may also notice that the Cost Calculator menu in the WordPress admin panel contains an ‘Orders’ option. This allows tracking of orders from calculators which have been monetized using one of the payment integrations:
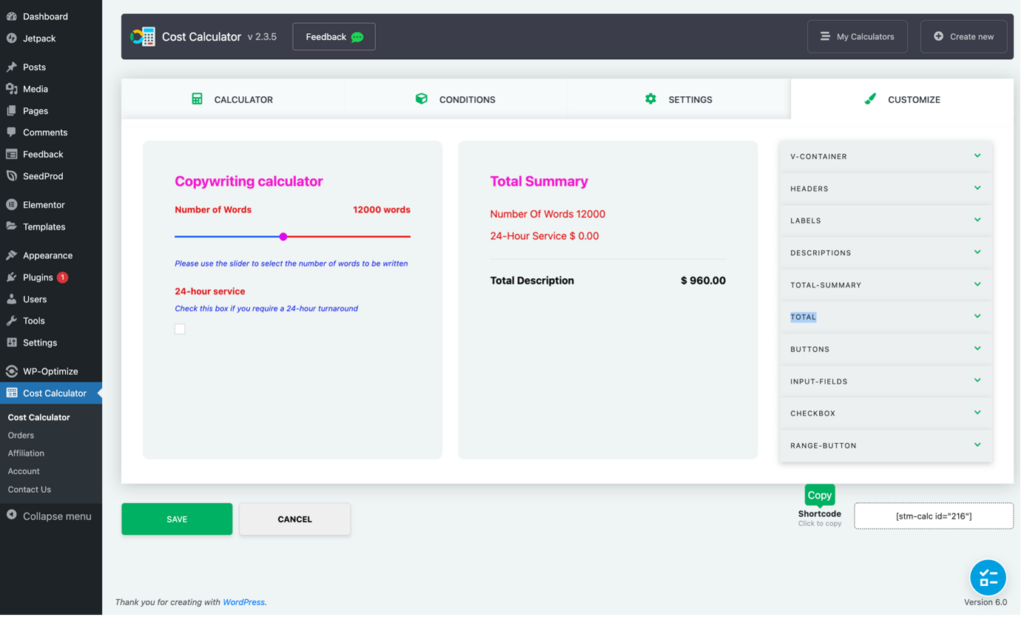
Customize
The Customize tab includes tons of options to jazz up calculators or make them match a site’s branding. One particularly nice feature of this tab is that you can see the changes made to the calculator in real-time before saving them.
The Verdict
I have to say, I’m in love with Stylemix Themes’ Cost Calculator Plugin for WordPress and will definitely be using it on my business websites.
Creating both simple and complex calculators is an absolute breeze thanks to an intuitive interface, drag-and-drop, and detailed documentation. Furthermore, the calculators add an interactive element to your site, which helps with engagement. Best of all, the PayPal and Stripe integrations allow your customers to select the options they want and pay via the calculator so that you can capture their business (and Dollars) immediately.
Whatever type of business you run, it is possible that your website could benefit from the addition of a calculator. Not only will it create a better user experience for site visitors, it will also give them the personalized cost information they need automatically, allowing them to make an immediate purchasing decision. And the Cost Calculator Plugin for WordPress will make adding calculators to your site super easy.