Would you like to know how you can embed videos in WordPress? Similar to images, videos can be beneficial tools for attracting, engaging, and re-engaging your website’s visitors.
You can also improve your Google search ranking by embedding videos on your WordPress site.
Consequently, in this article, we would like to explain why embedding videos in your WordPress blog posts is essential and share some methods of embedding videos into your posts and pages.
Why Embed Videos in Your WordPress Blog Posts?
It s a great idea to include videos on your WordPress blog to make it more engaging and increase conversions for your visitors.
A video is an excellent way to engage your website visitors and increase the number of pages they spend on your site. Some visitors may even choose to watch a video over reading text on your page.
Should You Upload Videos Directly to WordPress?
Adding videos to your posts and pages can have various benefits, but uploading them directly to your WordPress media library can significantly slow down your site.
These are some of the reasons why we believe you shouldn’t directly upload videos to your website:
Server Bandwidth
In many cases, web hosting plans come with a certain amount of bandwidth allocated to them.
The allocation is based on the number of pages, the volume of media that loads on the website, and the average website traffic.
When someone views a video hosted on your website, a percentage of your bandwidth is consumed. Increasing the popularity of any video will use up more bandwidth, leaving less for you to load your website.
File Size Limits
It is common for servers to restrict the maximum file size that can be uploaded. Most servers limit the total file size to approximately 50 megabytes.
You must contact your hosting provider to increase the maximum upload size in both cases.
Some web hosts do not apply such a small file size limitation, but many do, and most will have some limitations on the size of the files.
Even though your video fits within the limit, uploading too many and you will quickly exhaust your available storage.
There is a great deal of data contained in video files. Generally, a high-quality video should range from a few hundred megabytes to one or two gigabytes.
If you use shared hosting or a cloud hosting account, such large files can quickly consume your storage allowance if you are on shared hosting.
Slow Loading and Freezing Video
It is essential to have sufficient bandwidth and good server performance to support video playback on your website. Not all web hosting plans can accommodate both video and website visitors.
The audience may experience buffering and unexpected pauses when the video is played if you have limited bandwidth and upload a video of high quality.
Any disruption to the user experience quickly becomes annoying, and the problem could deteriorate if you have a high volume of traffic.
Varying Video Quality Across Devices
Most audiences expect your videos to be viewed at the highest possible quality for their connection speed and screen size.
In general, a 1080p video stream at a high bitrate should not pose a problem on laptops and larger screens, but there may be a problem on mobile devices.
Since WordPress videos are not responsive by default, you must create lower-resolution versions to accommodate smaller screens for mobile and tablet devices.
Compatibility With Web Browsers
There is a difference in the way each web browser processes videos. As a result, if the same video appears excellent in one browser, it may appear differently in another.
How to Embed Video in Posts or Pages?
Embedding your video involves uploading it to another website, such as Vimeo, YouTube, or DailyMotion, and playing it on your website. We strongly encourage you to use this method.
The embedding process essentially involves hosting your video on the server of a third-party hosting service and displaying it on your WordPress website.
This section presents various methods to embed video in posts or pages:
Method 1: Embedding Videos in WordPress Using Block Editor
With WordPress’s auto-embed feature, your website can automatically obtain embed codes from popular video hosting services, including YouTube, Vimeo, etc.
Follow these steps to do this:
- Copy and paste the video URL into the WordPress editor. Using YouTube as an example, you can copy the video URL you would like to embed.
- Open the WordPress post or page where you want to add the video in the edit mode.
- Paste the URL in the content area. When you paste the YouTube video URL, WordPress will automatically fetch the embed code for the video and display it inside the content editor.
- Save the post or page by clicking the Update or Publish button; after that, you have embedded the video in your post.
- Click on the video in the editor and make changes from the popup toolbar.
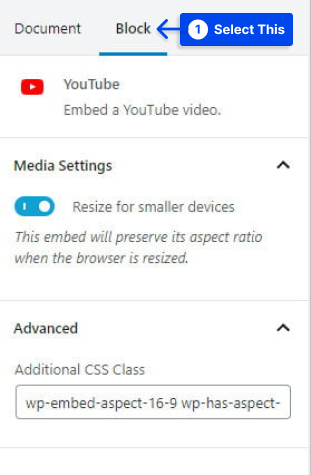
The video width can be adjusted, alignment can be changed, and additional options can be added. On mobile devices, the video’s aspect ratio can also be preserved.
Note: Only whitelisted video services can be embedded automatically by WordPress; for other websites, the embed code must be obtained and then pasted into your blog.
You will need the HTML embed code for the video if you wish to include a video from a website that is not on the WordPress whitelist.
Follow these steps to use this method:
You can copy the HTML code provided by the video website and paste it inside the HTML block in your editor. So, you can embed videos in WordPress with or without youtube.
Method 2: Embedding Videos in WordPress Using the Old Classic Editor (TinyMCE)
Alternatively, suppose you still use the old WordPress classic editor. In that case, you can embed the video in the same manner as before.
Follow these steps to use this method:
- Copy and paste the URL from a video hosting service like YouTube into the editor.
You will see a video preview if you use the visual editor.
However, you must note that you cannot utilize the width adjustment and other options in the new WordPress block editor.
- Click the Update or Publish button to make your changes live.
Method 3: Embedding Videos in WordPress Sidebar Widgets or Footer
In the same way, videos can be embedded in posts or pages in WordPress, and videos can also be embedded in sidebar widgets.
Follow these steps to use this method:
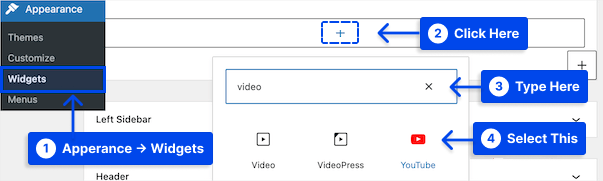
- Go to your WordPress dashboard.
- Go to Appearance.
- Go to Widgets.
- Click the Plus add block icon.
- Search for Video in the search bar.
- Click on the block for the type of video you want to add.
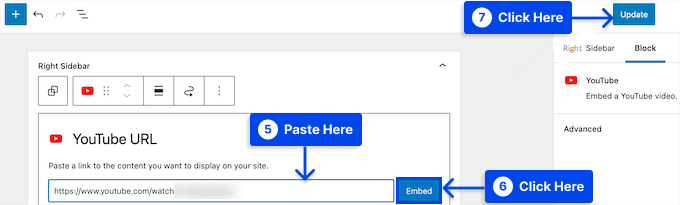
- Paste your video URL into the box.
- Click the Embed button.
The video will be automatically added to the widget area.
- Click the Update button.
Now that the video widget is live on your website, you may enjoy it.
If you visit your website, you can watch the video live. The video size will automatically be adjusted to fit within the widget area of your website.
Method 4: Embedding Videos in WordPress in the Elementor
In Elementor, you can embed videos using the Video Widget, which makes it very easy to include videos in your content.
Follow these steps to learn how to add video in WordPress with Elementor:
- Include the video widget in the content where you wish to include the video.
- Select the source from four options: YouTube, Vimeo, DailyMotion, and Self-Hosted.
- Paste the video link.
With Elementor Pro, you can also dynamically insert videos from custom fields using its dynamic content feature.
- Configure the other settings according to your preferences.
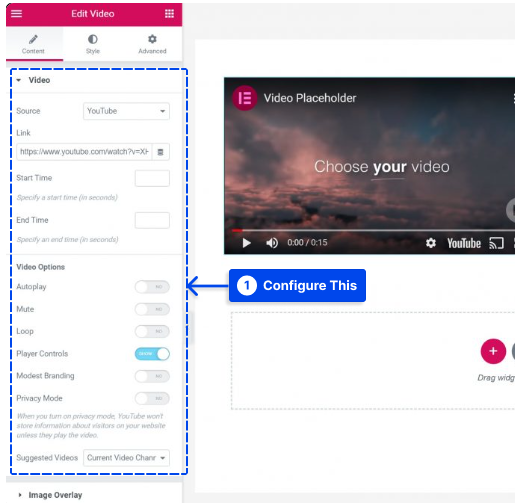
This can be done in several ways, for example, by auto-playing the video and disabling the player controls.
It is recommended to use the Image Overlay feature to show a static image while lazily loading the video to achieve better performance.
By doing this, you will delay loading the video until the user interacts with it, thereby speeding up the loading time of your site.
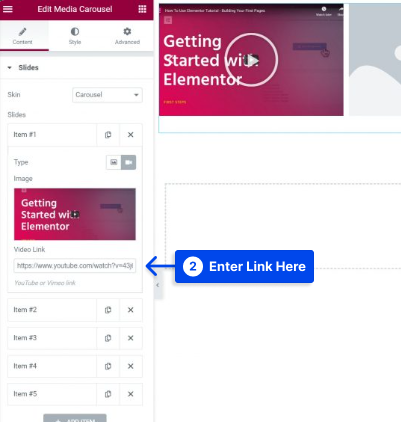
You also gain access to the Media Carousel widget with Elementor Pro, which allows you to create carousels and sliders with embedded videos from YouTube and Vimeo.
Follow these steps to use it:
- Select Video for the slide type in the widget’s settings and add a thumbnail image.
- Enter the YouTube or Vimeo video link in the Video Link box.
Additionally, third-party Elementor addons allow you to access additional widgets to facilitate the work with videos.
For example, Ultimate Addons for Elementor provides a new widget that allows you to filter your video collection.
Method 5: Embedding Videos in WordPress in the Divi
With Divi’s Video module, you can easily add videos to your pages. With this module, you can embed videos from various sources and customize the thumbnail image and play button to give the embedded video a more professional appearance.
If you have installed the Divi Theme, you will notice a button labeled Use Divi Builder that appears whenever you create a new post.
This button enables the Divi Builder, allowing you to access all the modules available through the Divi Builder.
Follow these steps to Embed videos in WordPress in the Divi:
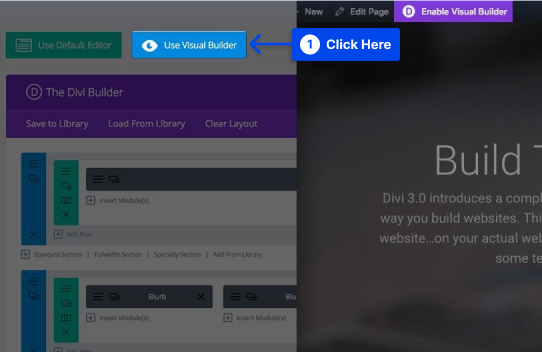
- Click the Use Visual Builder button to launch the builder in Visual Mode.
Note: this button can also be found when you are in your WordPress Dashboard when browsing the front end of your website.
- Click the gray plus button to add a new module to your page after you have entered the Visual Builder.
Note: you cannot add new modules outside of rows. If you are starting a new page, be sure that you have added a row to it before starting your page.
- Add the video module to your page by selecting it from the list of modules.
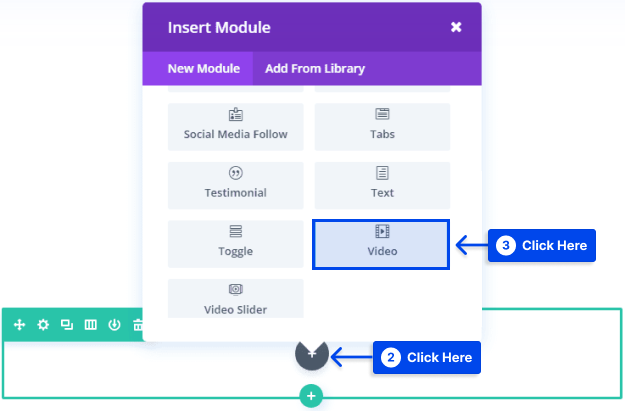
Adding the video module is automatically found and added by typing the word “video” and clicking enter in the module list.
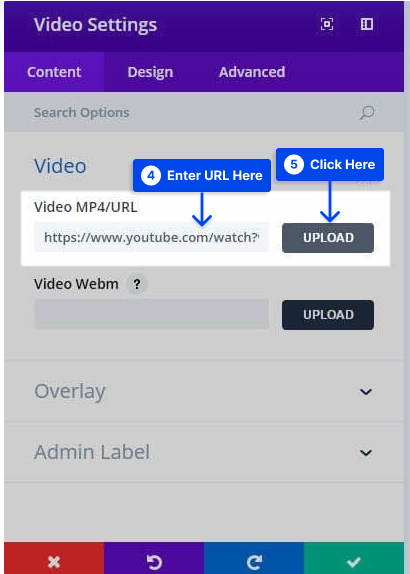
You will be presented with the module’s options when the module is added. Three main options are available: Content, Design, and Advanced.
- Enter the video URL of the video you want to embed under the Content tab of the Video Module Setting.
- Click the Upload button.
A URL for an Image Overlay can also be added to my video by clicking the Generate From Video button.
This feature automatically pulls an image from the video to serve as an overlay with a new icon for customizing videos.
You can change the color of the play icon under the Design tab to match the color of your page. You will now have a video for your landing page that is easy to view and matches the design of your website.
Method 6: Use Plugins to Display Videos Easily
Several plugins are available that extend the functionality of embedding videos in WordPress in addition to the default methods. So, you can embed youtube videos in WordPress with plugins.
Below are some tools you might be interested in checking out if you plan on using videos frequently or if you wish to customize them further.
If you are using WordPress.com, you will need a plugin-enabled plan to install these and many other plugins.
Advanced Responsive Video Embedder
With Advanced Responsive Video Embedder, you can add a wide range of useful features while maintaining an ease of use that is relatively simple.
The first benefit of this plugin is that it makes your WordPress videos responsive so they can be viewed on mobile devices.
In addition, you will have more options for your video titles, descriptions, and metadata, which may also benefit your search engine optimization.
In addition to supporting nearly every video host, this plugin provides an easy way to embed videos from various websites. The plugin also allows you to add shortcodes in CSS and set maximum video widths and alignment.
Additionally, this plugin allows you to control additional features such as autoplay and related video suggestions to ensure your site visitors are focused on your content.
Easy Video Player
The Easy Video Player is a highly easy-to-use plugin for embedding videos.
Even though WordPress’s default embedding options are straightforward, sometimes you want extra control without the burden of a lot of functionality you will never use.
With this plugin’s help, you can insert responsive videos that your audience will enjoy on mobile devices. It can be customized through shortcodes.
This plugin is also compatible with HTML5 for excellent browser compatibility. You need not worry about viewers with non-standard browsers or unusual sources.
Additionally, this plugin can mutate looped or auto-playing videos with the click of a button.
In addition to these features, a very user-friendly package allows you to upgrade your video content without difficulty.
Conclusion
Throughout this article, we have discussed why it is essential to embed videos into your WordPress blog posts and provided several examples of how to embed them into your posts.
Thank you for reading this article. We hope you find it helpful. Any questions or comments you may have are welcome.
You can follow us on social media platforms such as Facebook and Twitter for the latest updates on our articles.