How do you fix a “401 Unauthorized” error? Whether that site is your own or someone else’s. Either if it’s your site or someone else’s, it is not convenient to see this error once you open a website.
A 401 error is one of the most frustrating HTTP response codes because it does not provide information about how the error can be diagnosed or resolved.
As a result, 401 errors can occur in any web browser, a common problem people encounter. In most cases, it is simple to resolve.
This article will explain the 401 error code, what causes it, 401 error variations, how to fix the 401 unauthorized error with seven methods, and the error 401 vs. error 403 comparison.
What Is the 401 Error Code?
As defined by the Internet Engineering Task Force (IETF), the error code 401 Unauthorized is as follows:
The 401 Unauthorized status code indicates that a request could not be processed because the target resource’s authentication credentials were invalid.
A server that generates a 401 response must include at least one WWW-Authenticate header field containing the challenge for the target resource.
You may encounter HTTP 400 status codes if there is a problem making your request. The 401 status code is mainly encountered when your browser denies you access to a website.
As a result, the browser will display an error message instead of loading the webpage. 401 errors are possible in any browser, so the message that appears may be different depending on the browser.
A website requiring a login may cause these errors in most cases. Usually, this implies that there is either a problem with the credentials or that the browser can’t read them correctly.
There is some similarity between HTTP 403 Forbidden Error and HTTP 401 Forbidden Error in that access to the site is denied. However, unlike HTTP 403, the 401 error indicates that the authentication process failed.
In this case, the code is sent via the WWW-Authenticate header, which indicates the method of authentication being used for access to the web page or resource.
What Causes a 401 Error?
When you encounter an error code in the 400 range, you know you are experiencing a problem at the client or browser level.
It may be true that the problem is occurring within your browser, but this does not necessarily imply that it is the cause.
The 401 error occurs when you attempt to access restricted resources of your WordPress website, such as password-protected pages.
The authentication credentials must be the cause of the problem, so it can be safely assumed that it is the cause of the problem.
Reason 1: Outdated Browser Cache and Cookies
Your browser’s cache and cookies may be outdated, which prevents the authorization from going through successfully, causing a 401 error.
You will be rejected by the server if your browser is not using valid authentication credentials or if no authentication credentials are provided at all. You have to clear your browser cache to fix it.
Reason 2: Plugin Incompatibility
Sometimes, this error may be caused by a plugin conflict or error. For example, a security plugin or firewall may mistake your login attempt for malicious activity and return an error 401 to protect your website.
Reason 3: Incorrect URL or Outdated Link
It is also possible that a minor error causes the problem. Common examples of such mistakes include incorrectly typed URLs or outdated links.
401 Error Variations
The 401 error is no longer just a bland and plain message. You can now get many different types of errors due to the variations in the online environment.
Listed below are some error messages that might appear when a 401 error occurs:
- 401 Authorization Required
- Access Denied
- 401 Unauthorized Error
- HTTTP Error 401
Taking a look at some of the most common error messages that clients encounter, let’s look at a few variations of the popular 401 error message:
- 401.504: You are using a hostname listed on the server’s deny list.
- 401.503: There is a chance that your IP address is on the server’s deny list when this error occurs.
- 401.502: In this case, the error occurs due to countless requests sent to the same web server by the same client. The client has reached the daily limit for sending requests to the same web server based on dynamic IP Restriction Concurrent access.
- 401.501: The error occurs if you, as the client, send multiple requests that exceed the maximum number of requests.
- 401.3: An Access Control List (ACL) has prevented the login attempt from being successful.
- 401.2: An attempt to log in was unsuccessful due to configuration issues on the server.
- 401.1: An attempt to log in has failed.
How to Fix the 401 Unauthorized Error (7 Methods)?
Throughout this section, we will examine seven effective methods for resolving the 401 Unauthorized error:
Method 1: Confirm the URL Is Correct
When the browser’s address bar is filled with the incorrect URL, the user may receive a 401 error message.
It is highly recommended that you check the URL that you have entered before attempting any other method. Make sure no special characters or numbers are missing from the URL.
It is recommended that you double-check the hyperlink if it contains typos. Sometimes the hyperlink might be faulty or outdated, resulting in the 401 error.
If you want the correct URL, go to the website’s homepage and manually navigate to the problematic page. In addition, you may find the page by searching on Google.
Method 2: Clear Your Browser’s Cache
Typically, your browser’s cache reduces the time it takes to load pages and improves your online experience. Unfortunately, sometimes this can also cause interruptions to your online experience.
One of the common causes of the 401 error is the presence of outdated or incorrect cache data or cookies. In this case, if you do not observe any problems with the URL of the page, you should clear the cache in your browser.
Using this method, you will remove any invalid information stored locally in your browser, which may interfere with authentication. Furthermore, your browser’s cookies may contain authentication data that needs to be updated.
Follow these steps to clear your browser’s cache in Google Chrome:
- Click on the menu icon in the top-right corner of the browser.
- Click on the Settings option.
- Click on the Privacy and security section.
- Click on the Clear browsing data option.
- Check all three boxes are selected under the Basic tab.
- Click on the Clear data button.
There may be some differences in the appearance of this process in other browsers.
Follow these steps in Mozilla Firefox:
- Click on the library icon in the top-right corner of the browser.
- Go to History.
- Click on the Clear Recent History option.
- Choose Everything in the drop-down menu.
- Check the box near the Cache option.
- Click on the Clear Now button.
Method 3: Flushing DNS Cache
Additionally, DNS records are stored locally on your device in addition to the cache and cookies maintained by your browser.
As a result of the data in the DNS cache, your device can match URLs to their IP addresses more quickly, which can result in faster loading. Nevertheless, unlike the browser’s cache and cookies, the DNS cache is a system-level cache.
401 HTTP status codes are generated by DNS errors, although these are rare. There is a possibility that the DNS cache is outdated, containing incorrect information regarding URLs and IP addresses.
If you flush your DNS, it will delete all of your device’s existing DNS records, forcing it to make a completely new request and reauthenticate the URLs with the new DNS records.
Follow these steps to flush your DNS cache on Windows:
- Go to the search bar and type in Command Prompt.
- Run Command Prompt as Administrator.

- Type in the command “
ipconfig/flushdns” and press Enter.
A successful flush of the DNS resolver cache will be indicated by a message such as “Successfully flushed the DNS Resolver Cache“.
Method 4: Deactivate Your WordPress Plugins
Your browser may not be the cause of your 401 error. There is also a possibility that one or more plugins may be the cause of your difficulty logging into your WordPress website.
Security-related plugins are configured to display a 401 error message when suspicious login activity is detected that may indicate an attack.
Alternatively, some may be experiencing compatibility issues, so it might be worthwhile to deactivate all of your WordPress plugins and test if that resolves the problem.
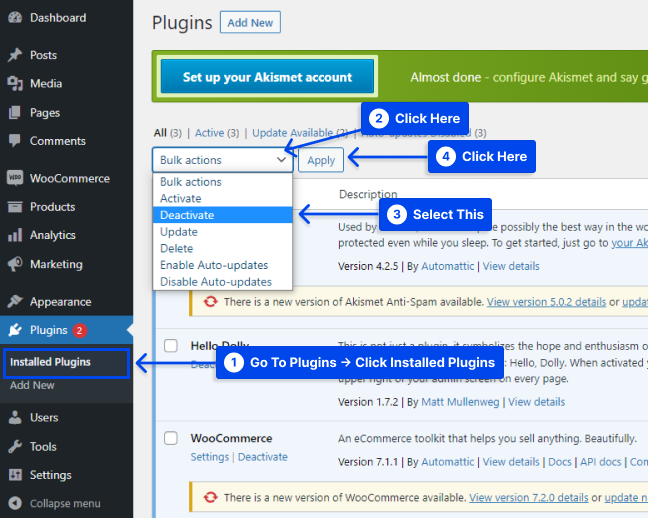
Follow these steps to deactivate all your plugins at the same time in your dashboard:
- Go to Plugins in your WordPress dashboard.
- Click on the Installed Plugins option.
- Check the checkbox next to each plugin.
- Click on Bulk actions.
- Select Deactivate and click on the Apply button.
Once you have completed the above steps, try reloading the page that returned the 401 error to see if it has resolved the problem.
For further investigation, you may manually activate each plugin one at a time to determine which one is causing the problem.
Then you may want to remove the plugin and replace it with a new one, or you may want to contact its developer for assistance.
Method 5: Check Authentication Credentials
When you attempt to access a password-protected page with an invalid authentication credential, you may receive the 401 Unauthorized Error code. Consequently, you can’t access the page.
You should double-check to ensure that you are logged in with a valid username and password; if you are certain that you have entered the information correctly, you should change your password.
It may be necessary to reset your WordPress password if you have difficulty accessing a password-protected WordPress site.
Method 6: Disable Password Protection
You may want to temporarily disable password protection on the problematic section of your site if you are a webmaster and want to resolve the 401 error.
Follow these steps if you have enabled password protection using the .htpasswd and .htaccess files:
- Access your hosting account’s File Manager.
- Open the password-protected website directory.
- Locate the
.htaccessfile that was created when you enabled password protection. - Back up the file’s content in case you want to re-enable password protection.
- Delete the
.htaccessfile from the directory. - Locate the secret location of the
.htpasswdfile, back it up, and delete it too.
Method 7: Check .htaccess File
There are other ways to protect your passwords besides the hosting panel. In some cases, a website won’t prompt for login even though it’s not set in the hosting panel, but directives in its .htaccess file may cause it to.
There may be a problem with the .htaccess code that you entered earlier and forgot about or from a plugin that added it.
Follow these steps to check if there are such directives:
- Open the website’s folder from FTP or File Manager.
- Check the
.htaccessfile. User credentials for the protection are specified in.htpasswd. This file includes the user name and the encrypted password for protection. - Delete the code from the
.htaccessfile if the protection is not intended. - Save the changes.
Error 401 vs. Error 403 Comparison
A 401 error code indicates that the client’s web browser failed to receive resources from the web server caused by insufficient or incorrect authentication information.
Nevertheless, the 403 Forbidden Error signifies that the server has received the request, but not all parts of the website are accessible.
Incorrect login details are usually responsible for the 401 error, and insufficient access levels are responsible for the 403 client error.
An example of this might be a WordPress site containing a membership feature that prevents users with a “visitor role” from accessing the members-only pages.
It is also possible for geo-blocking to result in the 403 client error status message. There may be a restriction on IP addresses from specific countries or regions that are allowed on the web server.
The 403 HTTP status code may also appear in other variations: “403 Forbidden”, “Forbidden: You don’t have permission to access [directory] on this server”, and “Access Denied ‒ You don’t have permission to access”.
Conclusion
This article has explained the 401 error code, what causes it, 401 error variations, how to fix the 401 unauthorized error with seven methods, and the error 401 vs. error 403 comparison.
Thanks for taking the time to take a look at this article. We are pleased to provide it to you. Please use the comments section to post your questions and comments.
We regularly update our Facebook and Twitter pages, so we invite you to follow them so that you can keep up with the latest developments.