Would you like to know how to fix the “Error for Site Owner Invalid Domain for Site Key” error? A lovely day suddenly turns into a frustrating experience when you are unable to access your WordPress Dashboard due to this error message.
Moreover, you are highly frustrated because you need help finding a solution to this problem.
So, this article will explain What the “Error for Site Owner Invalid Domain for Site Key” error is and present the six best methods to fix it.
What is “Error for Site Owner Invalid Domain for Site Key”?
This error often occurs when you migrate or duplicate your website to a new domain. Still, you forget to change the Site Key and Secret Key on the Login NoCaptcha plugin on the new website, or you do not specify the new domain on your Google ReCaptcha page.
Therefore, your new domain cannot be accessed by the WordPress dashboard; instead, you receive the error message “Error for Site Owner Invalid Domain for Site Key.”
How to Fix “Error for Site Owner Invalid Domain for Site Key”?
Sometimes, you may experience the “error for site owner invalid key type” error. What is the cause of this issue?
There are two main reasons for this – the wrong type of ReCaptcha and the problem with the domain name.
Continuing with this section, we will examine how to resolve the “error for site owner invalid domain for site key” issue with six methods.
Method 1: Downgrade to ReCaptcha V2 Key
The most popular web frameworks are not compatible with V3 keys, so the first thing you can do to resolve the “error for site owner invalid key type” issue is to downgrade to the Recaptcha V2 key.
Follow these steps to do this:
- Go to your WordPress dashboard.
- Choose Contact Form 7, Integrations, and remove the API keys.
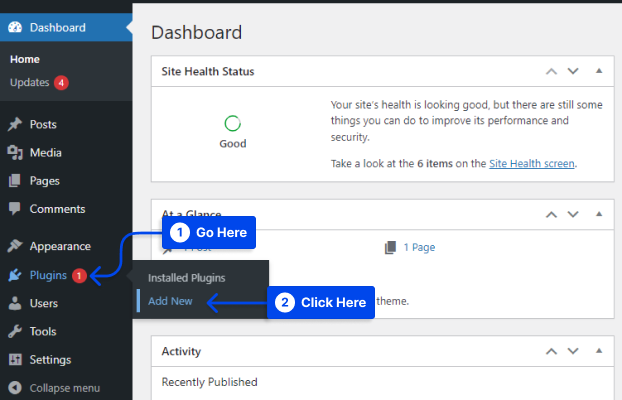
- Go to Plugins and click on the Add New option.

- Search, install, and activate the Invisible reCaptcha for the WordPress plugin.
- Go to the ReCaptcha Admin account.
- Select ReCaptcha v2 (Invisible) and generate new keys. After completing the form, you will receive a site and secret keys.
- Copy the site key to the clipboard.
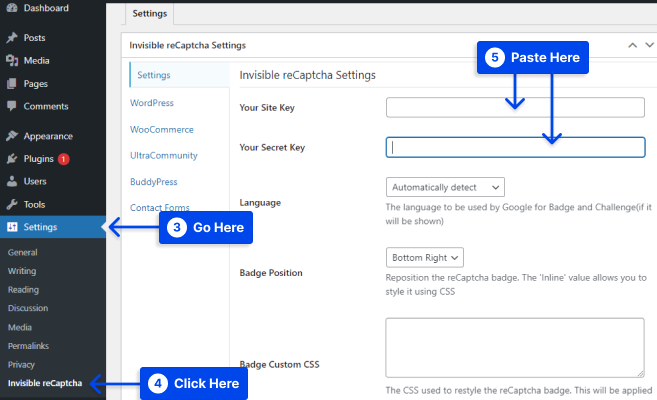
- Go to Settings in the WordPress dashboard.
- Click on the Invisible reCaptcha option.
- Paste the Site Key you copied earlier in the Site Key field.
- Go back again to copy the Secret Key.
- Paste the Secret Key into the Secret Key field.
- Click on the Save Changes option to save changes.
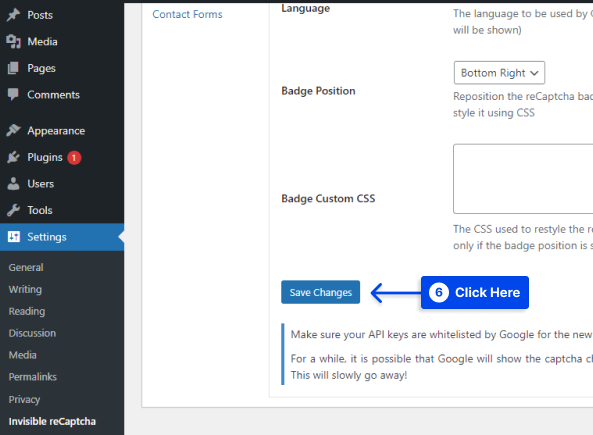
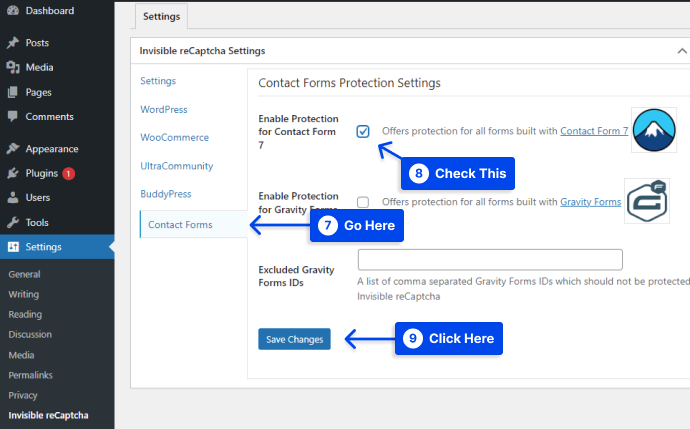
- Go to the Contact Forms tab.
- Check the Enable Protection for Contact Form 7 option.
- Click the Save Changes option.
Method 2: Reinstall the Plugin and Add Your Site to Google Recaptcha
In this method, if you use the Login No Captcha reCaptcha plugin, you must first go to the cPanel of your website and open the file manager to make changes.
Follow these steps to do this:
- Go to your cPanel.
- Open the file manager.
- Select the Public_html folder.
- Click on the wp_content folder.
- Choose the plugins folder, then Login-recaptc folder.
- Select all files in Login-recaptc folder and delete them.
- Check the WP login page to see if the error has been resolved.
As long as your website is working, the error has been fixed. You should now be able to access your WordPress dashboard, although the error has been resolved by removing your plugin.
As a result, your website has a new issue; you should reinstall the plugin and add a new domain to protect your site from hacking attempts and unwanted threats.
Follow these steps to do this:
- Go to your WordPress dashboard.
- Go to Plugins and click on the Add New option.
- Search, install, and activate the Login No Captcha reCaptcha plugin.
- Go to Settings and click on Login NoCaptcha.
- Click on the Click here link to create the Site Key and Security for Google Nocaptcha.
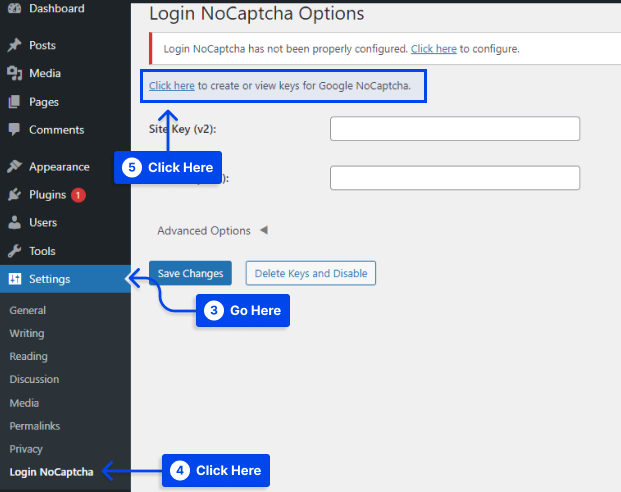
- Go to the Google Recaptcha page and fill out the form, including the label, your site’s Domain, and reCaptcha type.
- Check the box next to Accept the reCaptcha terms of service and click on the Submit button.
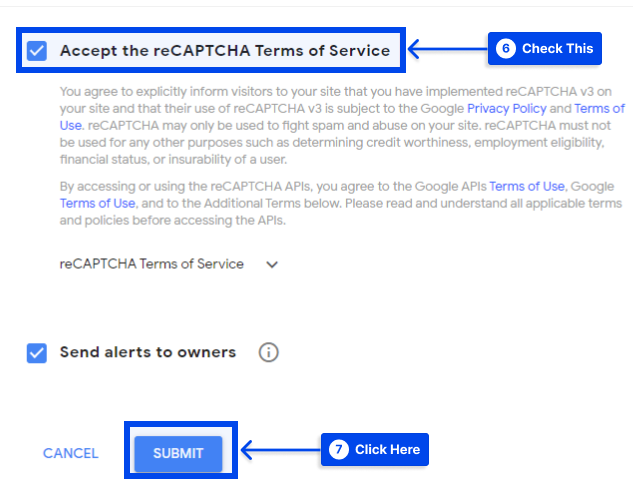
You will be provided a Site Key and Security Key for your website when you click the Submit button.
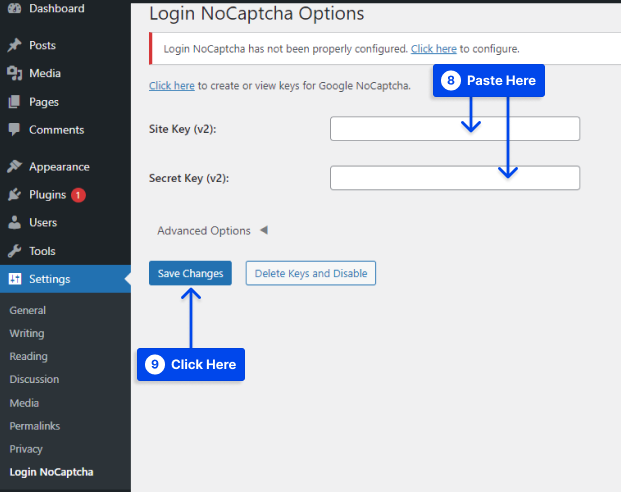
- Copy these keys and paste them into the settings page of the plugin.
- Click on the Save Changes button to save your settings.
- Visit your login page, and you will see that the Google reCaptcha security protocol is in place to secure your website.
Method 3: Verify Domain Name
You should confirm that your website exists and has the same domain name registered for ReCaptcha and that it has been included in the domain name section of the Google ReCaptcha page.
You can verify this by following these steps:
- Select Plugins, then click Settings under WP-ReCaptcha options.
- Enter the site key and secret key.
- Click Save ReCaptcha changes.
Method 4: Edit and Update Settings in the Database
When the site administrator must also enable the verification code option for logging into the site and they encounter the same error message, you need to make some changes to the database.
During this process, you will only need to disable this option; however, ensure that you have backed up your files before proceeding.
Follow these steps to do this:
- Run the following command in the database to disable the verification code:
Update tblconfiguration SET value ='' where setting ='CaptchaSetting'; - Verify that the “error for site owner invalid domain for site key” has been resolved.
Method 5: Disable the Domain Name Validation Verify the origin of reCAPTCHA solution
Follow these steps to use this method:
- Go to https://www.google.com/recaptcha/admin
- Click on the domain.
- Go to key settings at the bottom.
- Disabled the option below the Domain Name Validation Verify the origin of reCAPTCHA solution.
- Click on the Save button, and the captcha starts working.
Method 6: Contact Support
If none of the methods are working, you should consider contacting support. It would be best if you waited until you received your reply before following the advice provided by customer service. Ensure that the “error for site owner invalid key type” problem has been resolved.
Conclusion
Throughout this article, we have outlined the “Error for Site Owner Invalid Domain for Site Key reCaptcha” error and explained six ways to resolve it.
We are pleased to welcome you to this article; thank you for taking the time to read it. Please feel free to leave any comments or questions in the comments section.
Our articles are regularly posted on Facebook and Twitter, so please follow us for the latest information.