Would you like to know how to fix the “This Site Can’t Be Reached” error? In most cases, you will encounter an error message in your browser that states, “This site can’t be reached” when you visit any website.
There may be many users who are experiencing this error but are unsure of how to fix it. There are many situations in which this error occurs in the browser.
In this article, we will explain what causes the error and how to fix it with the most effective methods so that you can enjoy your browser without a problem.
What Causes the “This Site Can’t Be Reached” Error?
The “This site can’t be reached” error can sometimes be frustrating because Chrome may not understand the cause of the problem. It is important to note that this message may appear along with various error codes.
If you encounter the DNS_PROBE_FINISHED_NXDOMAIN error, for example, then you will receive the “This site can’t be reached” error notification.
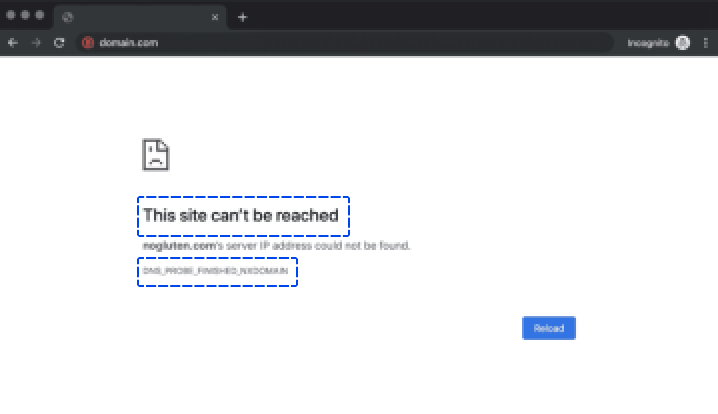
The exact error message will appear if the connection times out or if the error code ERR_CONNECTION_RESET is encountered.

It is common for Chrome to use the message “This site can’t be reached” as a catch-all description of various errors. “This site can’t be reached” when the server took too long to respond is an example.
Generally, the most common causes of this error are as follows:
- Errors related to resolution for the Domain Name System (DNS)
- Time-outs in your connections
- An overall problem with your internet connection
- Misconfigured firewall or internet network settings
While Chrome provides a few solutions to each error message, several other ways exist to resolve this issue.
How to Fix the “This Site Can’t Be Reached” Error?
This section will guide you through various methods for troubleshooting the “This site can’t be reached” error. For example, you can use these methods to fix “This site can’t be reached” on android and desktop devices.
Furthermore, “This site can’t be reached” in windows 10 and 11 can be fixed with these methods.
Let us begin with the most straightforward fix, which entails checking your Internet connection:
Method 1: Restart Your Internet Connection
Despite having a working internet connection, you may still encounter the “This site can’t be reached” error if there are any errors with the connection.
The solution may seem too simple, but restarting your router or modem can help to resolve this issue quickly.
Since restarting your connection usually takes only a few minutes, this should be the first step you should take.
Most internet service providers (ISPs) recommend disconnecting your router’s power cable and waiting one full minute before reconnecting it.
Once it has been restored, wait a few minutes for your internet connection to reactivate, and then attempt to access the site again. In this way, you can fix the “This site can’t be reached” when the connection is reset.
Method 2: Disable Your Firewall and Antivirus
You may find that the built-in firewall of your operating system, or other software you use, often blocks pages aggressively and prevents your computer from connecting to them.
You can check if that is the problem by temporarily disabling your firewall and antivirus software. After this, you can reaccess the website.
To disable the firewall built into your operating system, you will need to follow a separate set of steps depending on the OS that you are using.
If you wish to disable your antivirus software, your settings will vary depending on the tool that you are using.
Although your firewall may block you from loading a website, it is rare for it to do so unless the website is highly harmful.
The best way to solve your problem is to disable your firewall and antivirus software. If that does not work, it is time to try a different method. Don’t forget to reactivate them both before moving forward.
Method 3: Clear Your Browser Cache
While navigating the web, Chrome saves many data and files from the websites you visit. Those files are stored by the browser in a local cache, which saves you the trouble of reloading pages every time you visit them.
Your cache files might cause you to encounter the “This site can’t be reached” error. It is necessary to clear the cache of your browser to resolve this issue.
Follow these steps to do this in Chrome:
- Go to Settings.
- Click on Privacy and security.
- Click on Clear browsing data.
- Check the Cached images and files option, then click the Clear data button.
As soon as you have completed this procedure, wait for Chrome to complete its tasks before reloading the website that was giving you trouble earlier.
Method 4: Flush Your DNS Cache
You will find a lot of data stored in your operating system’s “DNS cache” from the websites you visit. It will also store the IP addresses for these websites.
In this way, your browser does not have to look up the same IP addresses repeatedly through its DNS server whenever you attempt to establish a connection.
If this sounds familiar, it is because the DNS cache works the same way as your browser cache, only that different types of data are stored.
This excellent feature will save the user’s time in the long run. Nevertheless, it can also lead to errors if the information that your operating system caches on a website is outdated. You will have to “flush” or “reset” your DNS cache in such a case.
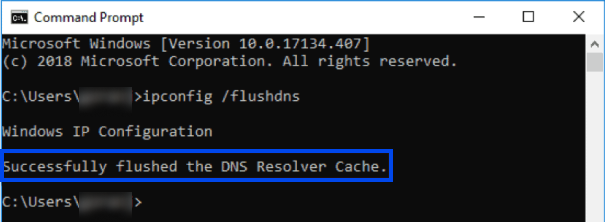
It is much simpler than you might think to flush your DNS cache. Follow these steps to do this:
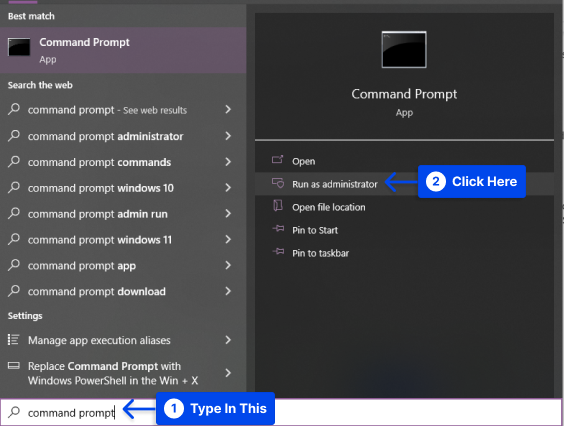
- Open the Windows search bar and type in Command Prompt.
- Run Comand Prompt as an administrator.
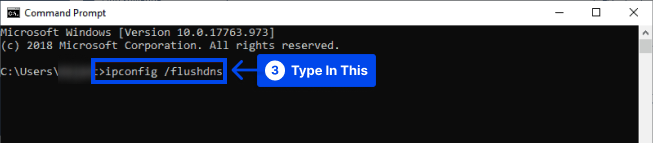
- Type ipconfig /flushdns in the command prompt and click Enter.
It should take only a few seconds to complete the process. You should see the DNS Resolver Cache confirmation message when it is completed.
The DNS cache database on your computer has been cleared. The next time your computer queries DNS servers, you should receive the correct IP mapping from the servers.
If this does not work, you might have to change your DNS servers, which will be discussed in the next section.
Method 5: Change Your DNS Servers
The DNS servers assigned to your connection by your Internet service provider are automatically configured. However, you can configure your internet settings so that a specific set of DNS servers is used.
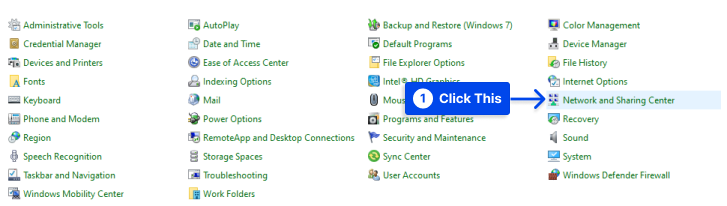
Follow these steps to do this in Windows:
- Go to Control Panel.
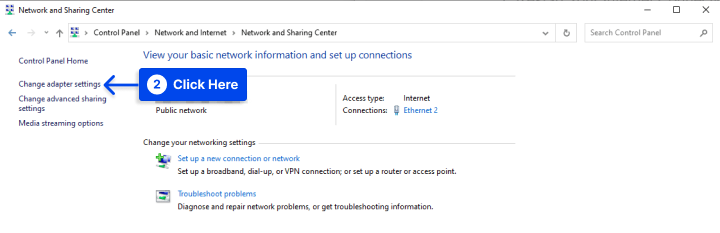
- Click on Network and Sharing Center.
- Click the Change Adapter Settings option.
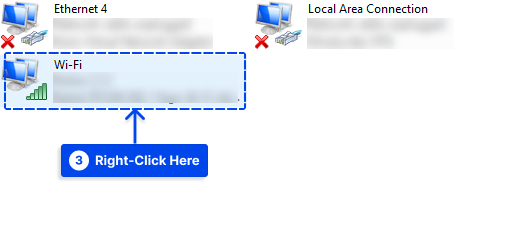
- Right-click on your active internet connection.
- Click on Properties in the pop-up window.
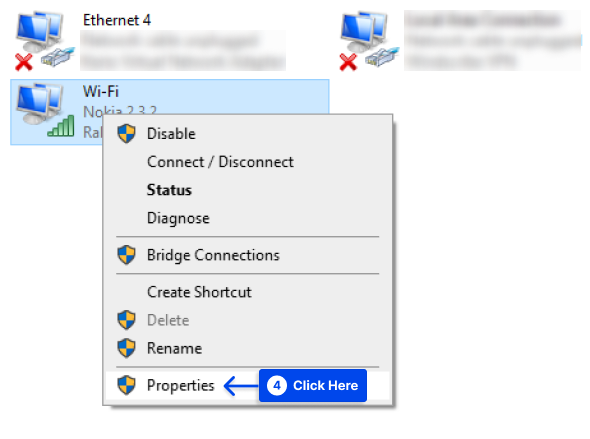
- Select Internet Protocol Version 4 (TCP/IPv4), then click on Properties.
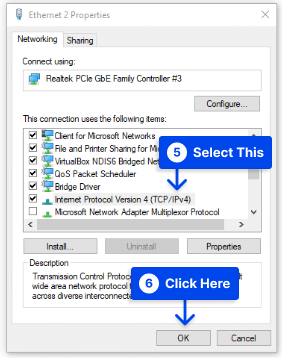
You will be presented with a new screen that includes a section on the configuration of custom DNS servers.
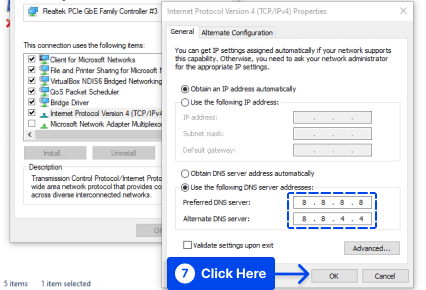
- Use the two fields to enter the DNS server addresses you want.
As you can see in the screenshot, we are using Google’s public DNS addresses of “8.8.8.8” and “8.8.4.4”. Nevertheless, there are several excellent free DNS servers that you can use.
- Click OK to save changes.
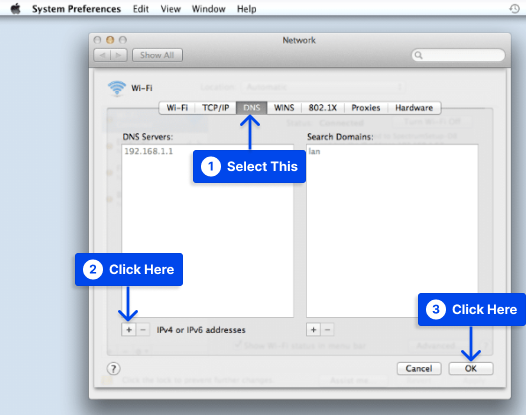
Also, follow these steps to change your DNS settings on Mac:
- Go to System Preferences, then Network.
- Select your network, then click on Advanced.
- Select the DNS tab.
- Click on the (+) icon to add the custom DNS servers you want to use.
- Click the OK button when you configure your new DNS settings.
Once this procedure is completed, your internet connection should work as usual. Still, you may no longer receive the “This site can’t be reached” error.
A change in DNS servers may allow you to load websites more quickly and access websites you could not access previously.
Method 6: Reset Wi-Fi Modem
You may solve the “This Site Can’t Be Reached” error by resetting the Wi-Fi modem. The Wi-Fi modem can be manually reset. You should also reset any separate routers you may have.
Follow these steps to do this:
- Ensure that the WiFi router is unplugged from its power source.
- For 10 to 15 seconds, hold down the reset button.
- Following the flickering of the modem’s lights, release the reset button.
- Allow three to five minutes for the Internet light to turn green.
- Try to connect to the Internet.
Resetting your modem may require account-related information.
Method 7: Disable the “Experimental QUIC protocol” Flag
QUIC was developed to provide a transportation protocol that would perform better than TCP over the Internet. A QUIC connection operates over UDP port 80 and UDP port 443.
Clients can bypass transparent proxies by using HTTP using QUIC in cases where UTM features such as web filtering may not work correctly in Google Chrome only but work perfectly in other browsers such as Internet Explorer and Mozilla Firefox.
You can disable the QUIC protocol on the Google Chrome web browser by following the steps below:
- Open Chrome and type chrome://flags/ in the address bar.

- Search for Experimental QUIC protocol.
- Change the Default to Disabled option from the drop-down menu.
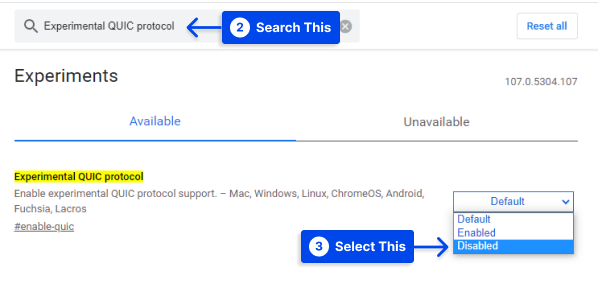
- To make your changes effective, restart Google Chrome.
Method 8: Changing Maximum Allowed TLS Version
There is also the possibility that the TLS version installed on the web server is outdated, which could explain this error.
TLS (Transport Layer Security) is a cryptographic protocol designed to ensure that communications over the Internet are secure. Currently, TLS 1.2 is in use, whereas TLS 1.3 is available for final implementation.
Follow these steps to use this:
- Type in chrome://flags/ in the Chrome address bar.

- Search Maximum TLS version enabled.
- Choose version 1.3, which is set to Default before.
- To ensure that your changes take effect, restart Google Chrome.
Method 9: Run the Windows Network Troubleshooter
Suppose you are experiencing problems with your wireless network connection. Try using the built-in network troubleshooter function to fix the error.
Follow these steps to do this:
- Launch the run program by typing “Run” in your computer’s search bar.
- Click on the Open option.
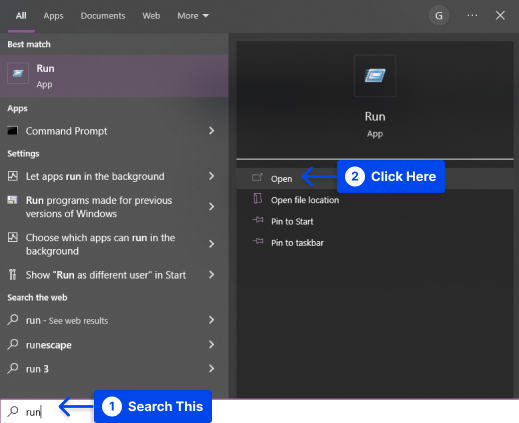
- To open the network connections window, type “ncpa.cpl” into the run program, then click OK.

- Locate your active connection in the network connections window, right-click it, and click on the Diagnose option.
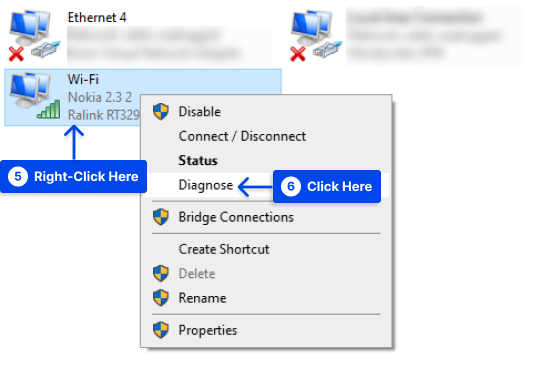
It may take some time for the network troubleshooter program to run. If the problem it finds is that “DHCP is not enabled for wireless network connection,” in this case, you will need to resolve the issue as an administrator.
- Click on “Try these repairs as an administrator,” then apply the fix on the next prompt.
- Ensure that the issue is resolved by rebooting the computer.
Method 10: Temporarily Disable Your Firewall and Antivirus
Several antivirus and firewall programs have been noted for interfering with network connections in the past.
If you have third-party applications on your system, check their security features for security rules that may prevent you from connecting to your target website.
Moreover, it is recommended that you check your router for any blacklisting rules that may be active. The steps you should follow will vary depending on the type of firewall and antivirus software you use.
Temporarily disable your firewall and antivirus software to determine whether your security settings cause your “This site can’t be reached” issue.
Follow these steps to do it for the built-in Windows Defender firewall:
- Go to Security in settings.
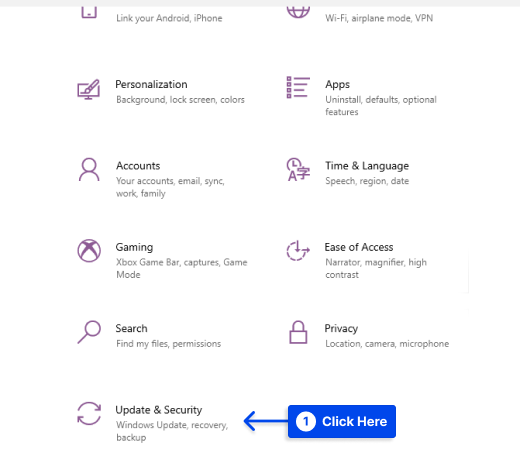
- Go to Windows Security.
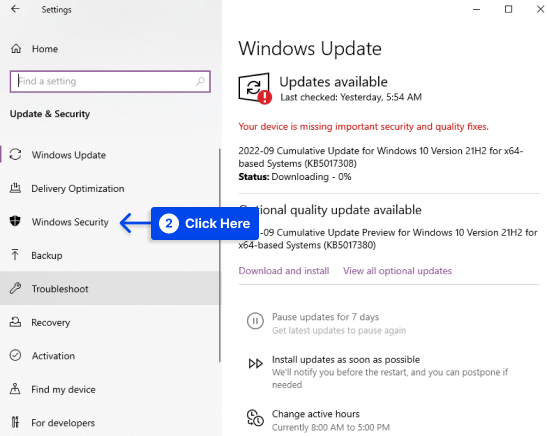
- Click the Firewall & network protection option.
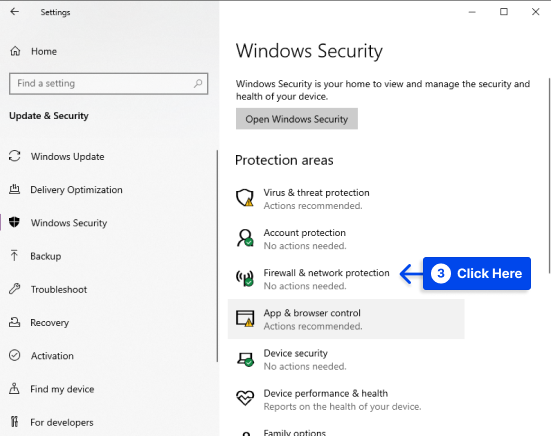
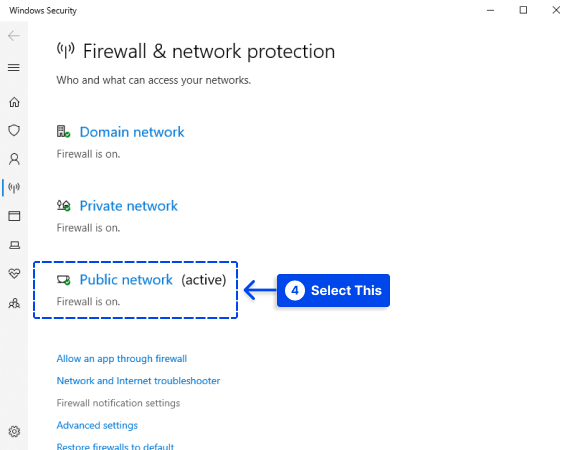
- Select the network connection that is labeled as active.
- Toggle Microsoft Defender Firewall off to disable it.
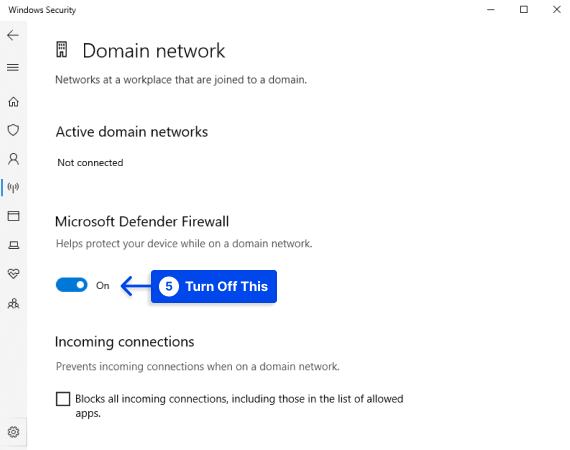
- Check to see if your target website is loading.
Imagine you can access the website you wish to visit after you have disabled your firewall and antivirus software.
If the latter is the case, you will need to dig deeper into your security settings to determine which configuration prevents you from accessing.
You should only disable security components on your computer as a temporary measure. It is important not to keep these components off. Find the problematic setting, correct it, and then reactivate your firewall and antivirus.
Method 11: Reinstall Network Adapter Drivers
Reinstalling network adapter drivers may also fix the error. Follow these steps to do this:
- Right-click the My Computer icon and select Manage.
- Click Device Manager to access a list of all the hardware installed.
- Select the Network adapters section and expand it.

- Right-click on the network connection you are using, then click Uninstall.
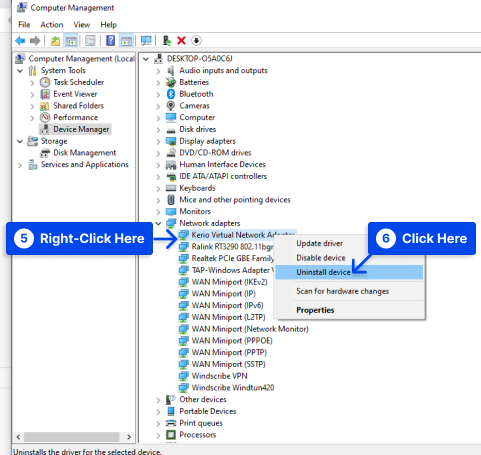
- Restart your computer.
By doing this, the drivers will get installed automatically, then try the open website again.
Method 12: Reinstall Chrome
Alternatively, if you are still experiencing the “this site can’t be reached” error, you may want to reinstall Google Chrome. This procedure will remove any corrupted data or files causing problems.
When you have uninstalled Google Chrome, you will need to download it again from the Google website.
This method’s disadvantage is that all your Chrome data will be lost, including all bookmarks, extensions, and browsing history. For this reason, we recommend you use it as a last resort.
If you do not wish to lose your Chrome data, consider using a different browser, such as Mozilla Firefox or Microsoft Edge.
Conclusion
We have explained in this article what causes the error and how to correct it using the most effective methods so that you can use your browser without interruption.
We are grateful for your time spent reading this article. Any questions or comments may be posted in the comment section.
Please follow us on Facebook and Twitter if you are interested in staying up-to-date with our articles.