
A
re you wondering how to install template kits in WordPress? Keep reading! We’ll show you how, step-by-step.
If you want to give your WordPress blog a custom design, it can be difficult without hiring a developer or learning how to code.
Luckily, there are website template kits that allow you to easily create a beautiful, custom WordPress blog, no coding required.
In this article, we’ll show you how to install template kits in WordPress so that you can create a professional website in minutes.
Let’s get started!
But first, let’s go over what WordPress template kits are.
What are WordPress Template Kits?
WordPress template kits are a collection of pre-designed web page templates, layouts, and other elements that you allow you to create a beautiful website, without needing to edit any code.
Simply install the template kit and you’ll instantly have a cohesive website design that you can customize to suit your brand.
Template kits come with everything you need to create a professional website, including:
Depending on the specific template kit features, it may also include other pages for services, portfolio, testimonials, or products.
Installing Template Kits in WordPress with SeedProd
Template kits are typically a feature of the best drag and drop WordPress page builder plugins. That’s because aside from allowing you to create individual WordPress pages from scratch, many page builder plugins have the functionality for code-free web design.
There are tons of page builder plugins to choose from, but we always recommend SeedProd.

SeedProd is the #1 drag and drop WordPress website builder, used by over 1,000,000+ website owners. You can use it to easily create custom WordPress themes, landing pages, and page layouts, without touching a line of code.
SeedProd comes with 73+ professionally-designed template kits and 183+ landing page templates that you can install with 1-click.
In the growing website template kit library, you’ll find template kits designed for specific industries such as blogging and fashion, food and restaurants, eCommerce stores, professional services, mobile applications, events and gaming, and more.
Plus, you can customize each template kit with ready-made blocks like email optin forms, galleries, countdown timers, pricing tables, star ratings, and much more.
Other powerful features include built-in coming soon mode, color schemes, smart sections, animations, WooCommerce integration, email marketing integrations, and domain mapping.
Alternative: Elementor is another popular WordPress page builder that offers a library of 100+ website template kits.
With that said, let’s look at how to install template kits in WordPress.
Step 1. Install and Activate the SeedProd Plugin
To get started, you need to install and activate the SeedProd plugin on your WordPress site. If you need step-by-step instructions, see our guide on how to install a WordPress plugin.
Once the plugin is installed and activated, you need to verify your SeedProd license key.
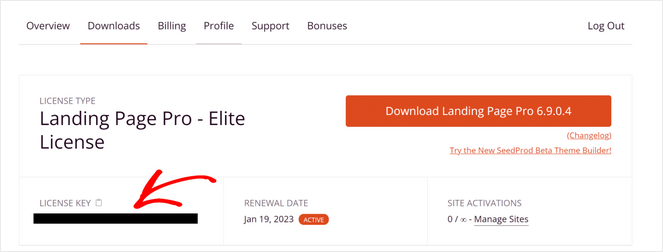
To do that, login to your SeedProd account and click on the Downloads tab. Then, scroll down to find your license key and copy it.
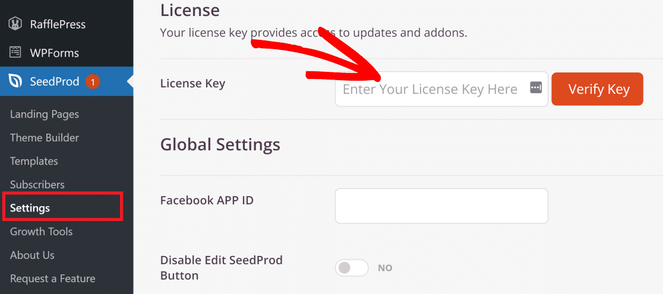
Next, go to SeedProd » Settings from your WordPress admin dashboard. Enter the license key you copied into the field provided and click on the Verify Key button.
Now that your SeedProd license key has been verified, you’re ready to install a website template kit.
Step 2. Choose a Website Template Kit
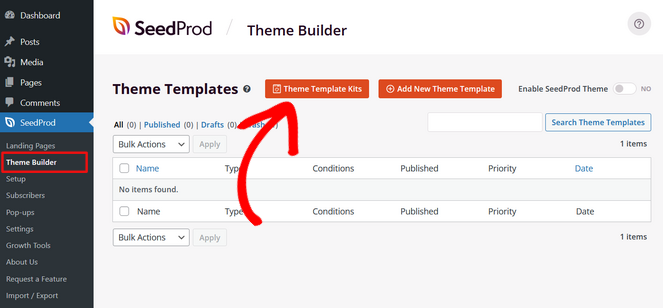
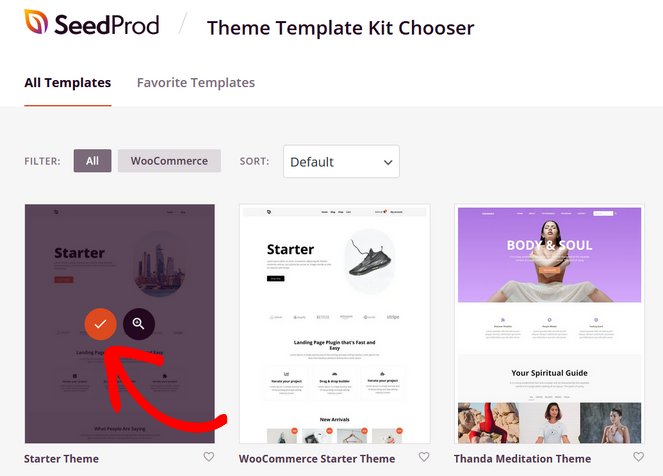
To choose a template kit for your blog, go to SeedProd » Theme Builder and click on the Theme Template Kits button.
This will open up SeedProd’s template kit library where you can choose a website design that you like.
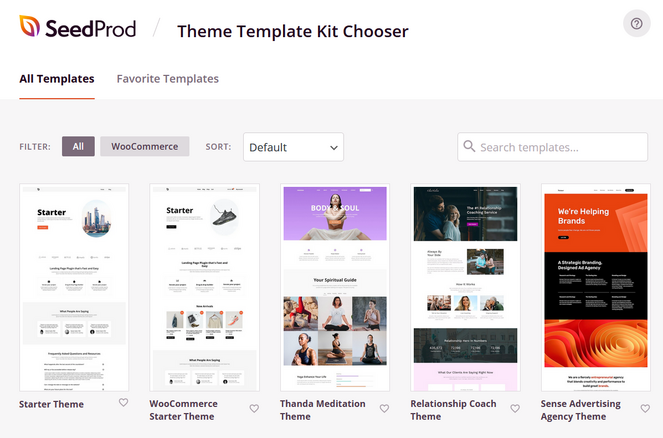
As we mentioned previously, there are template kits designed for multiple industries and niches like food and restaurants, health and fitness, fashion and beauty, and more.
To choose a template kit, simply hover over the kit you like and click the orange check-mark icon.
SeedProd will now add all of the pages and parts of the theme kit into your theme builder dashboard as a list. Depending on the theme kit you picked, it will include pages and parts like:
- Homepage and blog templates
- Single page and post templates
- Header and footer templates
- Global CSS template
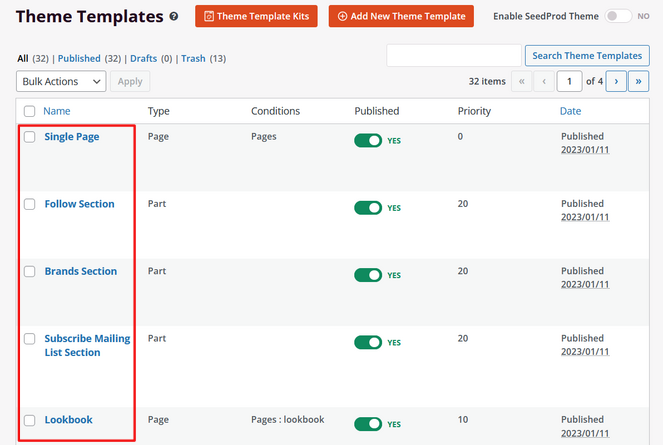
Remember, certain template kits will include different parts and pages.
For example, the template kit we chose above is called ‘Fashion Influencer Theme’ and it comes with parts like a Brands section, Subscribe Mailing List Section, and a Lookbook page.
If there are any pages or parts in the template kit that you don’t want to use on your website, under the Published column, simply toggle the switch from ‘Yes’ to ‘No.’

Note: If you install an eCommerce template kit, you’ll need to upgrade to SeedProd’s Elite plan and have the WooCommerce plugin installed and activated on your WordPress site.
Step 3. Customize Your SeedProd Template Kit
All of SeedProd’s website template kits come with demo content that makes it easier to visualize how your website will look.
But, now it’s time to replace this demo content with information about your business and make customizations to suit your specific needs.
Nearly every single part of your template kit can be customized and SeedProd’s drag and drop builder makes it super easy.
To begin customizing, hover over the theme kit part or page you want to edit, and click on the Edit Design link.

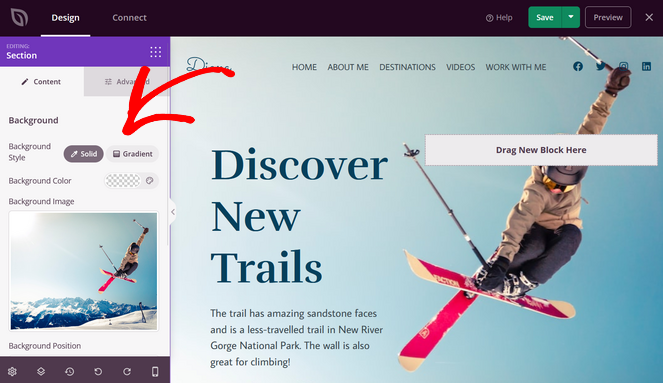
After that, you’ll be taken to SeedProd’s visual theme editor, which looks like this:
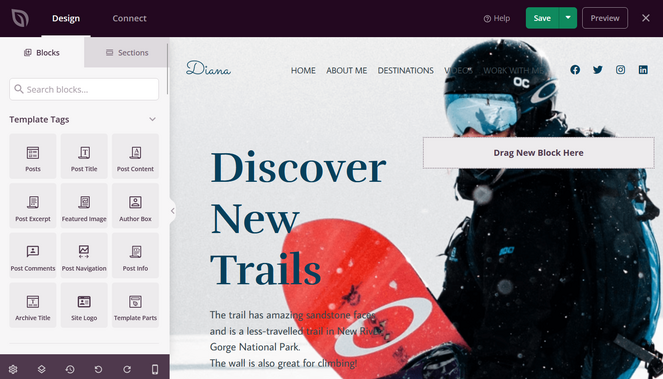
On the left side of the theme builder, you’ll see pre-made blocks and sections that you can add to your theme kit. On the right side, you’ll see a live preview of how your site looks.
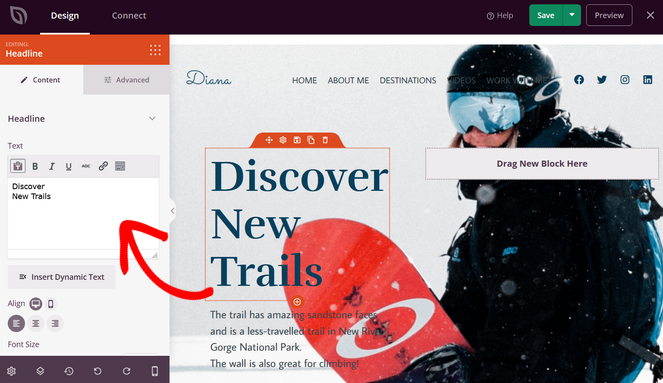
You can edit or replace any demo content by simply clicking on it. For example, you can click the headline and the editing options will appear on the left side.
From here, you can change the text, font, alignment, size, and more.
To show you another example, you can also click on the background image to change it.
You can choose a new image from your media library or use an image from SeedProd’s built-in stock photo library.
If there’s any demo content that you want to delete, simply click on it and hit the trash can icon.

Adding Template Tag Blocks
Template tags are responsive and dynamic blocks that allow you to import content from your WordPress database.
You can add them to your WordPress template kit by dragging and dropping them into place.
For example, you can drag and drop the Posts block onto any page of your template kit to display recent blog posts.
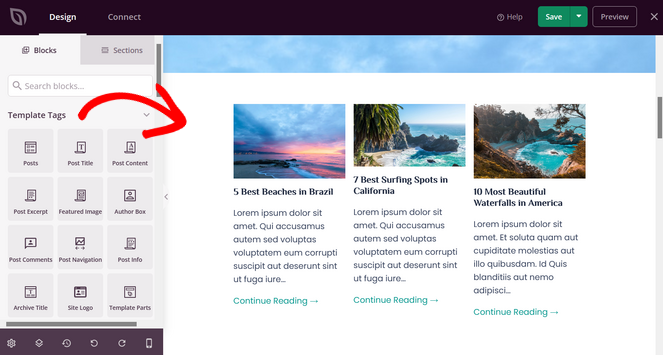
You can also add template tags for:
- Post excerpt
- Author box
- Post comments
- Post navigation
- Archive title
- Site logo
- And more
Adding Standard and Advanced Blocks
Aside from template tags, SeedProd also comes with a ton of ready-made content blocks that you can use to customize your website template kit.
This includes standard website elements such as headline, text, image, video, button, list, column, divider, and more.
There are also advanced blocks that you can add to boost blog engagement, generate leads, and increase conversions, including:
- Contact form
- Optin form
- Countdown timer
- Social profiles
- Social sharing
- Google maps
- Image carousel
- Price list
- And much more
To add a block to your template kit, just drag it from the left side of the screen and drop it onto your page on the right.
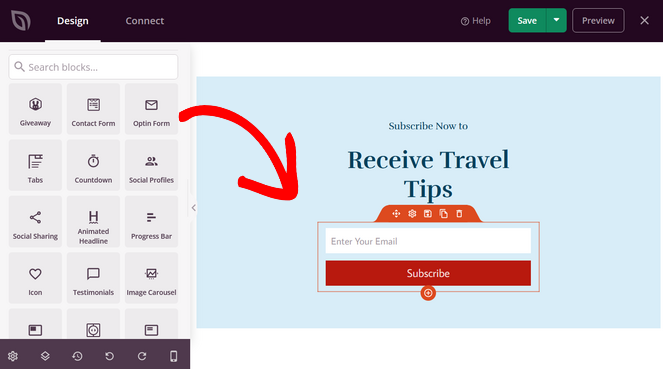
Again, you can click on the block to edit it. You can change the fields, size, alignment, button style, button text, and more.
If you have SeedProd’s Elite plan and the WooCommerce plugin installed, you can also use SeedProd’s custom WooCommerce blocks. Choose from blocks like Add to Cart, Checkout, Best-Selling Products, Upsells, Related Products, and more.
Editing Global Settings
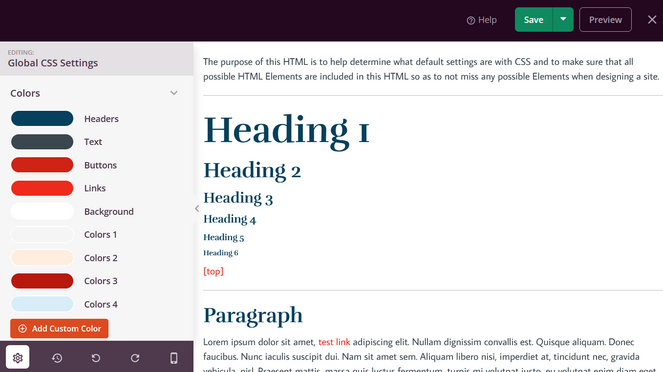
You can also change the colors, fonts, and other style elements used throughout your WordPress template kit with SeedProd’s Global CSS Settings.
From the theme builder dashboard, go to the Global CSS template part and click on the Edit Design link.
Here, you’ll find settings to adjust the template’s colors, fonts, background, buttons, forms, layouts, and custom CSS.
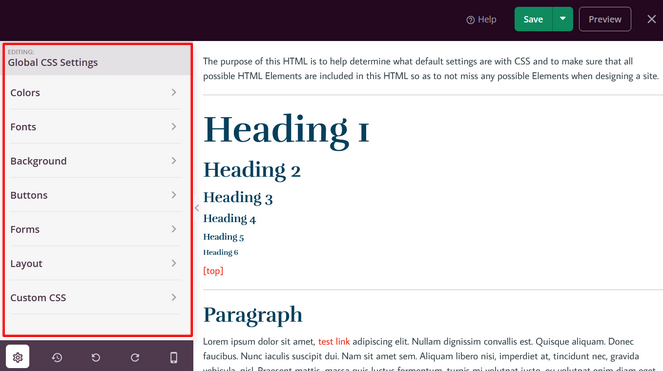
Simply expand a section heading, change the settings to suit your brand, and SeedProd will automatically apply the changes across your entire website.
Once you’re finished customizing all of the pages and parts, it’s time to enable your SeedProd website templates.
Step 4. Enable Your SeedProd Template Kit
By default, SeedProd’s template kits are disabled so that they don’t overwrite your current WordPress theme before you’re ready.
To make your website template kit live on your blog, go to the SeedProd » Theme Builder page.
Then, find the Enable SeedProd Theme toggle, and toggle the switch from ‘No’ to ‘Yes.’

You can now preview your new website design to see how it looks.

That’s it! Now that you know how to install template kits in WordPress, you can easily create a beautiful, custom design for your WordPress blog.
If you enjoyed this tutorial, you may want to check out our guide on how to make a blog look good for more design tips.
And don’t forget to sign up for our email newsletter to get blogging tips delivered straight to your inbox!