Every theme and plugin you install can add unnecessary CSS to your WordPress site. This could lead to slower loading times. Typically, these stylesheets aren’t needed for rendering the content on a page, yet they are still present in the code. Therefore, you may be looking for an easy way to remove unused CSS in WordPress.
Fortunately, the process is simpler than you might think. 🌞 Once you’ve identified the unnecessary code on your site, you can use a plugin to delete it and improve your site speed.
Why you should remove unused CSS
Unused CSS is code that isn’t actually needed to load a page. When it comes to WordPress, it’s usually found in themes and plugins that you install on your site.
Then, when a user accesses your website, the browser will still need to download and render this unused CSS. This can contribute to longer loading times, which will have a negative impact on your site’s overall performance.
In fact, unused CSS can lead to a poor Largest Contentful Paint (LCP) score in Core Web Vitals:
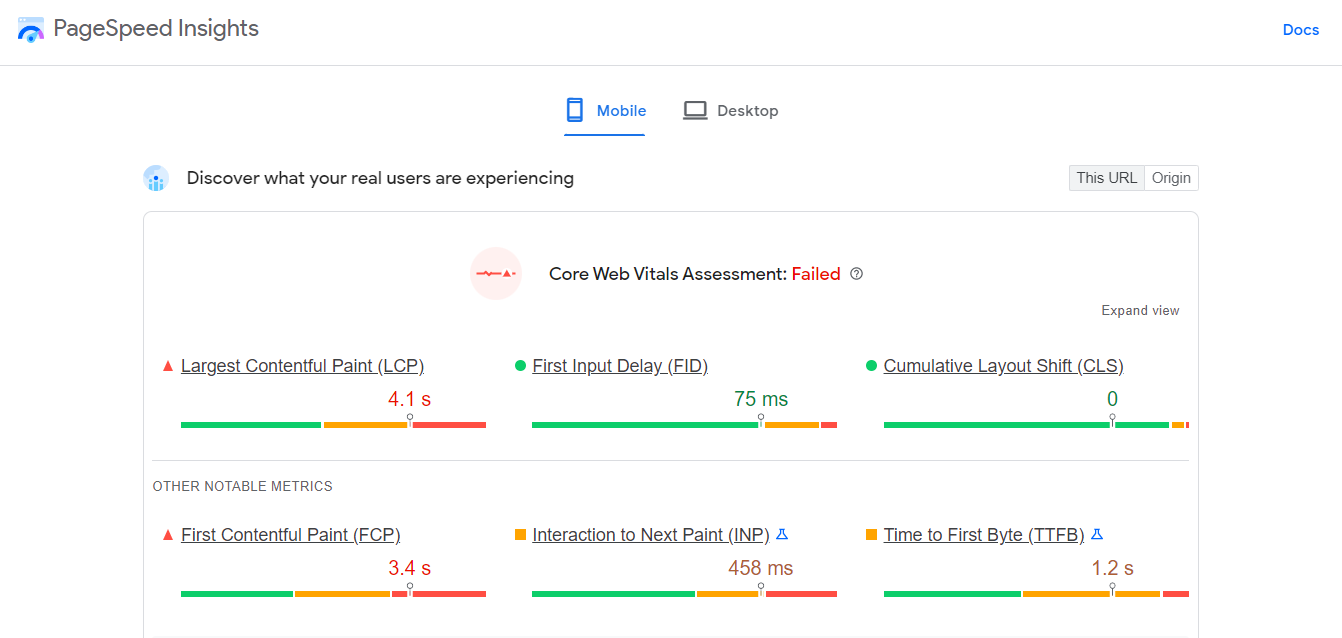
Largest Contentful Paint is a metric that measures the time it takes for a page to fully load the largest item on the screen. This is usually a visual element, such as a hero image.
To put it simply, unused CSS code adds bloat to your page. As a result, it will take longer for content like images to load.
If your site is slow, you could be losing out on potential conversions. Plus, it might lead to lower rankings in search results. Therefore, it’s important that you take the proper measures to remove unused CSS and speed up your site.
How to identify unused CSS on your site
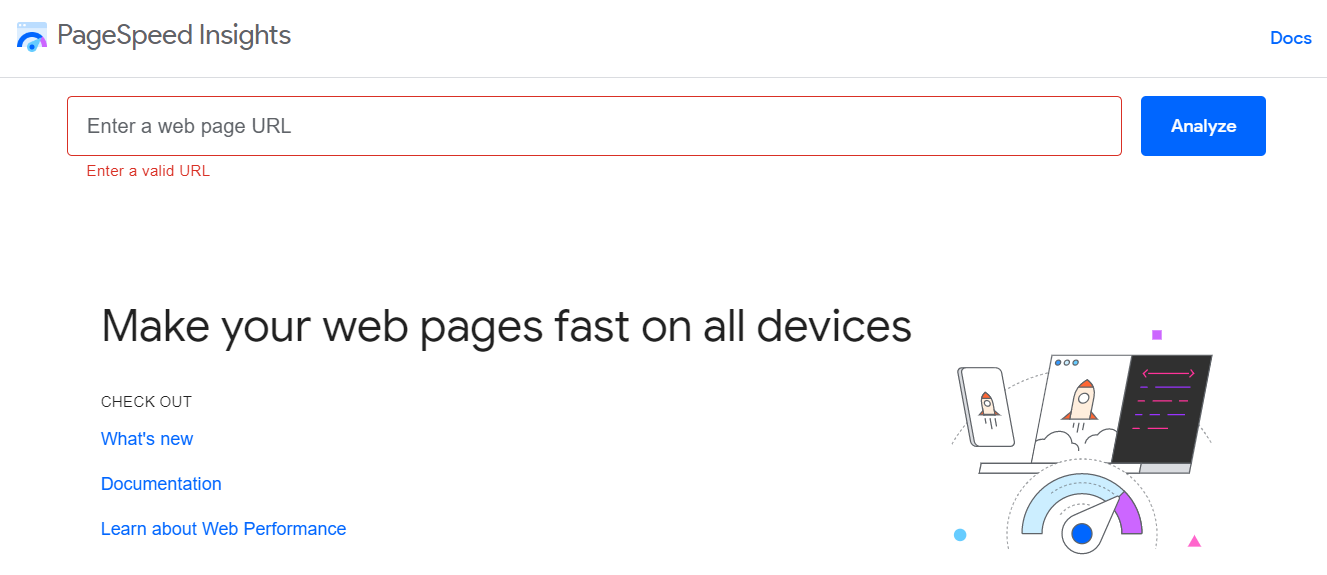
The good news is that identifying unused CSS on your site is an easy task. You can start by running a performance test on PageSpeed Insights. All you have to do is enter your URL and click on Analyze:
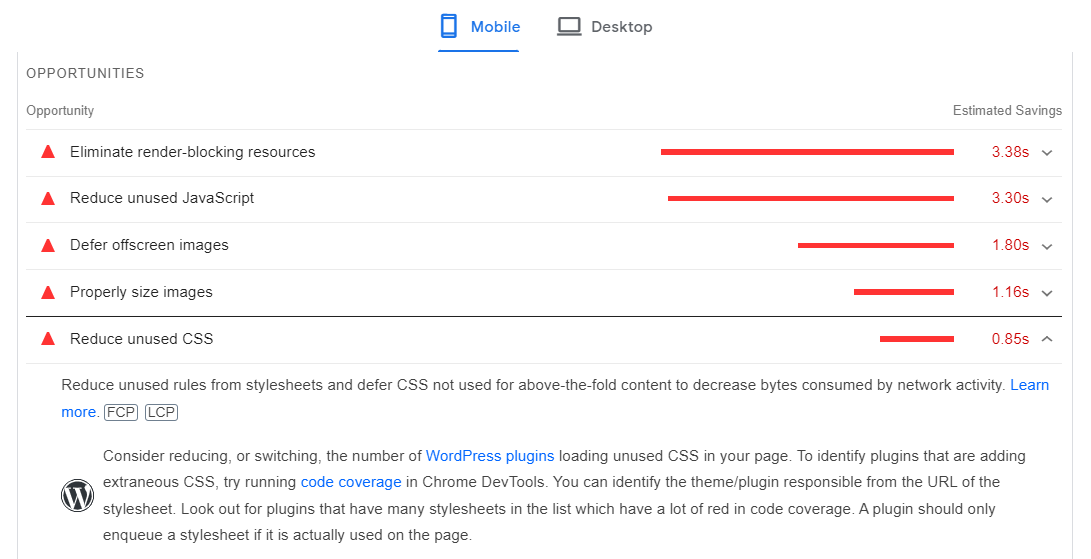
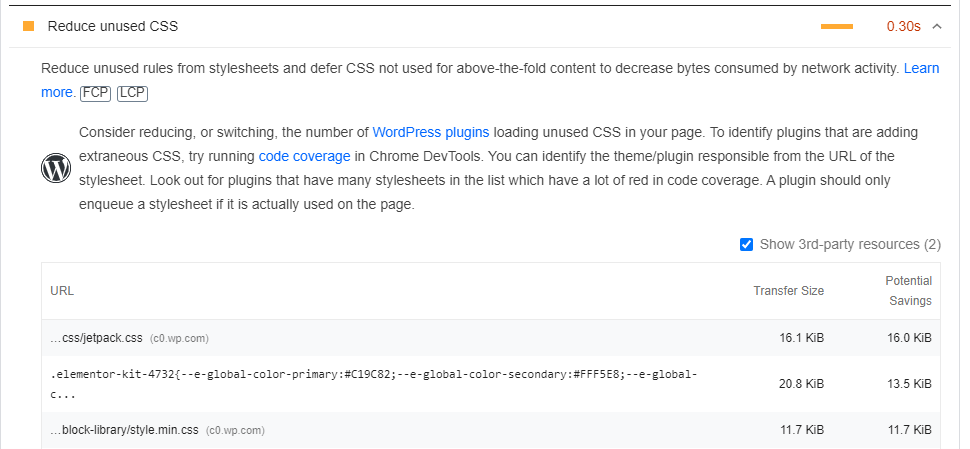
Once the test is ready, navigate to the Opportunities section and look for the Reduce unused CSS tab. If you click on it, you’ll see more information about this code:
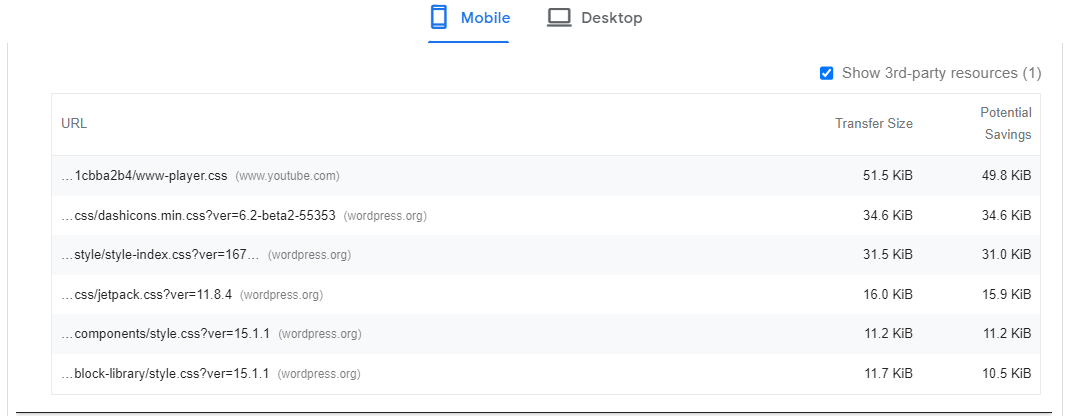
It will also show you which CSS files and plugins are affecting your loading times:
An orange square for Remove unused CSS means “Needs Improvement,” while a red triangle represents a very poor score. If you can’t see this section in your test results, it means that you don’t have any significant CSS problems on your site (or at least on the specific page that you tested – you might want to test other pages to make sure).
How to remove unused CSS in WordPress
If PageSpeed Insights has flagged unused CSS on your site, you’ll want to remove it to optimize your site’s performance.
You can do this by using a WordPress plugin that does all the heavy lifting for you. Alternatively, you can use a different plugin that will require some manual labor on your part, but as a reward you’ll get more control over the process. In this section, we’ll walk you through both methods, starting with the easier one.
Method 1: Remove unused CSS with Debloat
As we’ve discussed, “unused” CSS isn’t essential. Therefore, deleting these files won’t have any impact on the design of your web pages.
However, if you accidentally remove the wrong code, you could break your site. So, if you’re not familiar with coding, you’ll likely want to use a plugin to remove unused CSS.
With that in mind, we recommend Debloat for removing unused CSS code. It’s a free optimization plugin that can also help you improve your Core Web Vitals by delaying render-blocking resources, minifying code, and more.
To get started, you’ll need to install and activate the plugin on your site. Then, go to Settings > Debloat: Optimize and select the Optimize CSS tab:
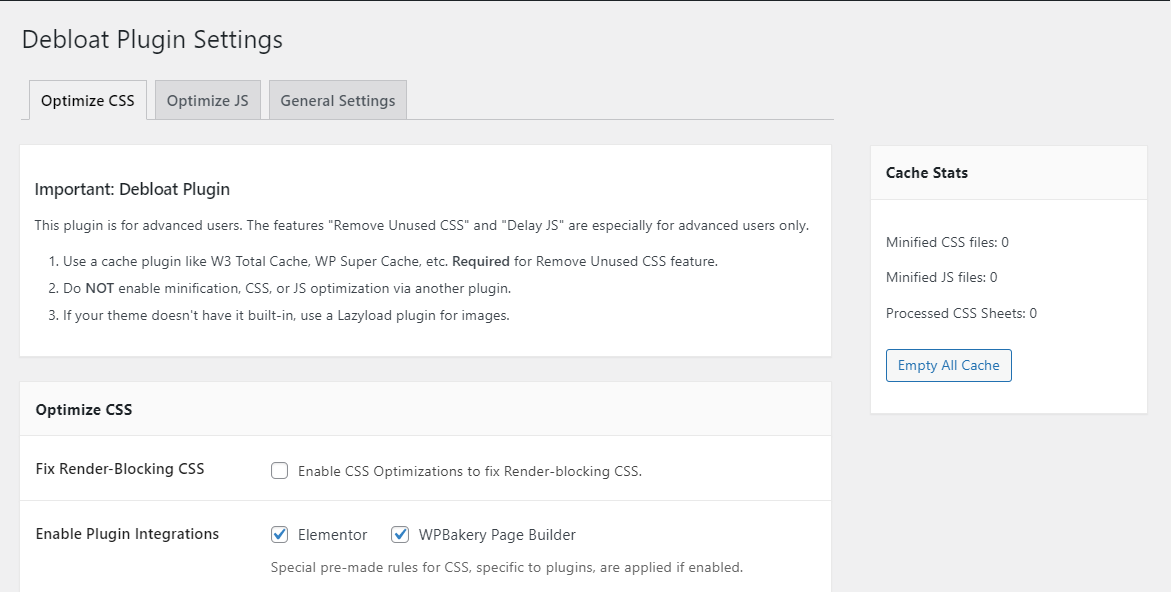
At the top, you’ll see a message advising you to use a caching plugin if you’re planning to remove unused CSS. If this interests you, you might consider trying out a free tool like W3 Total Cache or WP-Optimize.
Next, scroll down to the bottom of the page and check the box for Remove Unused CSS:
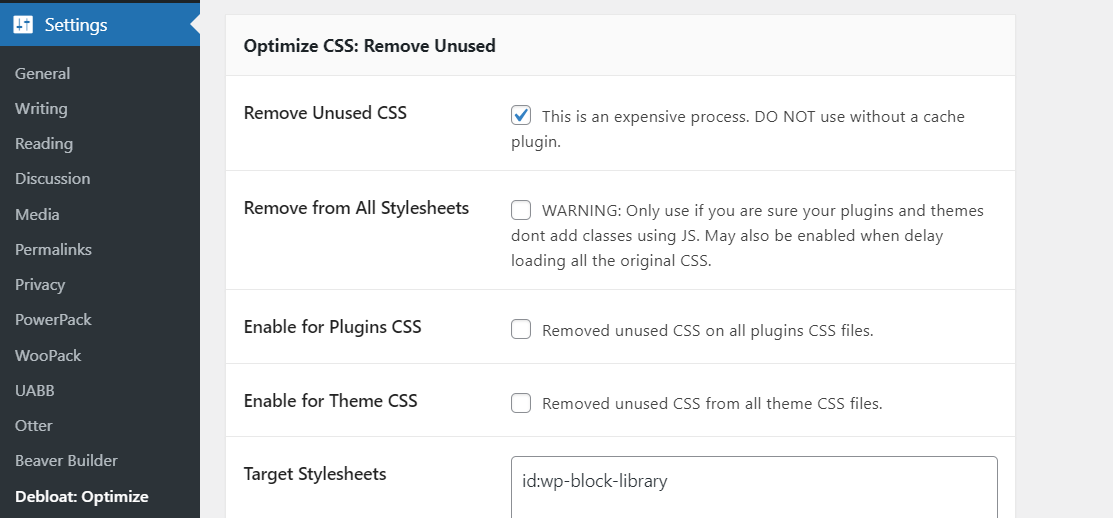
This will reveal several other options. However, if you’re not comfortable with handling code, don’t worry, you’ll only need to select a few settings.
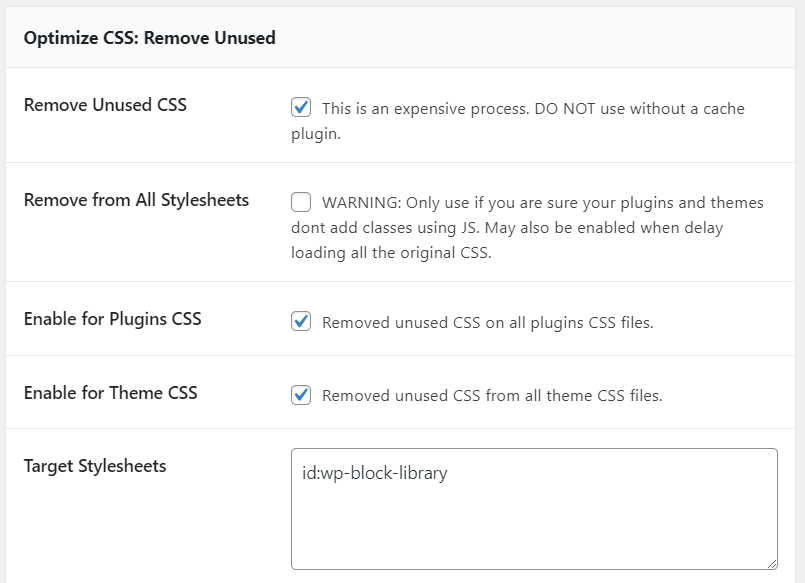
You’ll want to check the boxes for Enable for Plugins CSS and Enable for Theme CSS:
Then, scroll down to Remove CSS On and select the box for All Pages:
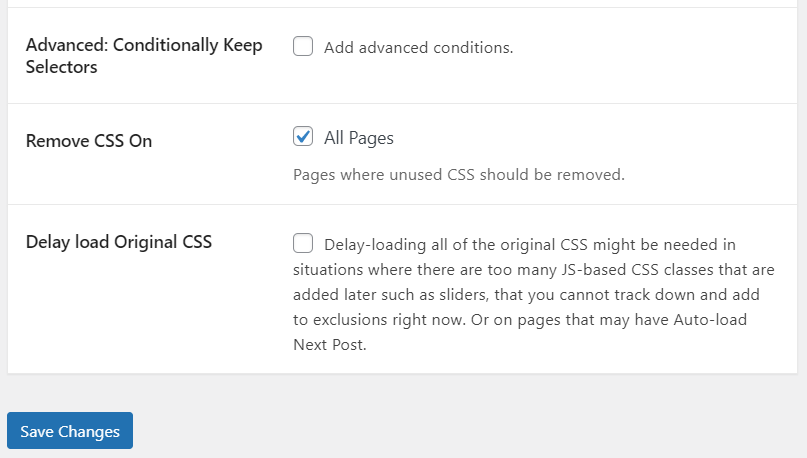
When you’re ready, click on Save Changes. The plugin will then remove unused CSS in your plugin and theme files.
Note that this method is not 100% accurate and some unused code may fall through the cracks. Still, if you run another speed test after enabling these settings, you should see some significant improvement in your site’s performance.
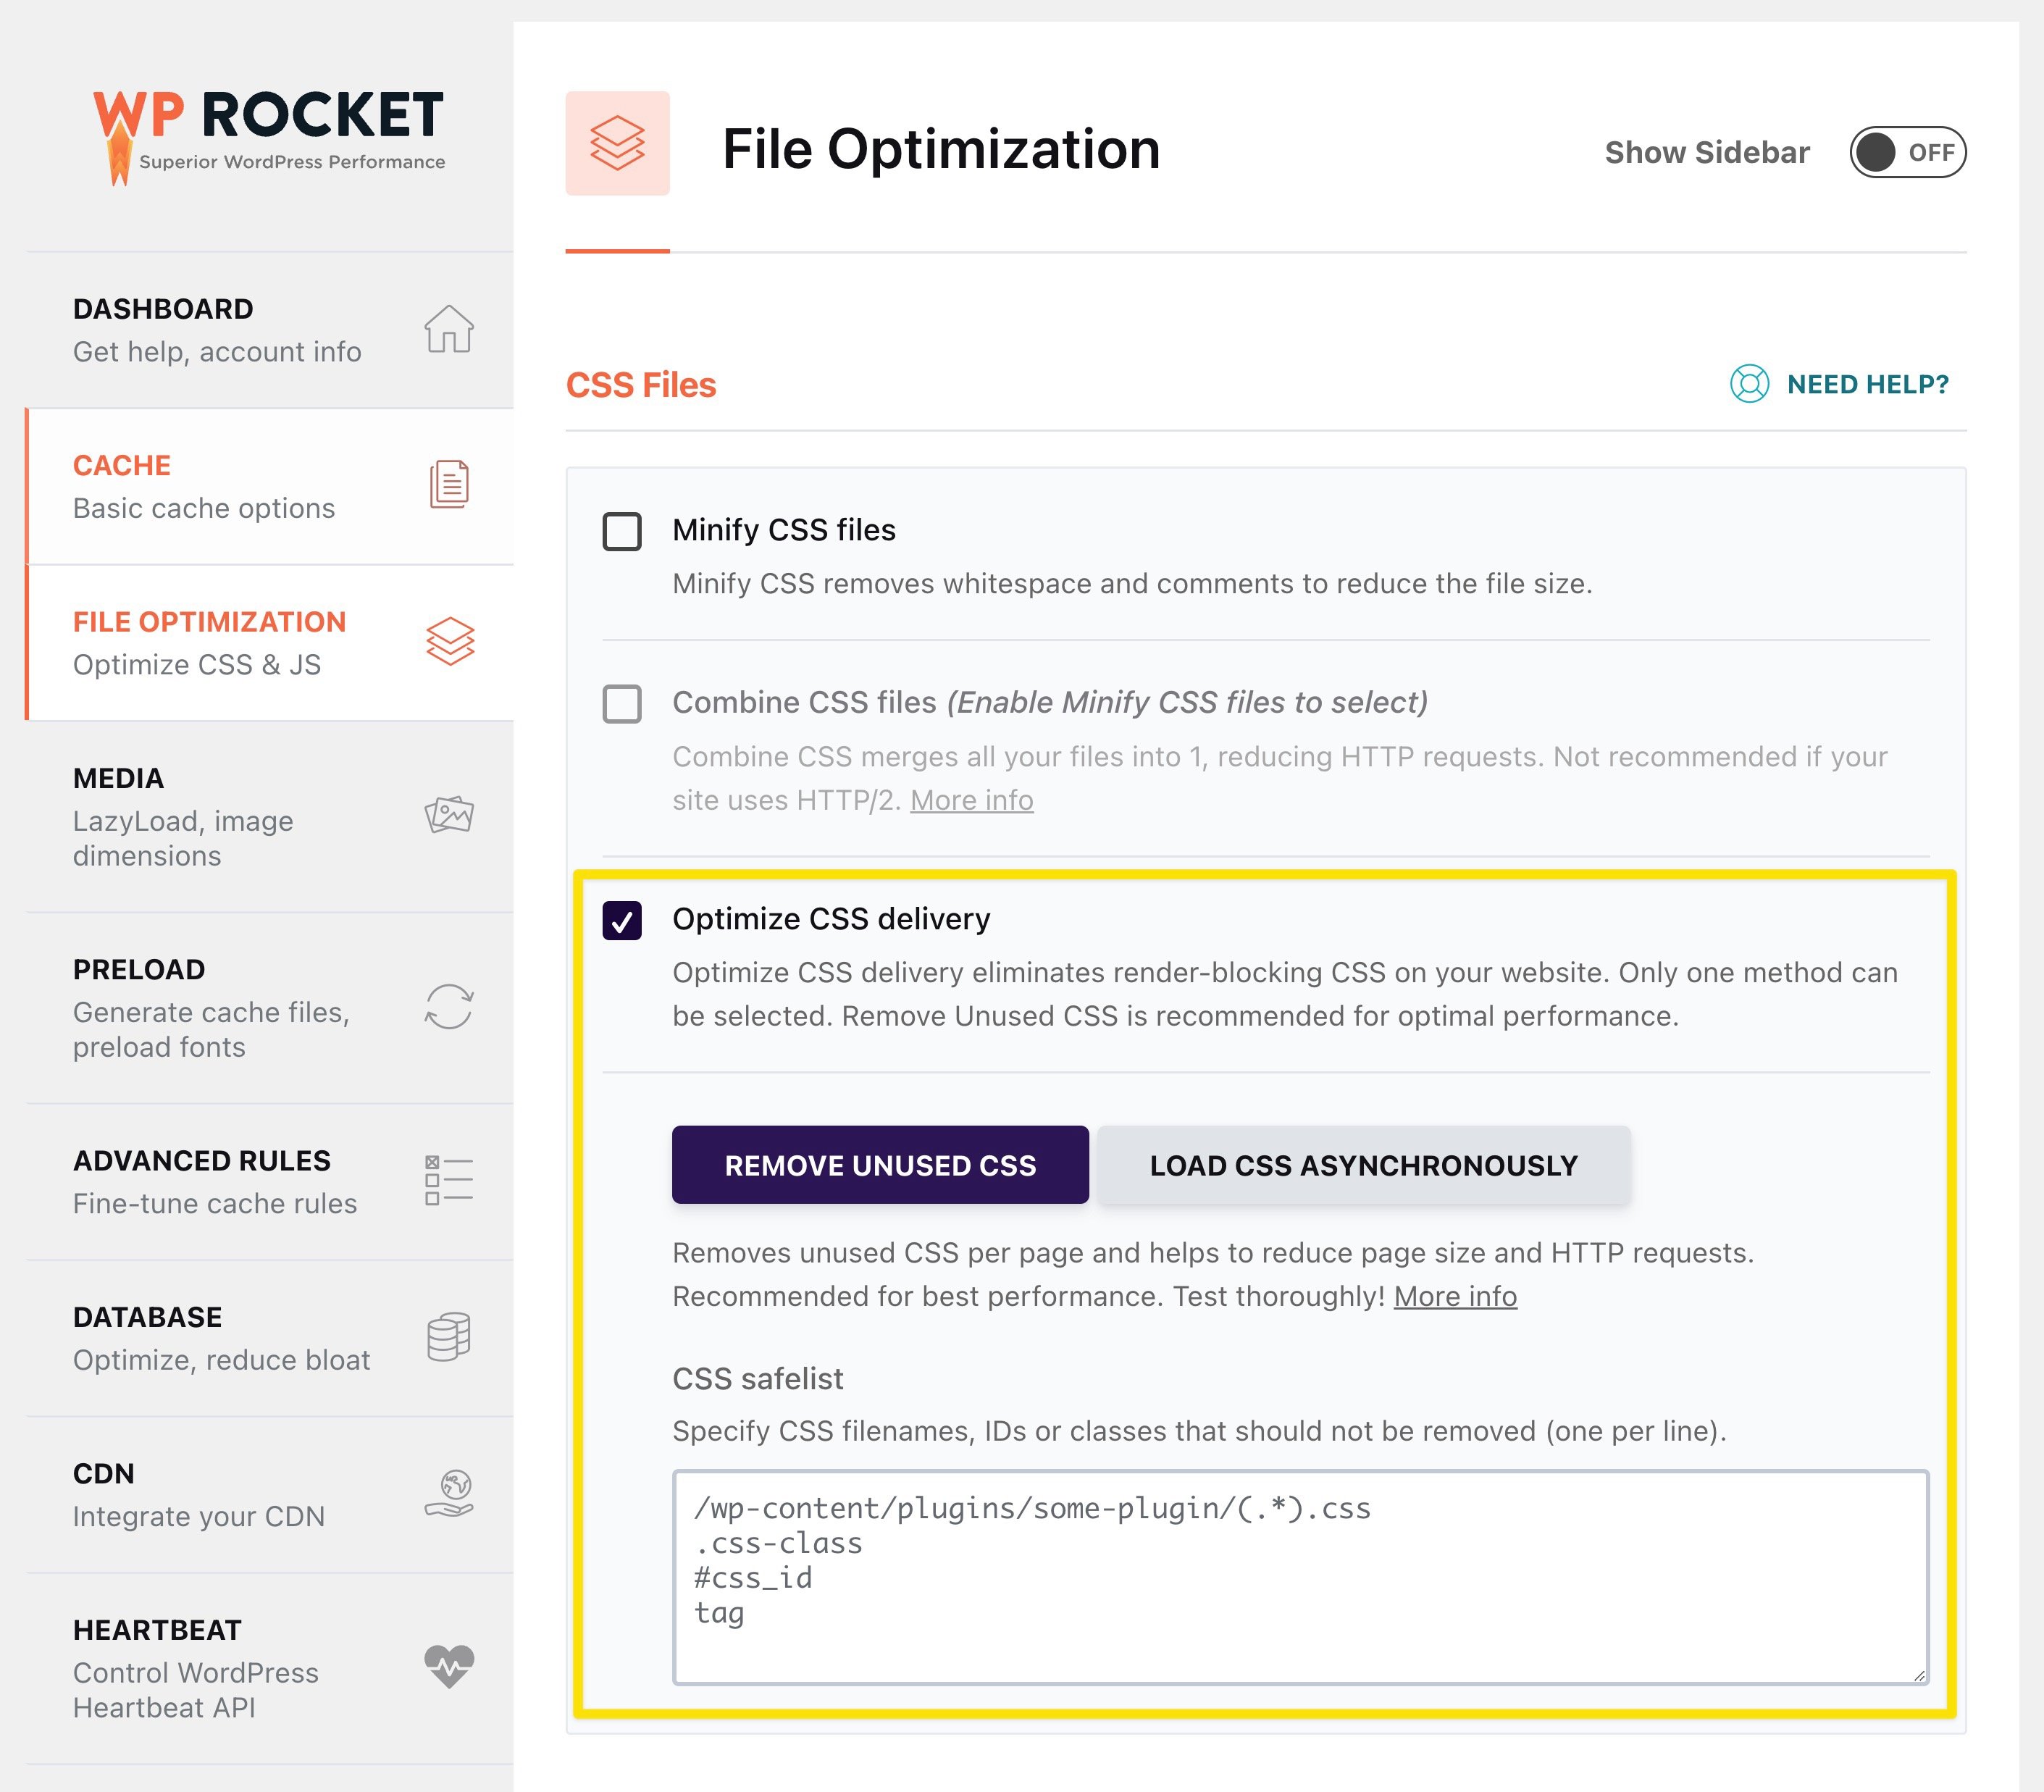
If you want to use a more powerful plugin, you might want to look into WP Rocket. This premium tool comes packed with optimization features, including page and browser caching, GZIP compression, code minification, and lazy loading. It can also remove unused CSS from your site.
Method 2: Remove unused CSS with Asset CleanUp
In the first method, we used a plugin that automatically removed unnecessary code from your site. This method is highly convenient, since all you need to do is enable a few settings.
However, you might be looking for a method that gives you more control over which files to remove, and which ones to keep. If that’s the case, Asset CleanUp may be a better choice for you. This plugin enables you to select and remove unwanted CSS files on a page-by-page basis.
Note that this approach can be a bit time-consuming and may require some technical knowledge. Plus, you’ll need to constantly test and refresh every page to make sure that your changes haven’t affected the design and functionality of your site.
Step 1: Install the Asset CleanUp plugin and enable test mode
If you still want to give this method a try, go ahead and install Asset CleanUp on your site. Then, go to Asset CleanUp > Settings. After that, select Test Mode from the side menu and use the toggle switch to enable this feature:
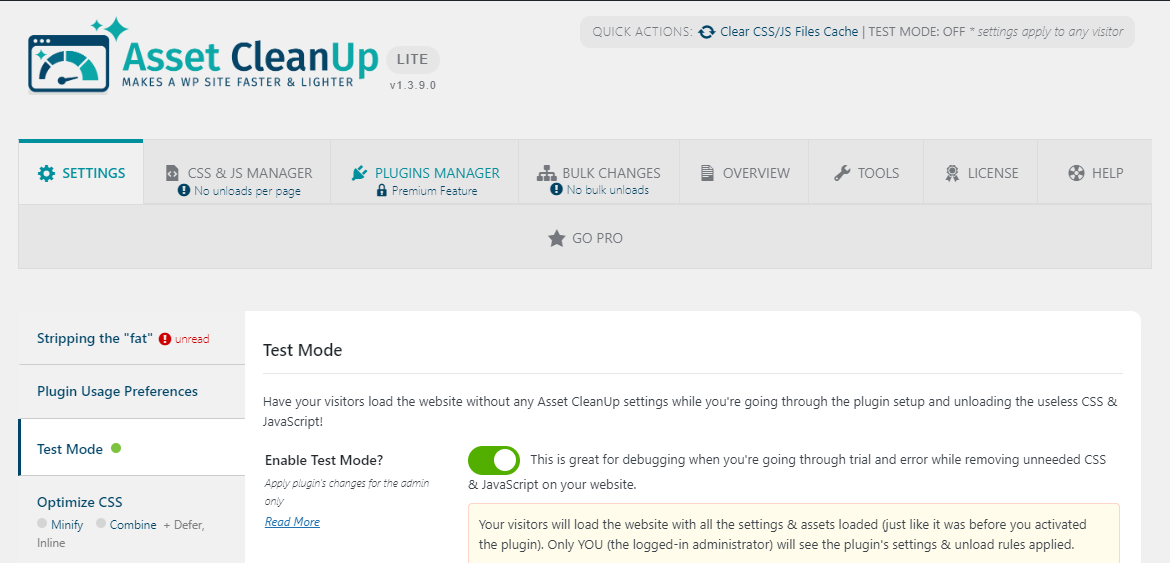
This way, any changes you make to your site won’t affect the user experience on the front end. You can remove unused CSS files in a safe environment and disable test mode once you’ve made sure everything is working properly.
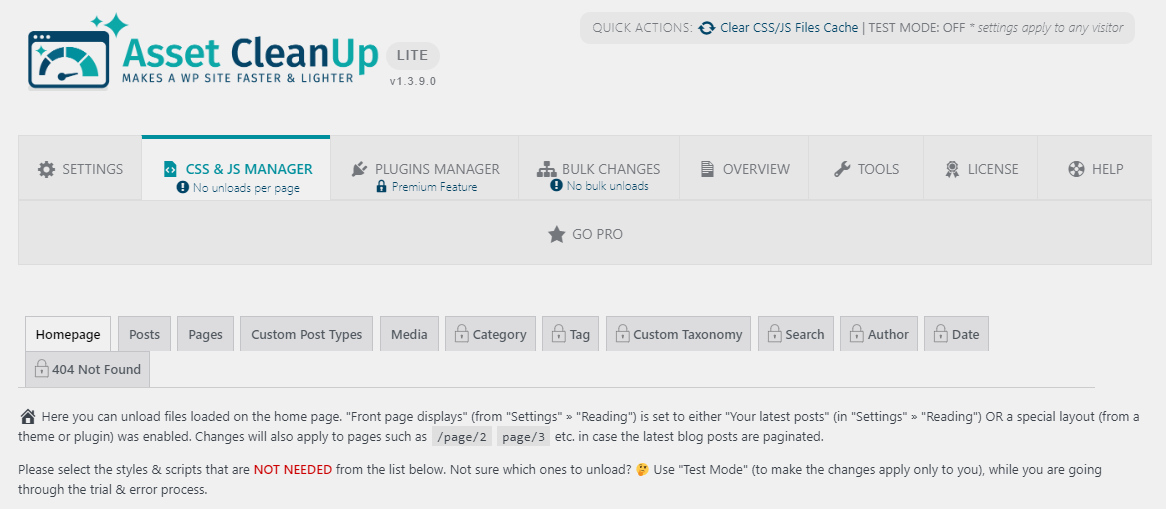
Step 2: Unload unused CSS files on every page
Now, click on the CSS & JS Manager tab. Here, you can remove any unwanted files from your site, starting with the homepage:
If you scroll down, you’ll see a list of all the loaded files on this page:

To remove a CSS file, you’ll just need to use the toggle switch for Unload on this page:
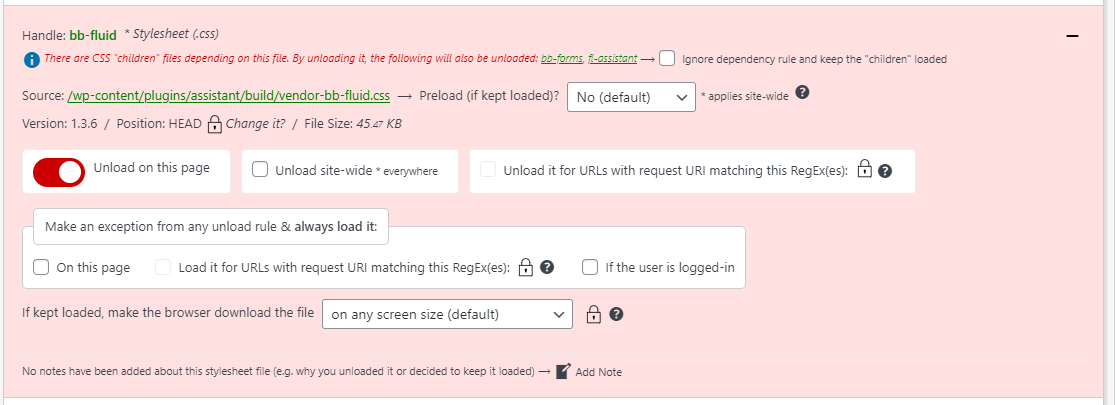
Asset CleanUp will let you know if there are any “children” files that are dependent on this file, and which may be affected by its removal. You can check the box for Ignore dependency rule and keep the “children” loaded to maintain these files.
Keep in mind, if you’re not sure which CSS files to remove, you can refer to your results in PageSpeed Insights. You’ll see the URL of these files under the Reduce unused CSS section:
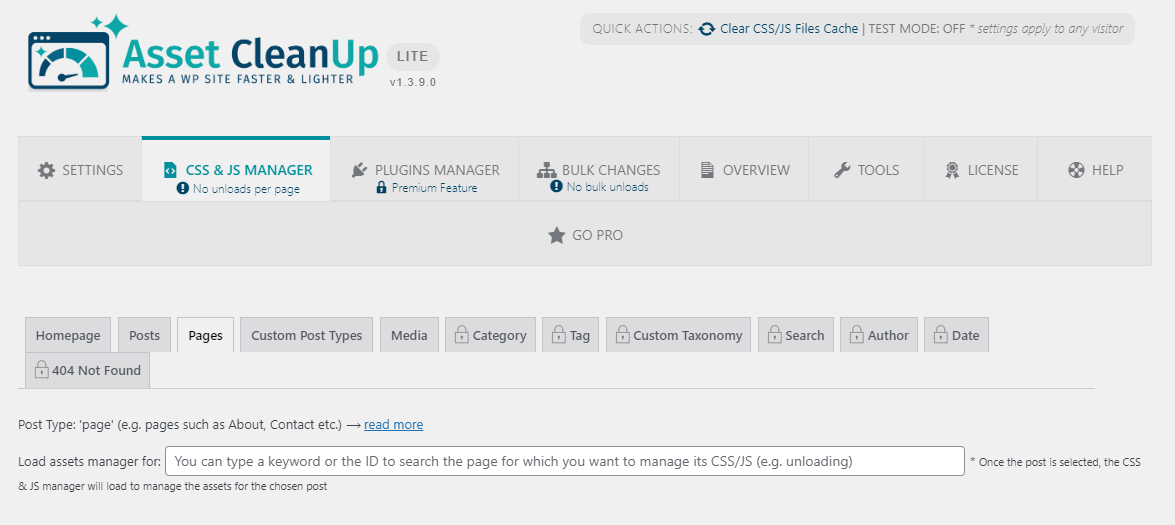
You can then look for them in Asset CleanUp. If you navigate to the Pages tab, you can look up a particular page on your site and review the CSS files that are loaded on it:
Once you select a file you want to unload, you’ll need to click on Update in order to save these changes.
Step 3: Test your site
Finally, we recommend that you test your site after each file removal to make sure that it’s working properly. Remember that you need to be logged-in to your WordPress admin dashboard to see these changes. If you access the site as a visitor (i.e., a logged-out user), you won’t be able to spot any issues on your page since you have test mode enabled.
It’s also important to note that, as long as you have test mode enabled, you won’t see any improvements in PageSpeed Insights. The results will still display the unused CSS files.
Once you’re confident that the removed files have not affected your site, you can go ahead and disable test mode. Then, run a speed test on PageSpeed Insights. At this point, the deleted CSS files should not come up in the results.
Premium WordPress plugins to remove unused CSS
While both tools above are free, you can also find some really simple WordPress plugins to remove unused CSS if you’re willing to pay.
Two of the best options are WP Rocket (from $59) and FlyingPress (from $60).
With WP Rocket, you get a one-click remove unused CSS feature that scans your entire site and removes unused CSS on a page-by-page basis.
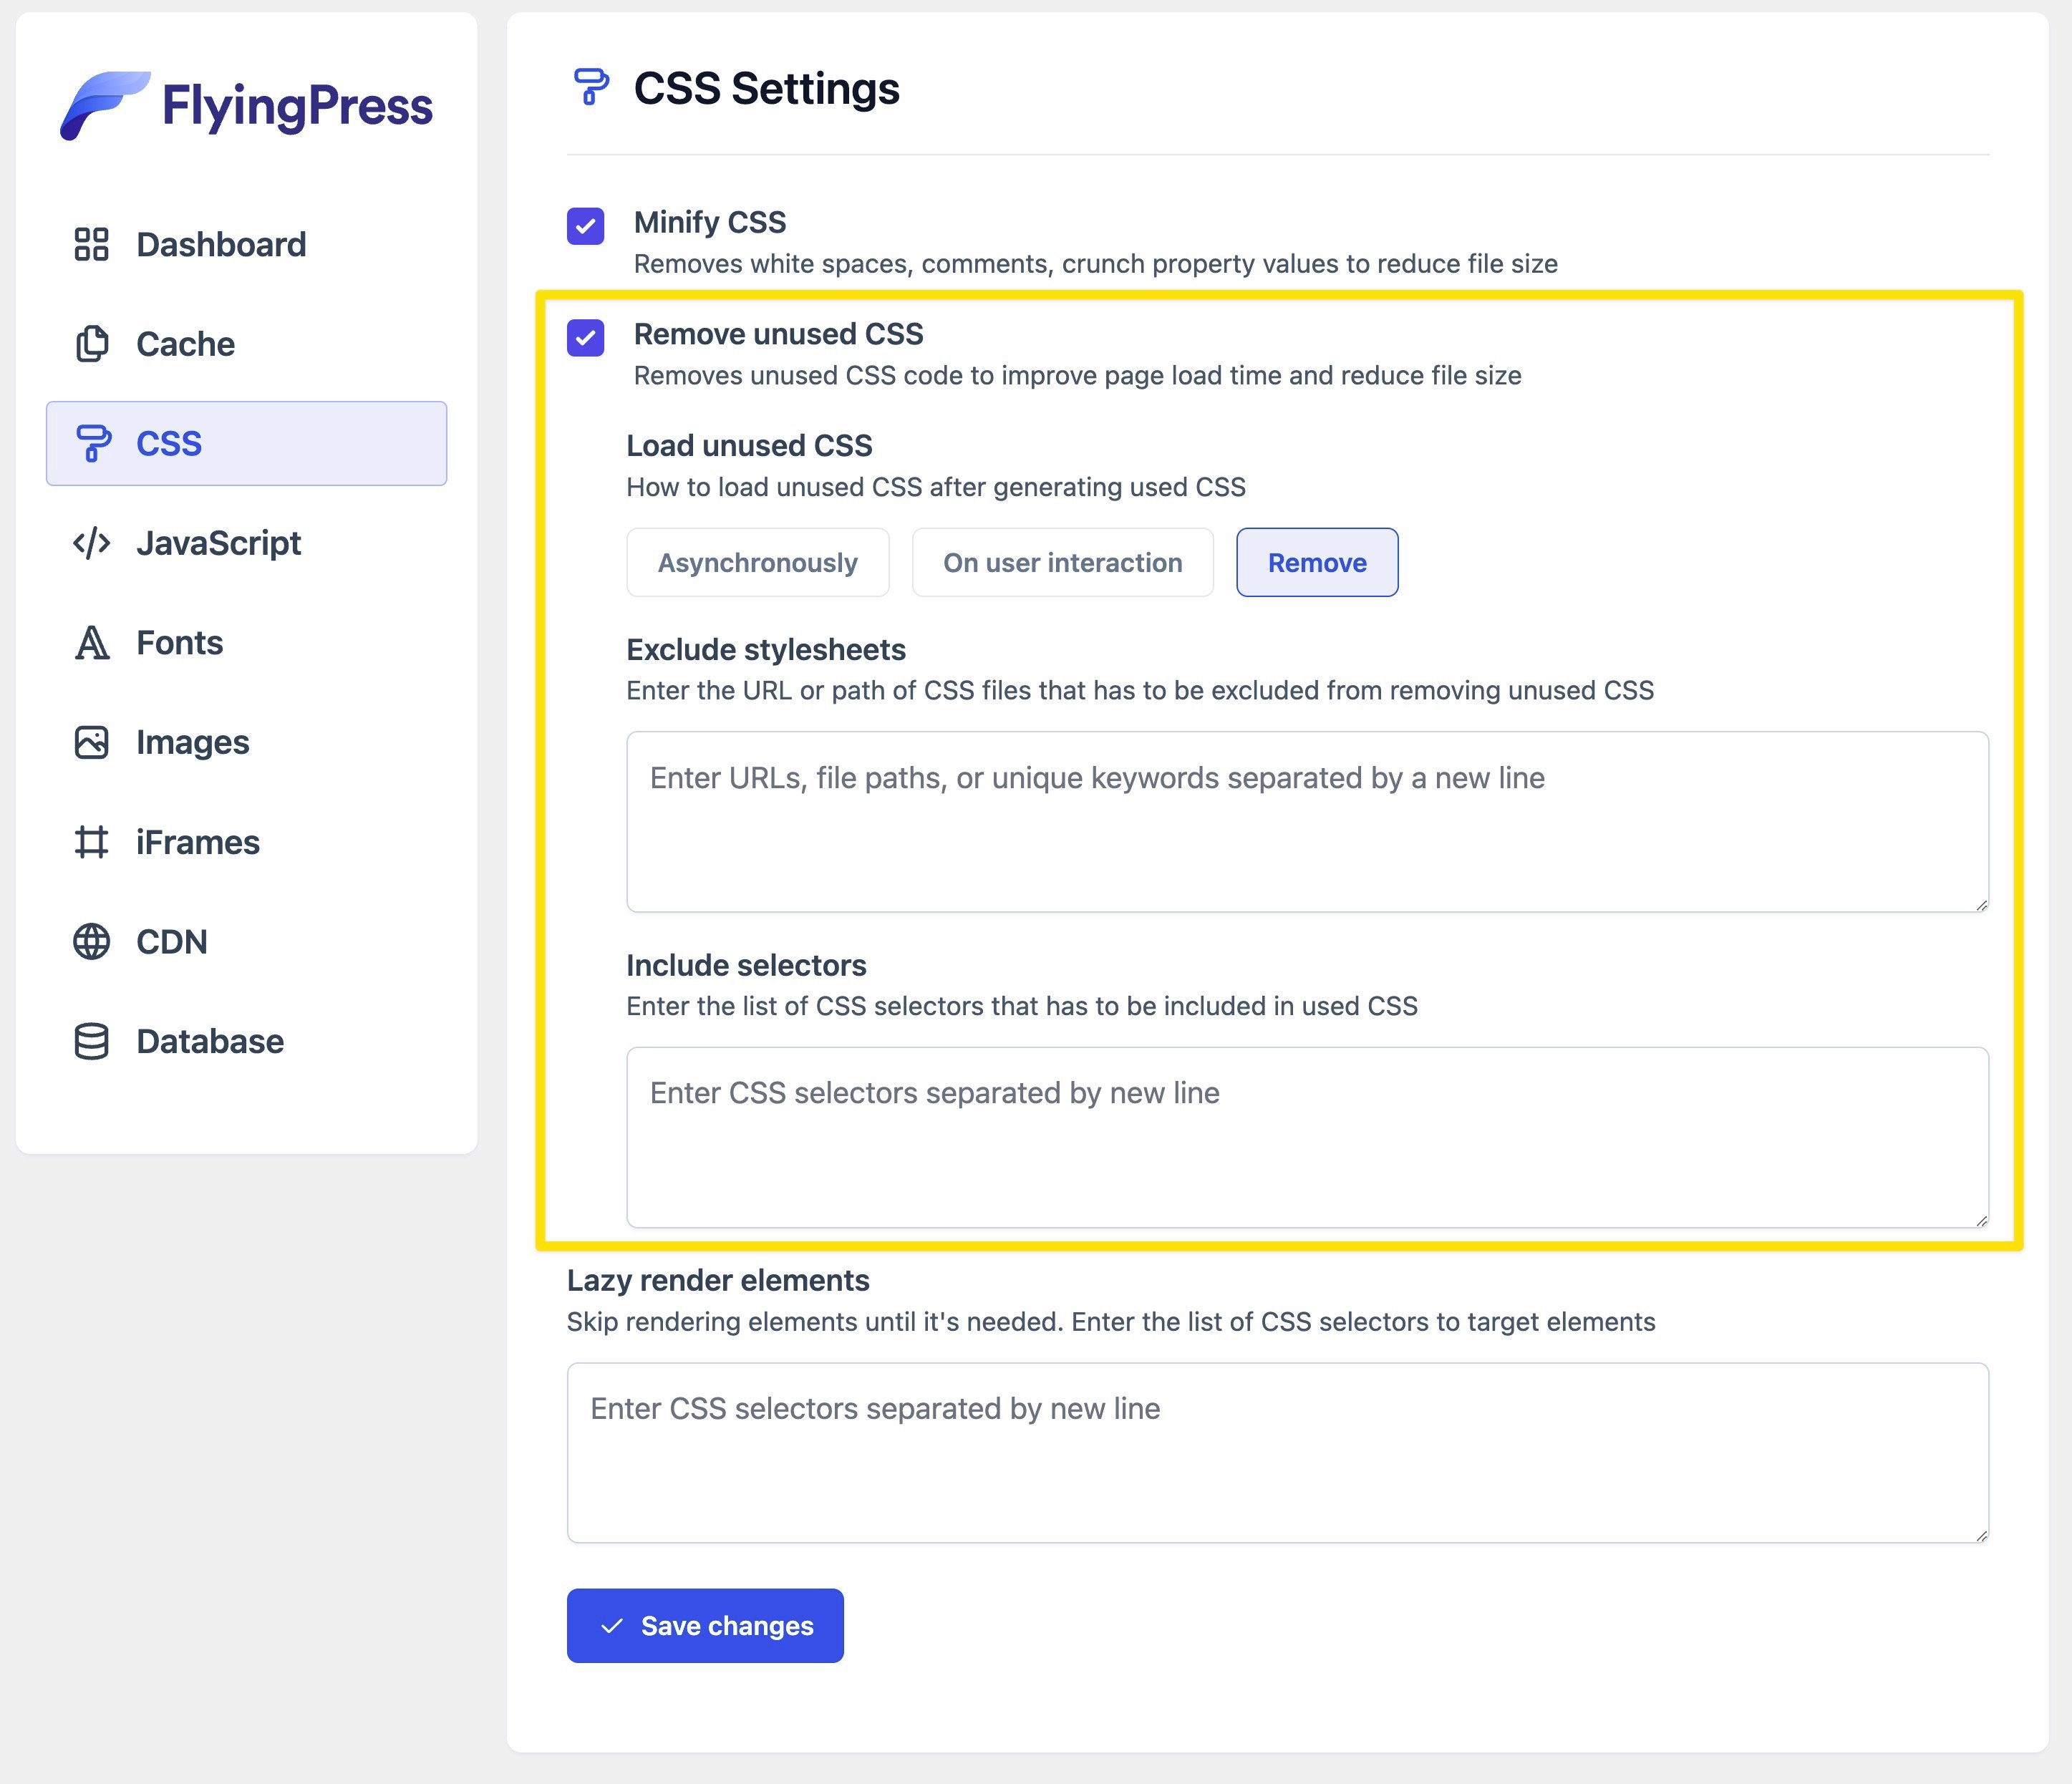
FlyingPress also offers a similar one-click unused CSS removal, with options to load the unused CSS in more optimal ways or remove it completely.
Both tools rely on processing your site’s code on their own servers, which is how they’re able to offer such a simple page-by-page removal approach.
A few more tips to help reduce unused CSS
Once you’ve removed unused CSS on your site (or at least most of it), you’ll want to avoid adding more unnecessary code in the future. On this front, there are several things you can do to keep your site running smoothly.
First, you’ll want to make sure that you’re using a lightweight theme. Generally speaking, a lightweight WordPress theme is a fast WordPress theme. Put simply, your theme should contain minimal code and be optimized for Core Web Vitals.
For example, our Neve theme prioritizes speed and performance. In fact, on a default WordPress install, this theme takes less than 1 second to load and has a file size of 28KB:

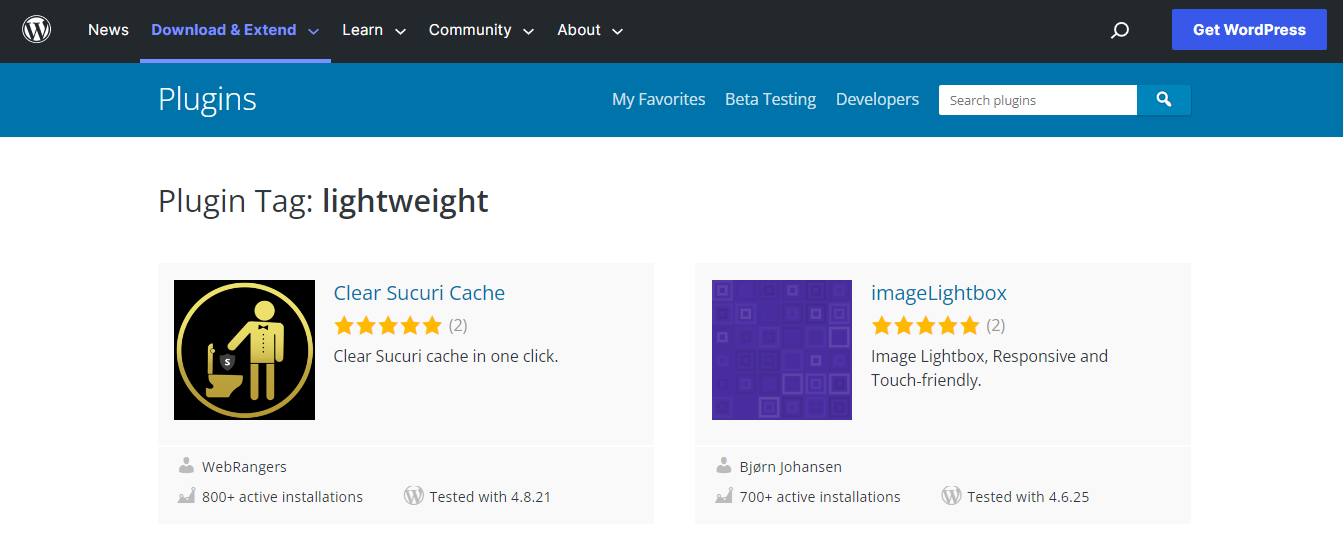
Likewise, you’ll want to choose lightweight plugins for your site. You can look for the lightweight tag when browsing through plugins:
We recommend that you run a speed test after installing a new plugin. This way, you’re able to check whether it contains unused CSS.
Additionally, you could try limiting the number of plugins on your site. This can help you improve your overall performance while minimizing the chances of having unused CSS on your pages.
As such, if there are any plugins that you no longer need, consider removing them. Note that deactivating them might not be enough – they could still load unnecessary code and take up space in your database. Therefore, it’s important that you delete them completely from your site.
Remove unused CSS from your website today 🚀
Unused CSS can have a negative impact on your site’s performance. This code isn’t needed to render the contents of your page but it is still loaded, resulting in longer loading times and a poor LCP score.
By removing it from your site, you can improve your Core Web Vitals performance and provide a better user experience.
To recap, here’s how to remove unused CSS in WordPress:
- Use a plugin such as Debloat to automate the task. 🔌
- Use a tool like Asset CleanUp to remove unnecessary code manually. 🔨
😎 For some other ways to improve your site’s Core Web Vitals metrics, you can also read our guides on 👉 how to speed up Largest Contentful Paint and how to reduce Cumulative Layout Shift.
Do you have any questions about how to remove unused CSS in WordPress? Let us know in the comments section below!