Would you like to know how to deal with The Url You Adopted Has Expired error? WordPress may perhaps have an error message stating, “The Website link You Adopted Has Expired.”
This is one particular of the most widespread WordPress challenges you might face if you use the WordPress system.
This error may possibly appear in different scenarios, including: “the hyperlink you adopted has expired” in WordPress localhost MAMP, “the website link you followed has expired” in WordPress localhost XAMP, “the connection you adopted has expired” in Divi, and “the connection you adopted has expired” in WooCommerce.
The problem often occurs when the file you are hoping to upload exceeds WordPress’ default restrictions for uploading and executing data files, this sort of as “the connection you followed has expired” when uploading a theme.
The finest strategy to solve this difficulty is to maximize the default upload restrictions. We will exhibit you several approaches to take care of the “the link you adopted has expired” mistake in this article.
What Brings about ‘The Hyperlink You Followed Has Expired’ Error?
The “The url you adopted has expired” error frequently occurs when uploading a WordPress concept or plugin to your website from the WordPress admin spot.
By default, WordPress hosting providers limit the size of files that can be uploaded by using the WordPress administration panel.
You will receive this error message if you try to upload a concept file that exceeds the common measurement limit. Further, this error has a essential challenge as it does not have a description.
Tiny facts about what is erroneous is provided in the mistake discover, so newbies ordinarily have problems fixing the dilemma.
This mistake takes place due to WordPress’ default limits for uploading and executing data files. In the following part, we introduce the very best approaches to increase the limits to address this mistake.
How To Fix ‘The Hyperlink You Followed Has Expired’ Error?
Your internet site will have to have a much larger upload limit and a quicker execution fee to deal with the “the connection you followed has expired” error.
It is needed to edit a main WordPress file and duplicate a couple of lines of code to execute this. Numerous strategies can be used to carry out this. You will be guided via the method.
Just take observe that you do not have to use all of these methods, just after trying a system that did not prove prosperous, reverse the alterations that have been built and try another system.
Right before building any improvements to the WordPress main data files, it is also important to again up your web site and make a duplicate of the documents.
Technique 1. Raising Limits In functions.php File
Though this approach is much more clear-cut, it has some cons as properly. The critical one particular is if you alter the topic of your web-site, the website will return to its former restrictions.
If you intend to transform your topic, you may perhaps desire to contemplate just one of the other solutions explained in the adhering to sections.
Even so, this process can be employed by merely adding the subsequent code to the capabilities.php file of your WordPress theme.
@ini_established( 'upload_max_size' , '120M' )
@ini_set( 'post_max_size', '120M')
@ini_set( 'max_execution_time', '300' )
The add_max_measurement and submit_max_dimension values can be set to a sizing increased than the file you are uploading.
It might also be vital to increase the max_execution_time to the total of time you consider the file will acquire to add. If you are doubtful, you can double this benefit.
Approach 2: Correct by Raising Limitations in .htaccess File
Alternatively, you can use the .htaccess strategy in its place of incorporating code to your theme’s features file.
In buy to put into practice this technique, you will need to have to edit the .htaccess file by way of an FTP consumer or as a result of the File Manager app in your cPanel account.
The technique for applying this approach is as uncomplicated as connecting to your web-site as a result of FTP and modifying the .htaccess file.
Follow these techniques to do this:
- Hook up to your website via FTP.
- Locate the .htaccess file.
- Suitable-click on on it.
- Pick out the Watch/Edit choice.

- Incorporate the subsequent code at the base of your .htaccess file:
php_value add_max_filesize 128M
php_value submit_max_sizing 128M
php_price max_execution_time 300
php_value max_input_time 300
- Help save your modifications.
- Upload the file to your website.
Process 3. Fix By Raising Boundaries in php.ini File
WordPress and PHP use the php.ini file to configure their configuration. Adhere to these ways to repair the error by expanding limits in the php.ini file. Adhere to these techniques to do this:
- Hook up to your WordPress web page making use of an FTP shopper.
- Lookup for the php.ini file in the root directory.
In most cases, end users are hosted on a shared hosting account consequently, they are not likely to uncover it in the root directory of their web-site.
In that circumstance, to properly configure your site, you need to make a blank php.ini file using a plain textual content editor, like Notepad, and upload it to your server.
- Increase the adhering to code inside of the php.ini file:
add_max_filesize = 128M
put up_max_measurement = 128M
max_execution_time = 300
- Preserve your alterations and upload the file to your website.
Now you can stop by your web-site and add the topic or plugin. You really should now be equipped to add the file without encountering an error.
If the mistake persists, check out expanding the file size restrict to accommodate the file you wish to add.
System 4: Update the PHP Version
An out-of-date PHP edition may perhaps induce the “Link you followed has expired” mistake to seem on your site.
In this scenario, the WordPress program will not be suitable with your PHP model, and you will have issue protecting the functionality of your web-site.
Many hosting companies present cPanel hosting solutions that permit end users to update their PHP versions.
Comply with these methods to do this:
- Log in to your cPanel.
- Click on PHP Configuration beneath the Superior options.
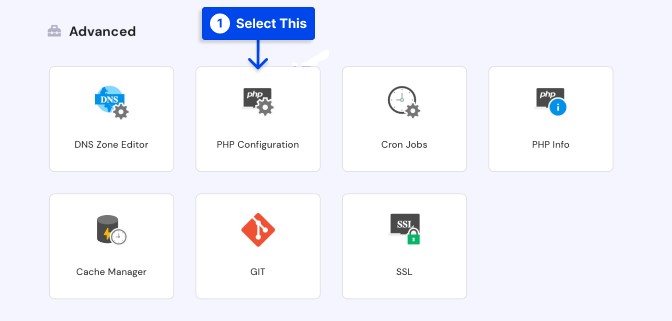
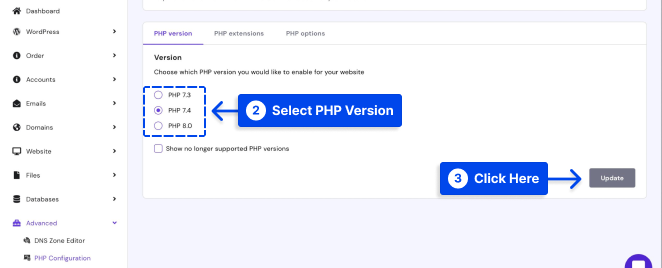
- Pick the PHP version you want from the checklist underneath the PHP version tab.
- Click on on the Update button to apply it server-large.
System 5: Make contact with Your Hosting Company
Look at getting in contact with your host provider if none of the previously mentioned-mentioned strategies work. Their guidance workforce will be in a position to guide you in resolving the difficulty.
Summary
You have been revealed various procedures to take care of this article’s “The connection you adopted has expired” mistake. The most successful method is to improve the default add restrictions.
We hope this report has been practical to you. If you have any issues or responses, please use the remark area.
Please, observe us on Facebook and Twitter to continue to be up-to-day with the most up-to-date content articles.