Would you like to know how to set up WordPress email logs? If you enable email logging on your WordPress website, you can keep track of every email your website sends.
WordPress Email logs assist users in troubleshooting WordPress issues and monitoring the status of email notifications sent by the site.
This article will explain why you must set up email logs in WordPress and WooCommerce, how to set up WordPress and WooCommerce email logs quickly, and how to check that WordPress emails get delivered.
Why Set Up Email Logs in WordPress and WooCommerce?
In both WordPress and WooCommerce, certain email notifications are sent automatically to your users when you run a small business website using WordPress.
A typical WordPress website will send the following emails: password reset emails, new user notifications, password change notifications, comments, and WordPress update emails.
The importance of email becomes even greater if you are also running an online store. A regular series of emails will be sent from WooCommerce to customers, including receipts, order details, new order notifications, and emails regarding their accounts.
Email notifications are important, as they are essential for a website’s proper operation and to deliver the best possible user experience.
Those emails must reach the users’ inboxes rather than disappearing or making their way into spam folders. You can accomplish that using an effective SMTP service provider to ensure email delivery.
In addition, you may also wish to observe which emails are sent and to whom. This provides a record of email activity, which is helpful in several circumstances.
A WordPress email log can be helpful in the following situations:
Therefore, the following section will demonstrate how you can set up email logs for your WordPress or WooCommerce site in a straightforward manner.
How to Enable WordPress Email Logging in WordPress and WooCommercer?
If you like to see what emails your WordPress site sends out, follow these steps to set up email logging on WordPress:
- Download and install the WP Mail SMTP plugin.
- Launch the Setup Wizard to configure the plugin.
It will guide you through connecting your site to a third-party mailing list. If you would like to gain the most benefit from your email logs, be sure to use a transactional mailer such as SendLayer.
By doing this, WP Mail SMTP can record more detailed delivery information about your email messages.
It may be more convenient for you to have the WP Mail SMTP team handle all the configuration and testing for you. If this is the case, look at the White Glove Setup option.
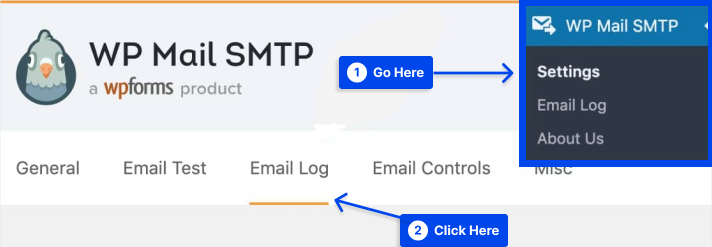
- Go to your WordPress dashboard.
- Go to WP Mail SMTP’s Settings.
- Click on the Email Log tab.
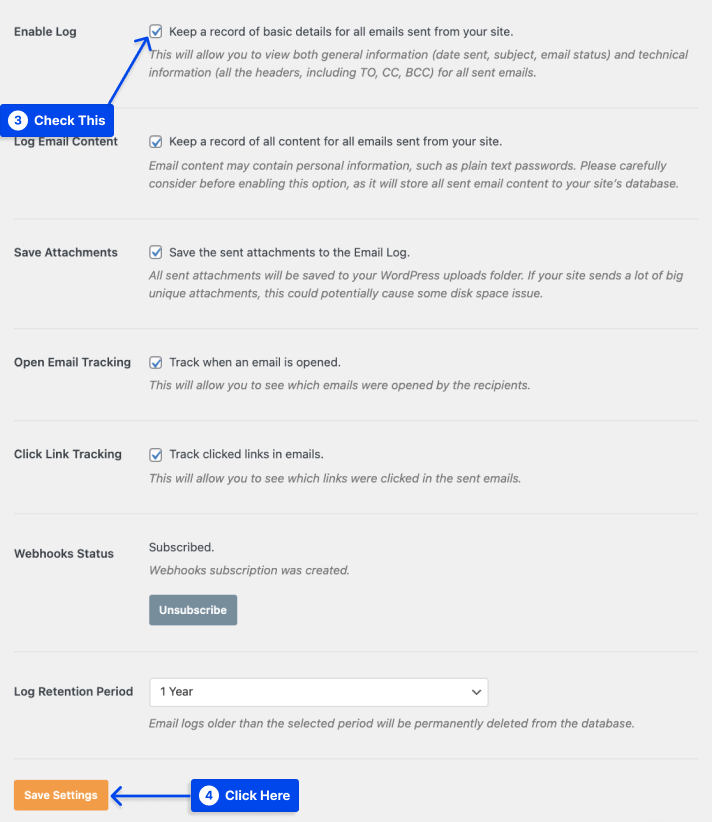
An option called Enable Log will appear on the Email Log page. By selecting this option, you can keep a record of all emails sent from your website in the future.
By selecting this option, WordPress email records will include the following information:
- Status of the email informing you whether it was successfully sent.
- The date and time at which a message was sent.
- The subject line of the email.
- The recipient’s email address, including CC and BCC.
- From Email.
- The total number of attachments.
- The mailer option has been used.
- Information about the technical details of the content, such as the MIME type.
- Check the box next to Enable Log.
Selecting this option will result in a list of additional options appearing beneath it.
The following are the options:
- Log Email Content: By enabling this setting, you can view the content of all the emails you have sent. It is essential to consider carefully whether you need this option, as your website’s database will store email content as plain text, not encrypted, which may pose a security risk.
- Save Attachments: All email attachments will be stored in the Uploads folder of your WordPress site if you select this option. This setting may lead to disk space issues for sites that send many attachments.
- Open Email Tracking: Using this option, you can determine whether or not your recipients have opened your emails.
- Click Link Tracking: By checking this option, you can determine whether your recipients have clicked on any of your emails.
- Webhooks Status: Only specific WP Mail SMTP mailers can access this setting. This setting should be set to “Subscribed” by default. By doing so, the plugin will update your email logs with the delivery status of your emails.
- Log Retention Period: With the help of this dropdown, you can select how long your site’s logs should remain on your server before being permanently deleted.
The choice is entirely up to you whether to enable these settings. They are all optional and do not have to be enabled for email logging to be enabled.
- Click on the Save Settings button to enable WordPress email logging.
- Go to WP Mail SMTP, then click on the Email Log option on the admin menu to view your WordPress email logs.
In the list of emails, the most recent emails will be displayed at the top.
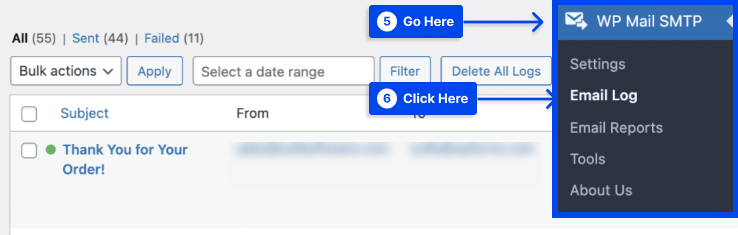
If you wish to review more information regarding a specific email, click on the Subject. This will take you to a page devoted to that particular email.
It contains details such as the status of the email, the mailer it was sent from, open and click tracking data, and more. It is also possible to export, print, and resend the email, if necessary, based on the information in the log.
How to Check WordPress Email Get Delivered?
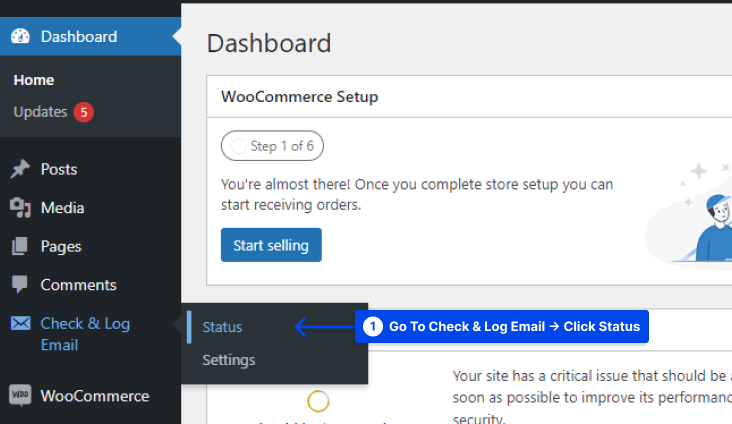
You can use the Check & Log Email plugin to verify whether your emails have been delivered. Follow these steps to use it:
- Install and activate the plugin.
- Go to Check & Log Email in your WordPress dashboard.
- Click on the Status option.
- Copy the email address on mail-tester.com to which you will send your test email.
The Mail-tester does not block or filter emails, as may be the case with Gmail or Yahoo.
- Paste the email address in the “Send test email to” box.
- Click on the “Send test email” button to send an email to your mail-tester address.

- Go back to mail-tester.com, and click to see if the email has been received.
Conclusion
This article has explained why you must set up email logs in WordPress and WooCommerce, how to set up WordPress and WooCommerce email logs quickly, and how to check that WordPress emails get delivered.
It is our pleasure to share this article with you. Thank you for taking the time to read it. The comments section is available for any questions or comments you may have.
The content on our Facebook and Twitter pages is regularly updated. Please follow them to remain informed.