It may seem counterintuitive to set a WordPress site to private. After all, most websites are built to attract prospects and customers. That can’t happen if the site is private. However, several circumstances justify the need for a private WordPress site. For example:
- hiding a website from search engines and the public during development so you don’t have to worry about external factors like rankings and have the space to scan your site for issues before it goes live;
- maintaining a website for only a few people, like a corporate portal, and having to keep private content away from the public eye;
- having a public website with a members-only section, which needs to be hidden from non-registered users and site visitors.
The best part about WordPress is that it allows you to hide both a small part of the website and the entire website. In this guide, I will give you a step-by-step tutorial on doing both. Let’s get started. 😎
Table of Contents
What Is a Private WordPress Post/Page?
“Private” is opposed to “public” and means a certain WordPress page/post is not visible to everyone. It can be viewed by some users; those who are not allowed to view the website pages and posts will be unable to access the site content even if they have a URL.
Privacy settings for posts and pages favor certain WordPress user roles like Administrator and Editor. Administrator is the website owner who has the ability to access, submit, edit, publish, and delete posts and pages, install plugins and themes, add and delete users, change settings in the Dashboard, and set the posts/pages to “Private.” The Editor role is allowed to open and modify WordPress private pages and posts but cannot make them private.
The remaining user roles have no permission to access private pages and posts at all.
Why Do You Need Private Pages and Posts?
Private posts and pages can be helpful for many reasons. Here are some use cases when you might need to make the website private:
- Content and design changes. Hiding a page/post is ideal when you are not ready to make them public because something there needs tweaking. By setting the content visibility to private, you get extra time to work on it and choose to publish it when everything is ready.
- Product/service launch. Prior to going live, you might want to organize a closed showing for a product/service. WordPress private posts and pages help you control who sees the content while it still remains non-available for guests.
- Invite-only communities. Private pages and posts can contain password-protected content for a limited number of users.
- Private blogs. Bloggers might sometimes want to keep something from their followers and share it with the chosen few. Access restrictions will help to make it happen.
- Internal pages. It’s a corporate practice to keep their internal guidelines, instructions, and other written matters away from the common public.
WordPress Private Website Benefits
Following the previous paragraph, it’s vital to outline the benefits brought by private web pages and posts. Use access restriction to get:
- better user experience – you’ll be able to create private membership areas where users could share thoughts and get a more personalized experience;
- increased exclusivity – you can gather a specific audience and create a stronger brand image;
- more control over the content – it’s a nice way to protect intellectual property rights and reach new monetization heights;
- improved security – you might want to reduce hacking attempts, bot traffic, and spam flowing to the website;
- better compliance – restricting access to certain website parts will give the site better data protection compliance.
Now is the time to find out how to restrict access to the entire website and its parts.
Making the Entire Site Private
There are different ways to make a WordPress site private. For example, you could use WordPress’s built-in features to hide your site from search engines. Although this will stop search engines from indexing your website, it doesn’t stop people who know the website’s address from accessing it.
Similarly, it doesn’t stop referral traffic from accessing the site. Let’s say you usually use a guest post service provider to distribute guest posts to other websites. The people reading those guest posts can still click on the anchor texts pointing to your site and access your content.
📚 Read also: How to Create a WordPress Guest Post Submission Form?
Therefore, if you want to make your website completely private – from search engines and the general public – you’ll need to use a plugin. Now, let’s quickly go through all options.
Hiding a website from search engines
Hiding your site from search engines means that Google, Bing, Yahoo, and other search engines won’t index the site. Therefore, your site will not appear on search engine results pages (SERPs). However, as mentioned earlier, anyone who knows your site’s address will still be able to access it.
This is a good option if you have just started building a new WordPress website. It gives you enough room to work on your content and troubleshoot potential issues without worrying about your audience or SERP rankings.
The best part is you can do it using default WordPress. Just log into your site and head over to Settings > Reading. You will see the option for Search engine visibility. Check that box to discourage indexing, then click “Save Changes.” That’s it.
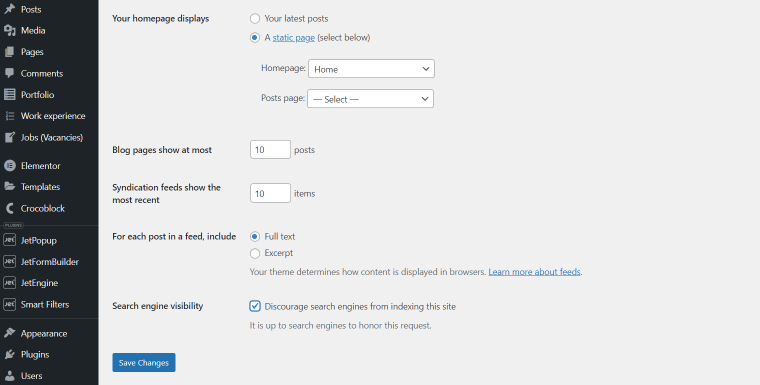
Remember to return to this page and deactivate the settings when you are ready to make your website visible.
Using a plugin to hide the website
Let’s say your site was live for several weeks, and now you want to put it back under construction. In that case, using the option above to hide it from search engines is not enough. Some people will still be able to visit the site using its address.
Hiding a website from search engines is also not ideal for web creators who have no intention of making their websites public. That’s where plugins come in handy.
Plugins are your best bet when you want the utmost privacy for your WordPress website. Several plugins can be used for this purpose. However, none of them are quite as effective and easy to use as My Private Site.
The plugin will make your entire website private. No one will be able to see your content except for members granted access to the site.
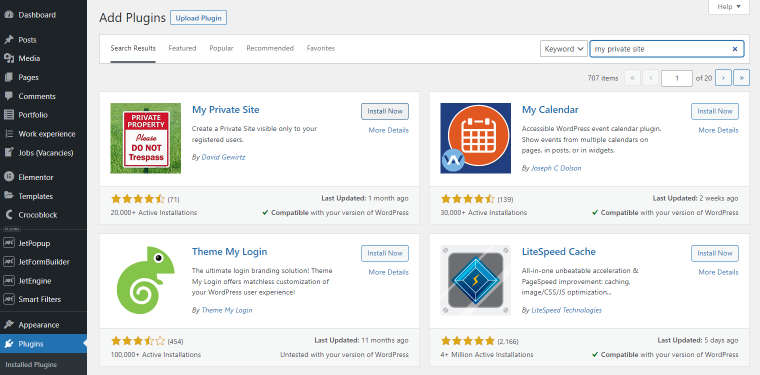
To set up the plugin, proceed to Plugins > Add New. Then, search for “My Private Site” plugin, and it should appear at the top. Install and activate it.
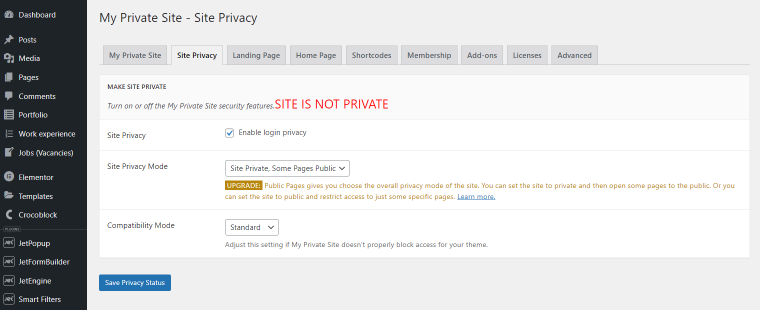
From there, click My Private Site in the sidebar menu and open the Site Privacy tab on the next page. You will see the checkbox to enable the login privacy setting. Tick it and save changes. That’s it; your entire site is now private.
You can find the full routine in the video below:
How to grant members access to the website
Click Users > Add New from the sidebar and create member accounts for users you wish to grant site access. You can make and manage as many accounts as you want.
Be sure to create those accounts with a “Subscriber” role at the bottom. That way, members can only access the content they need, not your delicate admin materials.

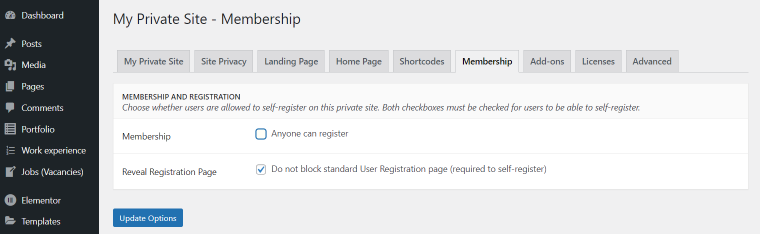
Something else you should do is disable the Anyone Can Register option found under the Membership tab in My Private Site plugin settings. That will prevent random people from creating accounts and accessing your website.
Making the site private without a plugin
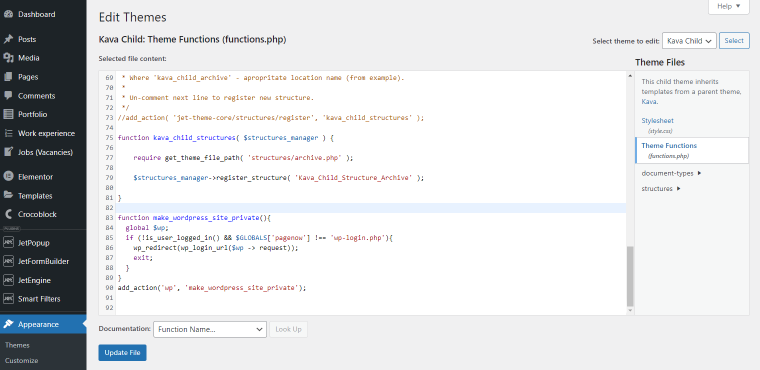
You can make a WordPress site private without a plugin, but you’ll need to use a few lines of code. Here is the first code snippet:
function make_wordpress_site_private()
  global $wp;
  if (!is_user_logged_in() && $GLOBALS['pagenow'] !== 'wp-login.php')
    wp_redirect(wp_login_url($wp -> request));
    exit;


add_action('wp', 'make_wordpress_site_private');
Add the code to the child theme’s functions.php file of the website you want to make private. Go to the Appearance > Theme File Editor directory. From there, you will see Theme Functions on the right side. Click it, and the functions.php file should show up. Paste the snippet at the bottom of the existing code, click “Update File,” and your website should go private.
What this code does is direct visitors to a login page. Visitors can then sign in using the accounts you’ve created for them. Come back to the same dashboard and remove the code to make your website public.
Another more aggressive code will direct unauthorized users to a 403 Forbidden page. Here it is:
order deny,allow
deny from all
allow from 123.45.67.89
Replace the digits in the last line of code with your IP address. This code should be added to the site’s .htaccess file.
Pro tip
Unfortunately, the code only works if your site runs in Apache.
I would recommend this option if the site is under construction and only a few developers need access. Otherwise, the plugin and the previous code snippet are better options if you run a private blog or membership site for family, friends, or a company.
Hiding the whole site using WordPress.com
NOTE
Before proceeding with this method, please note you should have a valid WordPress.com account and a website linked to it.
To make the website private through the WordPress.com platform, you need to follow the Settings pathway in the left sidebar. Scroll down the page until you reach the Privacy section. There are three options here – “Coming Soon,” “Public,” and “Private.” Click “Private” to hide your website from all users except those you have approved.
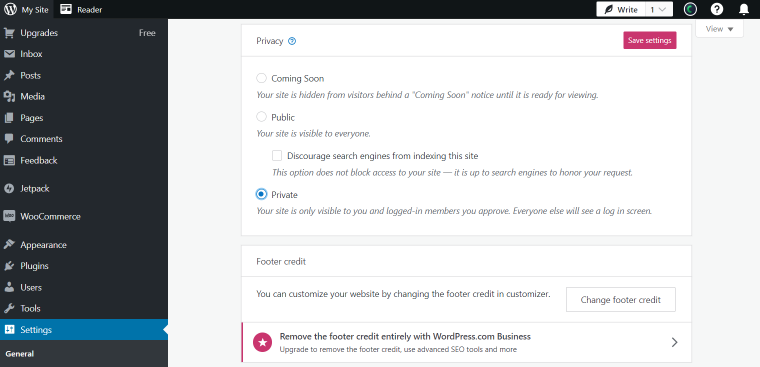
Besides, you can use the Manage > People tab to invite other WordPress.com members to access and view your private website. The downside is questionable WordPress privacy. Automattic (the company behind WordPress.com) has access to data about your website’s every user. Take that into account when choosing a content restriction method.
Hiding Single Pages
Hiding single pages is much easier than hiding a whole website. You also don’t need a plugin or custom code to get the job done. WordPress provides all the necessary features to make individual pages private. They also have different “privacy types” you could implement. Let’s go through them.
Using a password
The first option is to password-protect WordPress without a plugin. To enable this setting, open the page or post you want to make private. Then, check the visibility settings, and you will see three options. One of them is “Password protected.” Click on it, then create the password.

This privacy setting hides your page or post from anyone who doesn’t have a password. Instead of seeing the content, they’ll see a page requesting a password.
Besides the built-in WordPress feature, there is another way to hide your pages with passwords using the PPWP Pro plugin. You can install the PPWP Lite version for free in the WordPress repository.
PPWP enables you to hide and secure your pages with multiple passwords. Unlike the WordPress default password protection feature, it allows you to set roles for each password so that only the assigned roles can access password-protected pages.
Here’s how to use PPWP:
- In your WordPress admin dashboard, navigate to Plugins > Add New.
- Search for “password protect wordpress” in the keyword box, then hit “Install” and “Activate.”
- Head over to Pages on the WordPress sidebar and visit the page you intend to password-protect.
- Go to the Password Protect WordPress section at the top right corner of the page and press “Edit.”
- Enter your passwords. If you wish to set multiple passwords for your page, each must be displayed on a separate line.
- Set roles for each password if necessary.
PPWP provides two password options: Global and Roles.
The Global passwords permit all users to fill in the password form and unlock the content. Whereas the Roles passwords require password input from specific logged-in user roles. Unauthorized users will see an error message even though they’ve entered the correct password.
In addition, you can secure numerous pages with a single or master password. In this way, users can use that password to unlock all the content at once.
Showing pages only to paid subscribers
If you want to monetize your website, you can hide it and only make it visible to subscribers. You don’t have to hide the entire website, either. There is an option to hide specific pages. That way, you can put your premium content behind a paywall and leave the rest of the website accessible to the general public.
Unfortunately, WordPress does not provide a reliable inbuilt option to make content accessible to paid subscribers only. You have to use a plugin for this. JetEngine is one of the options at your disposal.
JetEngine lets you put content behind a paywall in just a few steps. It also allows you to create several subscription options. For example, you can make hierarchical subscriptions allowing subscribers to upgrade to different plans.
The plugin will help you make membership forms, create subscription plans, build pricing pages, manage members, set content-handling access rules, and manage content visibility from one place.
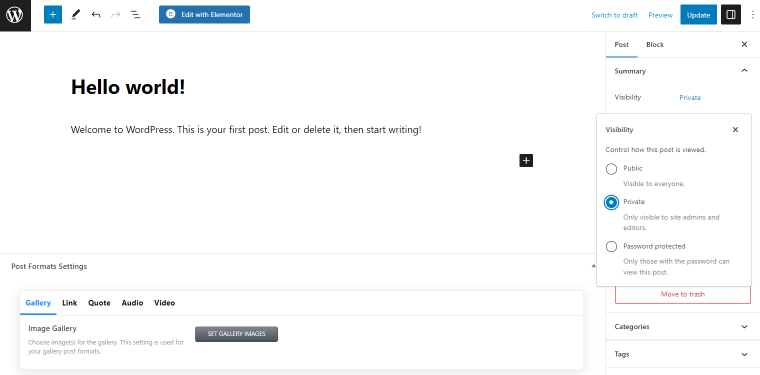
Setting privacy settings for some content
You can hide a page or post from the public. However, it will still be accessible to site admins and editors. The setting is found under the Summary/Publish section in the Visibility dropdown menu.
FAQ
There are several ways to hide a website from the public eye. You can use a plugin, paste some code into the functions.php or .htaccess file, use a WordPress.com account, hide the website from search engines, and use a password to protect it.
Absolutely. There are many free options, for instance, the My Private Site plugin, which hides the whole website from users and search engines. PPWP is another plugin allowing you to password-protect multiple website pages. JetEngine by Crocoblock has a membership feature to help you hide the site content behind a paywall.
Non-public posts and pages are visible to the Administrator and Editor user roles. Admin can give some registered users permission to access private site content.
To hide the website from Google and other search engines, go to Settings > Reading and tick the Search engine visibility checkbox. Don’t forget to save the changes.
Yes, you can make a blog private using WordPress.com (in the Privacy settings block). To make a self-hosted WordPress website, you’ll need a plugin or code snippet.
Closing Words
To recap, you can choose to hide a WordPress site from public or hide a few pages/posts. With the former, you have several ways to go about it. First, you can use the inbuilt WordPress option to hide your site from search engines. The second option is to use a WordPress private site plugin. My Private Site is one of the options. It’s easy to use and will hide your site from search engines and the public. Finally, you can add a code snippet to your child theme or .htaccess file.
The latter option uses password protection to hide your site. Only those with the password will be able to access it. You can also use the “Private” option to hide the content from everyone but the admins and editors. Use the Status & Visibility dropdown menu to make single posts and pages private.
Last but not least, you can install the JetEngine plugin to make your content visible only to paid subscribers. The plugin allows you to hide specific pages or the entire website behind a paywall.
Hopefully, this guide has helped you find the appropriate method to restrict website access.