Having a short and less complicated checkout process can hugely impact your conversion rates. If your customers have to enter lots of details or create a new account before placing an order, chances are every second shopper will abandon the checkout process and go elsewhere just because of the complicated checkout process.
To solve this problem, the makers of the PeachPay plugin for WooCommerce have created a solution to provide more streamlined and smooth checkouts and cut the average checkout time to just a few seconds.

It’s a bold claim, but one that could well prove to be a game-changer if you find yourself with an ever-increasing abandoned cart problem.
Why? Because the whole idea behind PeachPay is to ensure that returning customers can purchase all the products they want from you with just a single click of a mouse. As such, you get to eliminate the kind of fuss, frustration, and hassle associated with a multi-step checkout process, meaning customers are much less likely to give up on you and see their purchase through to the finish.
So far, so good, but does it work?
Is PeachPay effective in delivering one-click checkouts in just a few seconds? And if yes, how easy is it to use and set up?
Let’s jump into our complete PeachPay review to find out.
PeachPay Plugin Review
The first thing to note about PeachPay is that it’s entirely free, as their pricing is built into the payment processor, such as PayPal or Stripe’s standard transaction fee so that you can try it out unencumbered, at no added costs. Then decide to keep it if it proves to be a worthwhile addition to your online store. Also, it is worth mentioning that this pricing method does not affect the transaction charges, and there is no change in the final amount your customers need to pay.
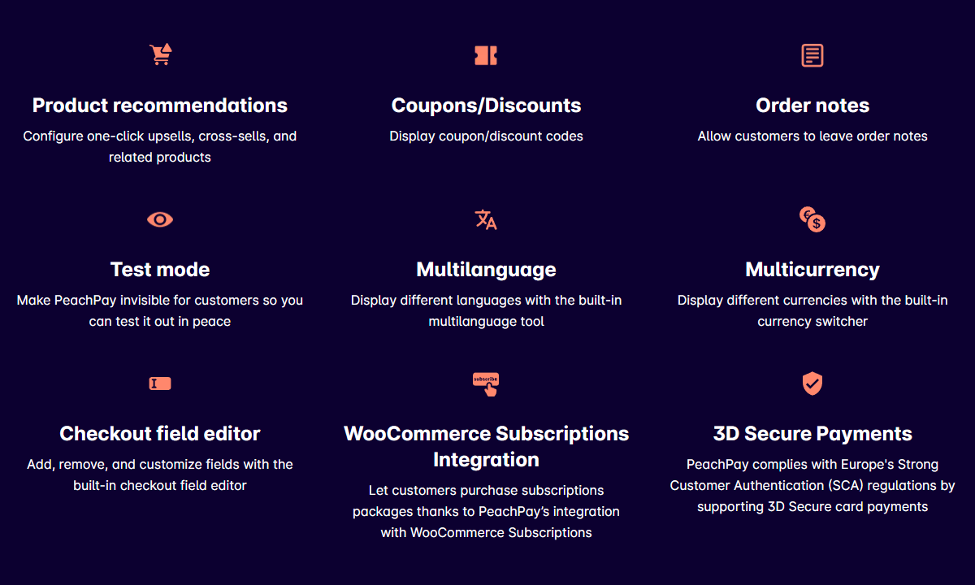
Moreover, PeachPay comes without restrictions, meaning you’ll have complete access to the full range of features, including:
- A straightforward setup and registration process.
- Secure payment processing via Stripe, PayPal, Apple Pay, Google Pay, Afterpay, and Klarna (more to come).
- Multi-device functionality so customers can shop without any issues.
- Comprehensive checkout button and window customizations.
- Powerful currency switcher to facilitate customers globally.
- Multiple languages supported.
- Reliable and knowledgeable customer team.
- Strategic product recommendations such as cross-sells, upsells, and related products.
- Support for WooCommerce Subscriptions.

Article Continues Below
Let’s look at some of these features in more detail:
Simple Setup and Effortless Onboarding Process
You can download PeachPay for free from the WordPress Plugins Directory simply by going to Plugins – Add New from your WordPress dashboard and then searching for ‘PeachPay.’
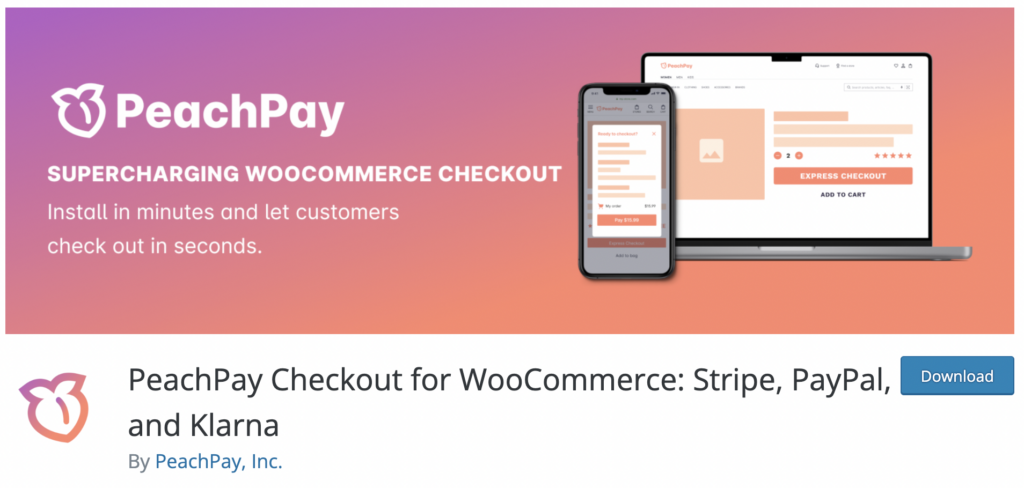
Click Install, then Activate, and you’re good to go.

Alternatively, you can set up PeachPay on your website with their setup wizard by entering your domain in the field provided.
Connecting WooCommerce
In order for PeachPay to work, you’ll need to connect it with WooCommerce, which is literally as simple as clicking “Approve” to confirm that you give PeachPay Read/Write access.
You don’t even need to go looking for this setting. It’s the first thing that pops up once you’ve activated the plugin.
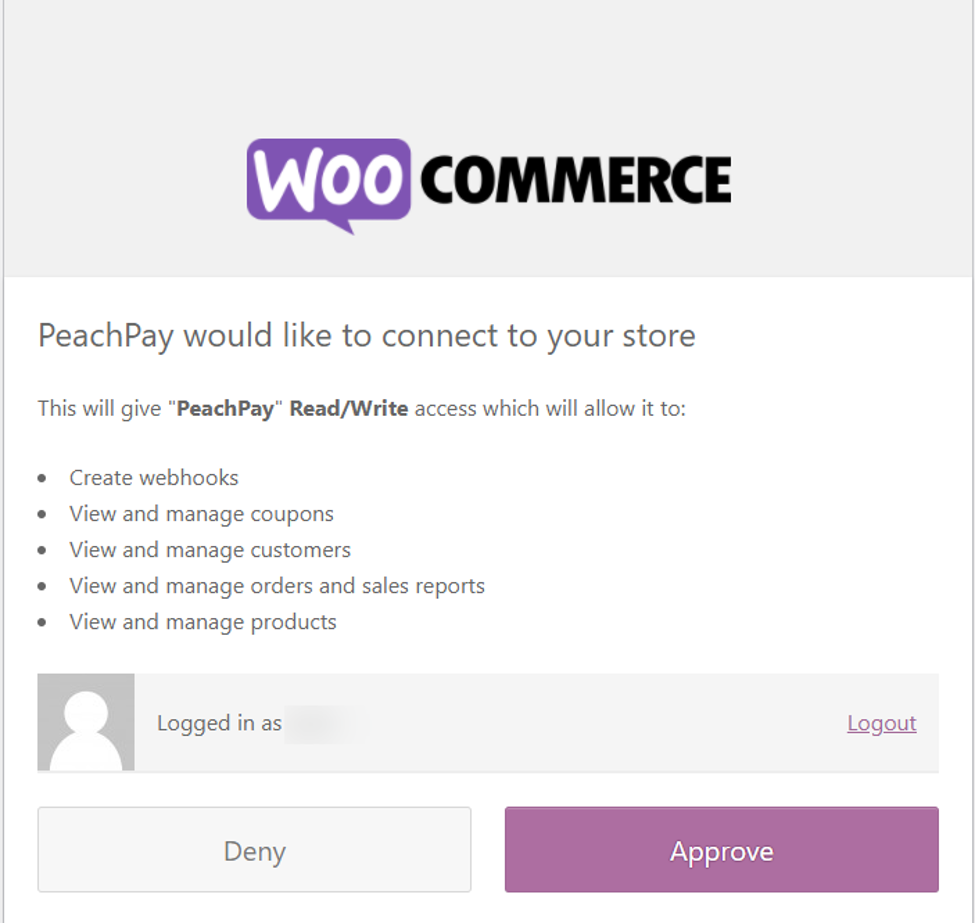
It’s also important to note that while granting this permission technically gives the plugin permission to do several things, really, the only task that it’s technically able to complete is fulfilling orders, so you don’t need to worry about the plugin conflicting with any other functionality on your WooCommerce store.
Setting up Payment Processor
If you choose to process your payments with Stripe, you’ll also have to connect with Stripe, which is as simple as clicking the notification on your dashboard following the instructions.
If you already have a Stripe account, you can simply log straight into that.

Otherwise, you can create a Stripe account at this point and then connect it to PeachPay after the fact. Still a fast process.
With that, you’re set up and ready to go.
If you wish to accept payments through PayPal, you need to set it up separately. Just like setting up Stripe, PayPal is easy to set up. You just need to authorize PeachPay on PayPal and complete the setup wizard.
Running Two Payment Processors
Interestingly, you can run PayPal along with Stripe so shoppers can choose their preferred payment method. Then, they can either enter their credit card details using Stripe, or they can process the payment using PayPal. Having both options can accelerate conversions on your WooCommerce store. On top of that, you can enable Google Pay, Apple Pay, Klarna, and Afterpay. The makers of PeachPay have also promised to add support for more payment integrations soon.
Effortless One-Click Checkout
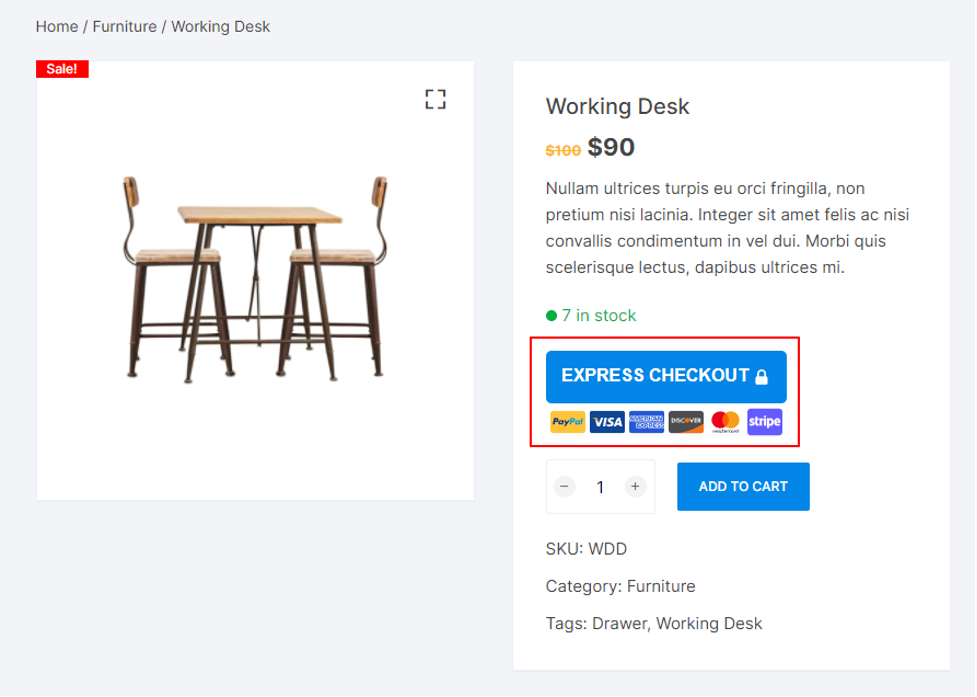
With PeachPay set up and activated, you’ll now find that when customers visit your product/cart/checkout pages (or mini/sidebart cart), they’ll be presented with a button inviting them to purchase with express checkout.
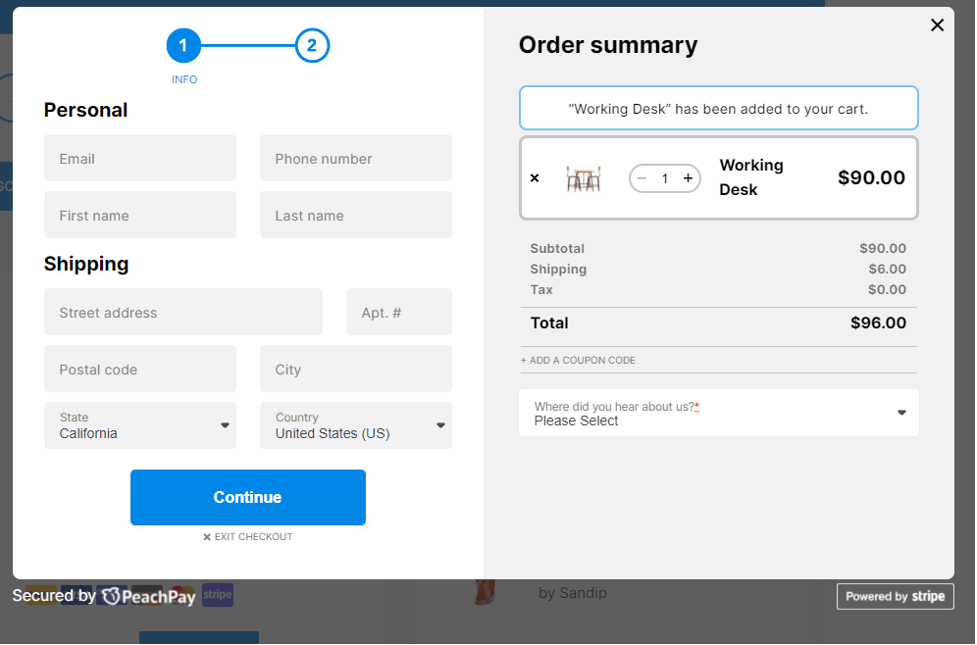
We found that even the first time someone uses PeachPay, it takes practically no time at all, especially if customers already have autofill enabled as many do.
With that done, customers complete their first checkout with PeachPay in seconds.
This is where PeachPay really comes into its own, as once that initial order has been placed, the “one-click” promise really does come true.
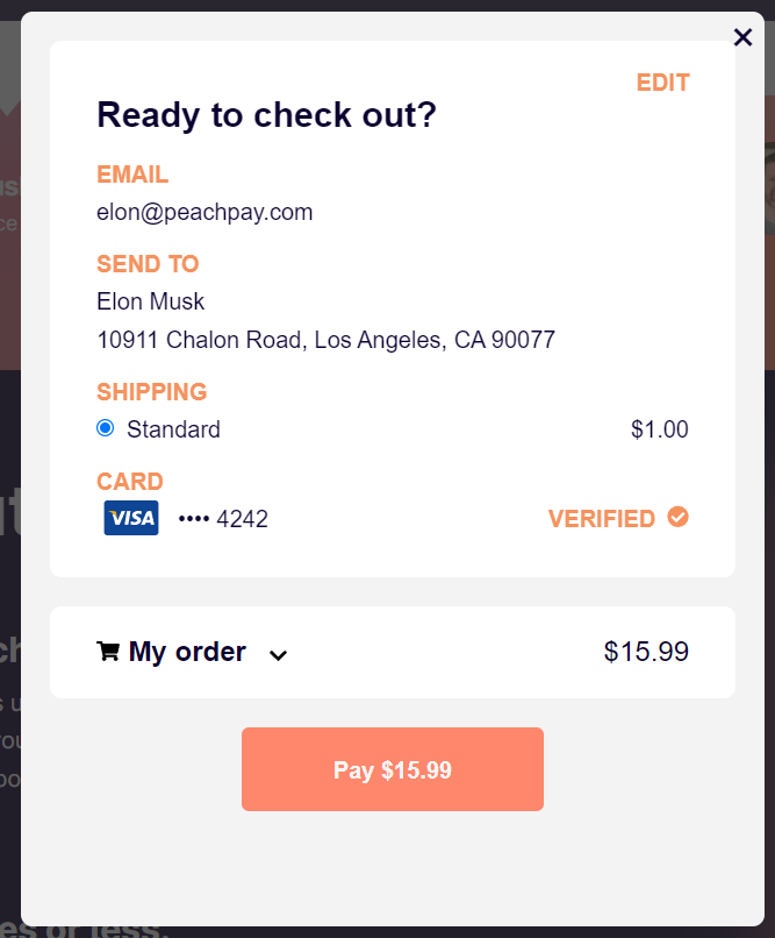
Returning customers just need to click that same “Express Checkout” button, only this time, all of their information has been securely saved, and all they need to do is click the Pay button.
Voila! From product page to completed purchase, the whole process takes less than five seconds, meaning your customers can now shop happily without having to work their way through an endless, laborious checkout process.
Powerful Button Customizer
Even making some styling changes to the checkout button can affect the conversion rates. To cater to this requirement, PeachPay lets you customize the color, text, visibility, width, and more using the button preferences settings page.
You can even view the changes you are making to the button in the live preview.
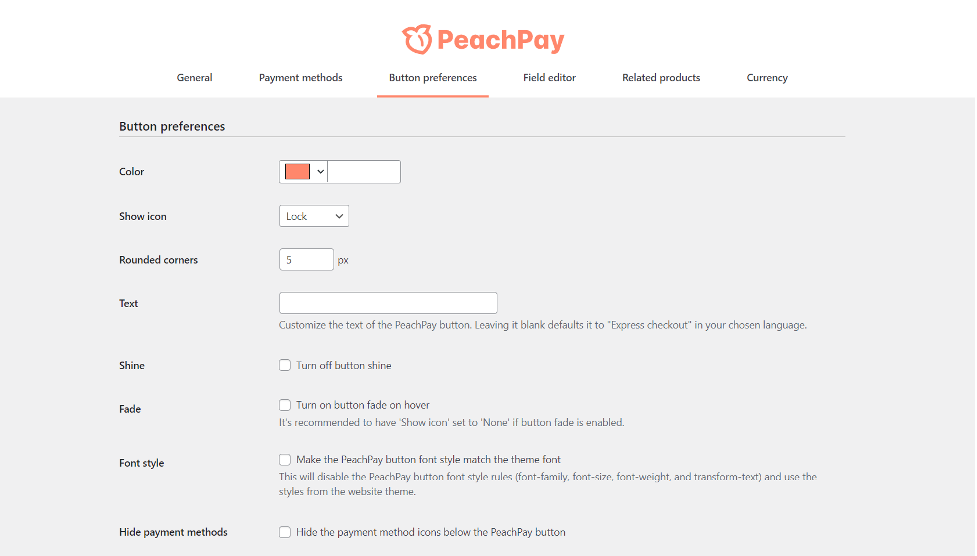
Moreover, you can make changes to the product page button, cart page button, shop page button, and checkout page button separately. In addition, changes like alignment and width can easily be adjusted.
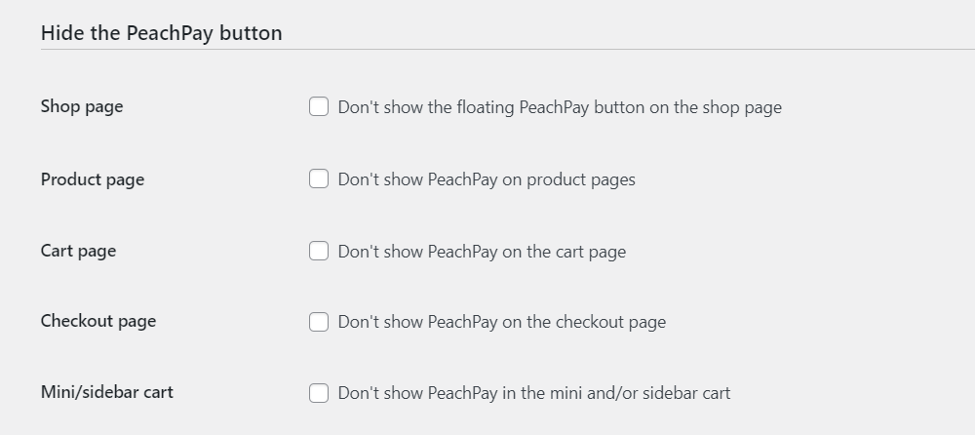
If you wish to hide the PeachPay button from specific locations, you can do that too.
Currency Switcher
To accept payments in other currencies apart from USD, you can enable the currency switcher. With this feature, you can allow more global shoppers to place orders on your website.
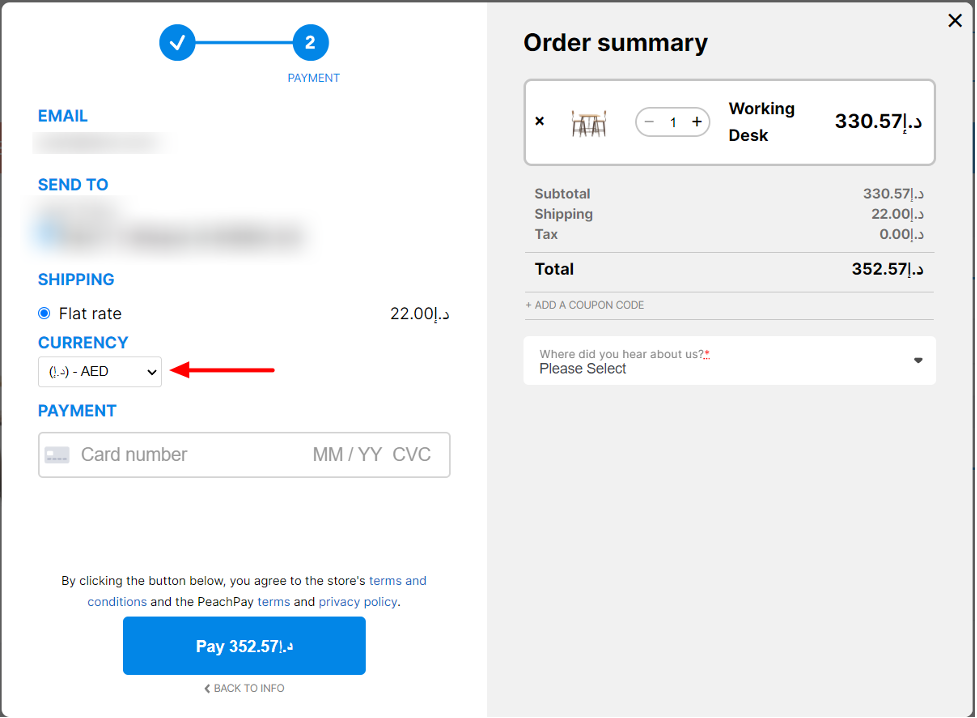
Doing so is pretty straightforward. At once, you can have up to nine currency switcher options, and you can define their conversion rate, number of allowed decimals, and conversion type for more accurate calculations.

Related Products
According to a report by McKinsey, cross-selling and smart placement of products in the checkout process can increase product sales by ~30%. With PeachPay, you can choose if you want to show related products in the checkout process or on the product pages.
This mechanism starts showing products depending on the product-related attribute. If you have products in your store that can be an excellent addition to your most selling product, it can highly impact cross-selling and upselling. This is how the upsell section would look in the checkout popup.
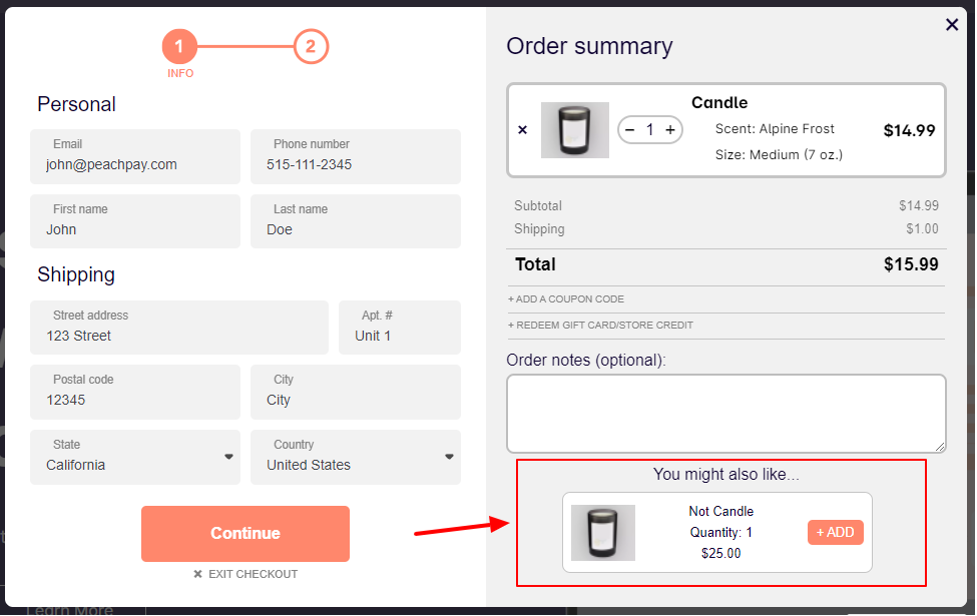
To enable related products, you can simply do it by ticking the checkbox and entering the number of related products you want to display. You can even show the related products in a slider format.

Field Editor
With PeachPay, you also get an option to collect additional information from your customers by adding more fields. You can add a new field from the field editor settings, give it a name, select field type, label it, and set a default or placeholder value. You can also make the field mandatory.
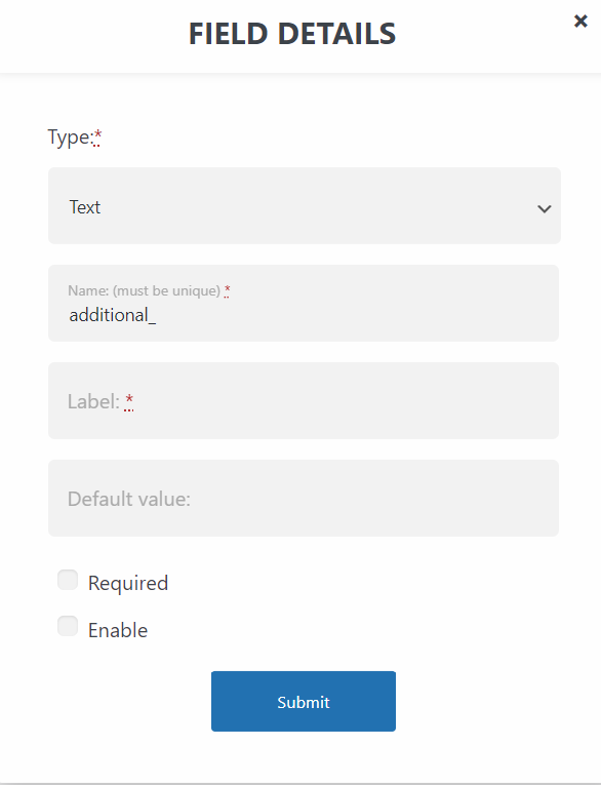
Since some digital purchases do not require the physical address of the shoppers, you can disable the address field from the checkout flow, and then the users can place orders for digital products without entering their addresses. Although you might still need to collect your customer address if the country you are selling from requires you to collect this information.
Fast-Acting, Quality Customer Service
Surprisingly, the PeachPay team doesn’t seem to make much of a big deal about their customer service and support, but in trying out their plugin for this review, we have to say it was one of the main things that endeared them to us the most.
We pretended to have an issue and shot a quick “help, it’s not working” email to see what kind of customer service folks could expect. This prompted a reply not ten minutes later. It explained exactly what to do about the issue in question.
This is a far cry from other plugins that offer lackluster support, if they indeed offer any support at all. It’s not uncommon to send a cry for help to a plugin developer and not get a reply back until the next week, so a ten-minute response is definitely commendable.
PeachPay WooCommerce Plugin: Our Verdict
We started this review by asking whether PeachPay really could optimize your checkout process and make it a seconds-long process, and now, having tried it out ourselves, we can confirm that yes, it can indeed.
Of course, the whole thing does mean customers will have to enter their payment and shipping details the first time round so that they can use the one-click checkout in the future, but we found that even the first-time checkout was infinitely faster and effortlessly simpler than the default WooCommerce process.
We also found the setup and onboarding process as simple as easy as you could hope for, meaning you could go from installing the plugin to offering excellent one-click checkouts to your customers within the space of about 5 – 10 minutes.
Not just Stripe, you can set up payments with PayPal, Apple Pay, Google Pay, Klarna, and Afterpay. This makes it easier for shoppers globally. Moreover, with advanced features such as currency switcher, checkout button customizations, field editing, and languages option, you can maximize PeachPay and utilize it to bring down checkout times by many folds.
Add in surprisingly good customer support and what you’ve got here is a quality plugin that may well be the answer to all your checkout and payment problems.
So, what are your thoughts on PeachPay? Considering this is essentially a free tool, why don’t you go ahead and integrate it with your WooCommerce store and boost sales?