In search of an honest review on the Simply Schedule Appointments plugin? If yes, then here we go.
As the name says, Simply Schedule Appointments is a simple yet powerful appointment booking plugin for WordPress. Using this plugin, you can set up your scheduling calendars to take your first booking within 5 minutes. And, it’s possible with its free version.
With the premium version, you’ll get a set of exclusive features that helps your growing business. But a question may strike your mind, ‘Is it the best appointment booking WordPress plugin for your site?’.
Don’t worry! Here’s a complete review of the Simply Schedule Appointments plugin. So, have a look at its features, pros, cons, support, etc., and find out the answer to your queries.
Now, let’s start.
A) Simply Schedule Appointments – A Brief Introduction
Simply Schedule Appointments (SSA) is one of the best easy-to-use WordPress plugins for appointment booking. You can quickly set up this plugin and create multiple booking calendars on your site. And on each one, you can specify the day and time you’re available for appointments.
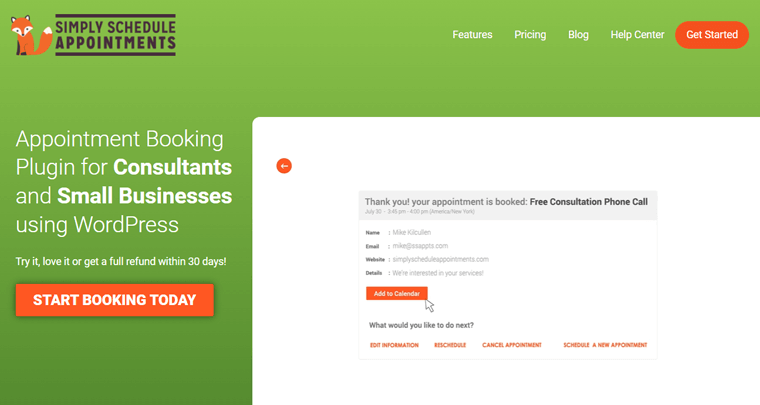
Moreover, you can also limit the number of daily appointments on your calendar. Plus, you can let your customers schedule phone calls, meetings, in-person, or coaching appointments.
For displaying the booking calendars, you just need to add easy shortcodes on the page you want to keep. It’s pretty simple that anyone can create a fully functional booking system with it.
Moreover, SSA also offers 2 helpful WordPress blocks. One to show all your appointment types and another for upcoming appointments. Also, you can integrate it with page builders like Elementor, Divi, and Beaver Builder with modules to further customize your booking site.
Not to mention, the calendars are fully responsive and will look good on every device. Also, you’ll get a great number of customization options to make your calendar look great.
In addition, your customers will also have ease when booking the appointments. They can view your availability and select a day and time to schedule an appointment accordingly.
Therefore, this plugin suits best for consultants and small businesses. And it’s ideal for client meeting booking, event booking, patient booking, service booking, etc.
To be specific, there are already 10,000+ websites using the SSA plugin. Also, it has a great review from its users with an average 5-star rating.
For more detailed information about its features, let’s move forward in our next section of this Simply Schedule Appointments review.
B) Key Features of Simply Schedule Appointments
In this review section, we’ll be discussing the key features (both free and pro) of the Simply Schedule Appointments plugin. So, let’s not wait to have a look at them.
1. Unlimited Appointment Types
Earlier, we mentioned that you can create and display multiple booking calendars on your site. And that’s because you can have an unlimited number of different appointment types set on your site. That can be as per your business or need.
For example, you can allow your new clients to schedule on an intro call calendar. On the other hand, let your established customers schedule a longer booking with a separate calendar.

Similarly, you can also have different calendars for every service you provide. For example, a freelance barber can have separate calendars for every treatment they provide. Such as one for the haircut and another for hair color.
Moreover, each appointment type is dependent on the other. So, suppose a customer booked a time slot from one appointment type. Then, the same time slot for other appointment types is automatically blocked for the new booking.
However, removing this default function to have independent calendars instead is also possible. You can do so if you’ve multiple appointment types tied to different independent meeting rooms. In such cases, you don’t have to worry about double booking at all.
Have a look at their documentation to know how to do so.
2. Unique Blackout Dates
Adding blackout dates is a unique feature of SSA that we love. Using it, you can blackout certain dates when you won’t be able to take any appointments.
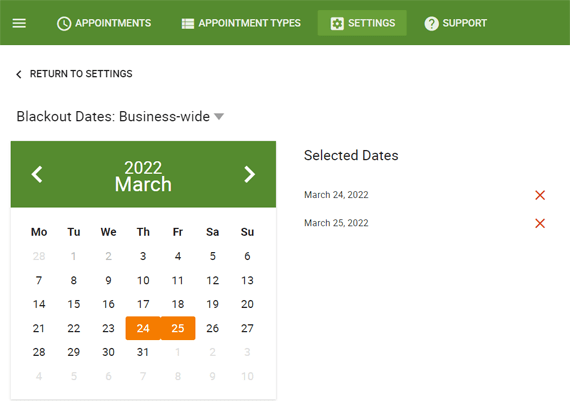
In simpler words, you can designate work holidays, birthdays, vacation days, or other unique days. That is to say that you won’t be available and wish to close the business on those days.
3. Sync with Google Calendar
The premium version of SSA also allows you to sync the booking calendars with your Google Calendar. And that’s quite advantageous in many ways.
First, you could be using Google Calendar to manage your schedule. So you may not want to lose that when you’re using this plugin. Thus, syncing the two calendars will enable them to work together in harmony.
Next, integrating Google Calendar on your site will ease you to confirm your true appointments and availability. Also, it avoids scheduling overlapping meetings.
4. Advanced Scheduling Options
Another great feature of this plugin is that you’ll get some advanced scheduling options for free. And more in the paid version. These options help you to create feature-rich booking calendars.
Here are some of the advanced scheduling options that the plugin provides:
- Able to display your availability by day, time, and appointment type.
- Use the localized timezone to show the date-time as per the user’s geographical location.
- Limit the number of time slots or access to your booking calendars, etc.
Overall, these options allow you to get the most out of your schedule and grow your business.
5. Complete Customization Options
This plugin contains many customization options for your booking calendars. By changing the colors, fonts, etc., you can completely customize them to match your business needs. Also, it helps to attract and satisfy your clients for easy scheduling.

On top of that, you get to also create your own fields or add questions on your scheduling form. With that, you’re able to collect unique and necessary information about your appointments.
Not to mention, you can also customize and automate confirmation emails and SMS reminders or notifications about the appointments. By doing that, you can reduce missed appointments.
6. Seamless Integration with Elementor, Divi, and Beaver Builder
Using a page builder plugin or Gutenberg blocks simplifies your form editing and customization. And this plugin is completely compatible with major page builders like Elementor, Divi, and Beaver Builder for free. With that, you can simply drag and drop the elements into your form.
Moreover, it offers you additional Beaver Builder modules, Elementor widgets, and Divi modules. And that’s best for a booking page or site. It includes:
- Schedule New Appointments.
- Display Upcoming Appointments, etc.
7. Supports Other Popular WordPress Plugins and Tools
The premium version of SSA also integrates well with multiple kinds of other popular WordPress plugins. Some of the important ones for a booking website are:
- PayPal and Stripe payment gateways to accept payments.
- Google Analytics, Google Tag Manager, Segment, etc., to track conversions & goals.
- WordPress Learning Management System (LMS) plugins like LifterLMS.
- Email marketing WordPress plugins like Mailchimp.
- Twilio to get and send SMS notifications.
- Form builder WordPress plugins like Gravity Forms, Formidable Forms, etc.
- Zoom and Google Meet to carry out web meetings.
8. Other Premium Features
Other than the above features, there are other premium features also available. Such as:
- Able to book classes and group events.
- Supports multiple bookings in the same time slot.
- Offers unlimited webhooks to use.
- Ability to schedule your team and more.
Now, let’s move ahead to the next section of this Simply Schedule Appointments review.
C) How to Install and Set Up the Simply Schedule Appointments Plugin?
It’s time to show you the steps on how to install and set up the SSA plugin. Here in this review section, we’ll be going through the steps for both the free and premium versions of Simply Schedule Appointments.
Note that, you don’t need to install the free plugin if you want to use the paid version. So, follow the steps accordingly.
1. Install and Activate the Free Version
The process to install and activate the free version of this plugin is very simple. It’s like installing any other WordPress plugin. Here we provide you with a brief guide for that.
First, log in to your WordPress dashboard.
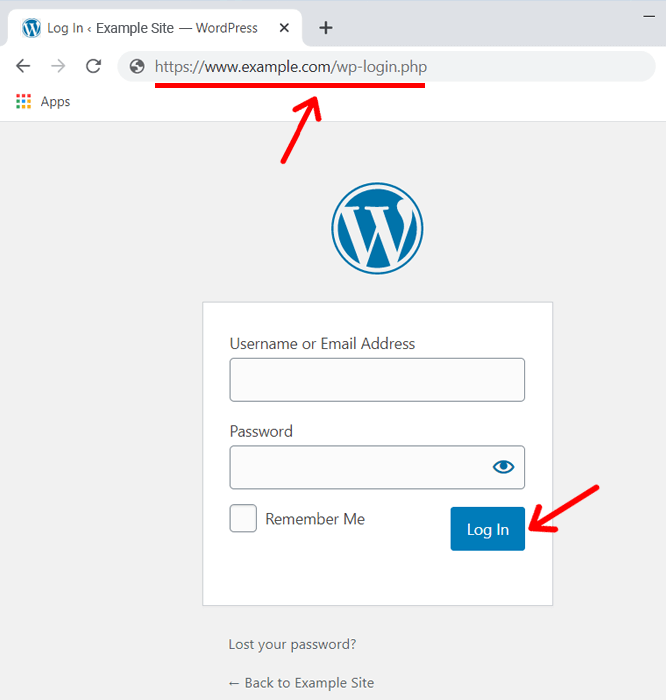
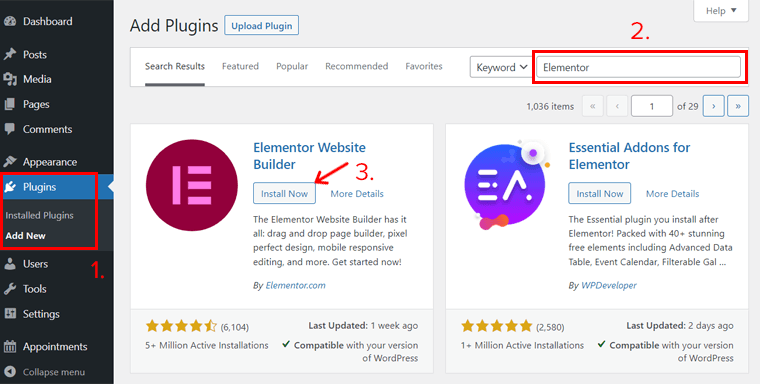
Then, navigate to Plugins > Add New menu on your dashboard. After that, type the keyword ‘Simply Schedule Appointments’ on the search bar. Next, click on the Install Now button for the plugin.
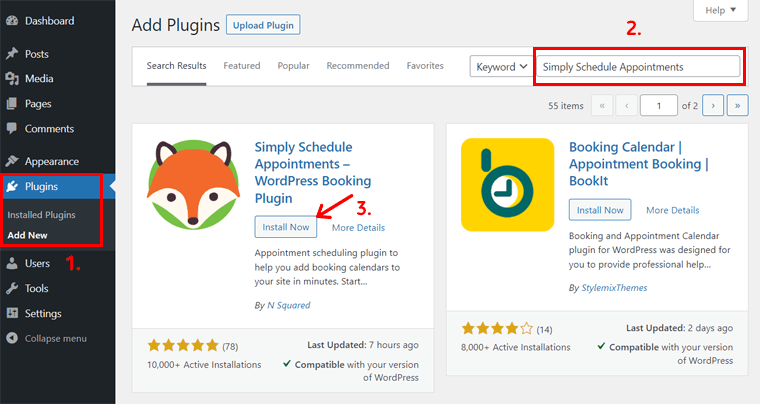
Lastly, click on the Activate button to activate the plugin.
That’s all you’ve to do to install and activate the free plugin. With that, you can see that a new menu Appointment has been added to your dashboard.
If you’ve any confusion, then you can check our detailed article on how to install and activate a WordPress plugin.
2. Purchase and Install the Premium Version
To use the premium version of SSA, you need to first purchase a plan and then upload the plugin to your dashboard. Then only you’ve to install and activate it.
So, here we present you with a step-by-step guide on how to do so.
Step 1: Purchase the Plugin
First of all, go to the Pricing page on the plugin’s official website. There, you can see the 3 pricing plans available. They are Plus Edition, Business Edition, and Professional Edition.
Now, choose the plan that you want to use for your website. On that chosen plan, click on the Get Started button. Here, we chose the Business Edition plan.
As soon as you do so, you’ll be redirected to the checkout page. There, you can see that the plan you chose is already added.
Also, there’s an option where you can add the discount code if you have one. In case you got one, then all you need to do is enter the code in the empty field and click on the Apply button. And after using the discount code, you can see that the price of the plugin changes accordingly.
Next, you’ve to select the payment method i.e. either credit card or PayPal. Then, you need to fill in your personal and payment information. Lastly, click on the Purchase button.
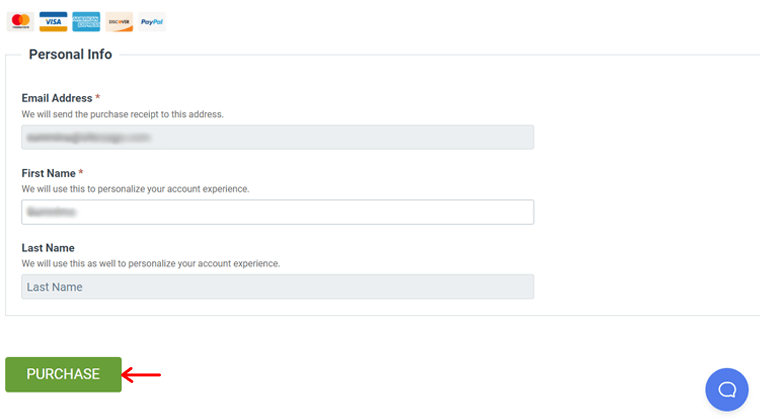
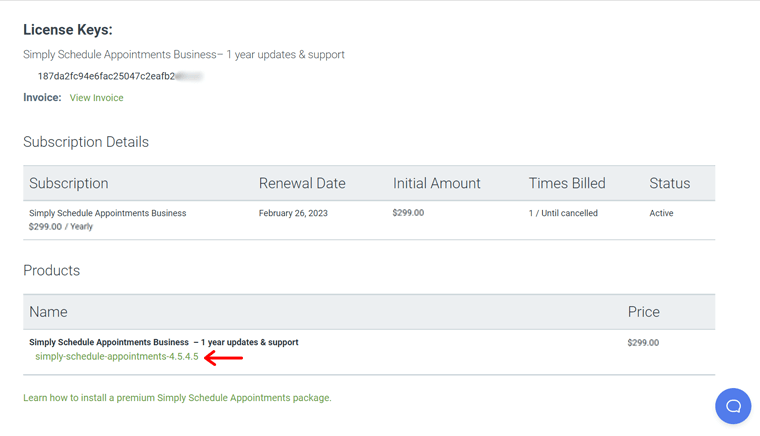
After the purchase is done, you’ll get access to your dashboard where you receive a purchase confirmation page. There, you can find the license key that you’ve to use later. So, keep it safe.
At the bottom, you can also see the link to download the premium plugin. So, click on it to download the ZIP file on your device.
Step 2: Upload, Install and Activate the Plugin
Now that you have the Simply Schedule Appointments pro version file on your local device, let’s see how to install it.
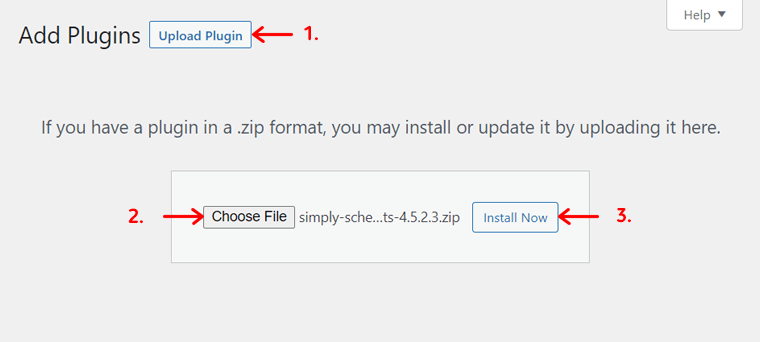
For that, log in to your dashboard and navigate to Plugins > Add New menu.
Then, click on the Upload Plugin button present at the top. Next, select the Choose File button. There, upload the ZIP file of the plugin and click on the Install Now button. In a few moments, your plugin will be installed on your site.
Note that if you were already using another version of the plugin, then you’ll get the option to replace the plugin instead. But your data will be safe and won’t get removed.
After the installation, you’ve to activate the plugin by clicking on the Activate Plugin button. By doing that, the premium plugin is installed and activated on your site.
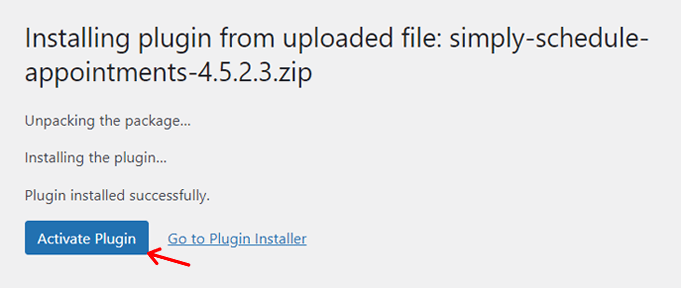
With that, you can see the new Appointments menu on your dashboard. However, the steps aren’t complete yet to start using the plugin right away. So, let’s move ahead.
Step 3: Add the License Key
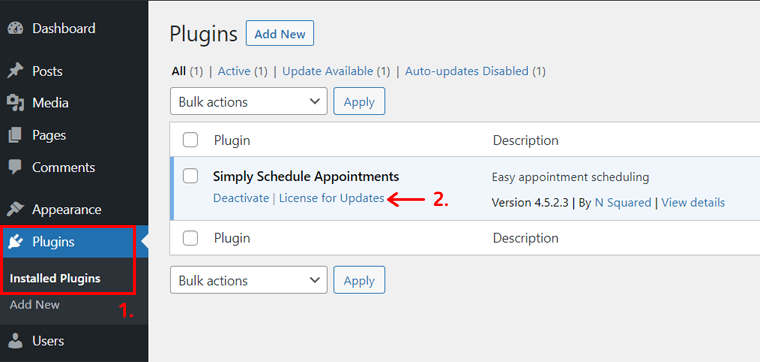
To easily get future updates, you’ve to activate the plugin’s license. So, for that, you’ve to navigate to the Plugins > Installed Plugins menu on your dashboard.
Then, click on the License for Updates option for the SSA plugin on the installed plugin list.
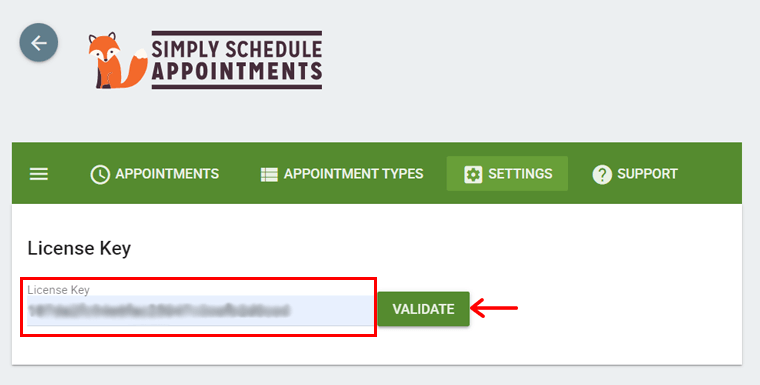
Now, you’ll be redirected to a different page where you can see a place to add the license key on the Settings tab. So, enter the license of the plugin in the empty field. Next, click on the Validate button beside it.
Step 4: Enable the Required Features on Settings
After you add the license key, click on the Settings option. By doing that, you can see the settings for all the features of this plugin.
Now, you can enable or disable all the features that your plan provides. In our case, we used the Business Edition plan, so we get to enable and use every feature of the plugin.
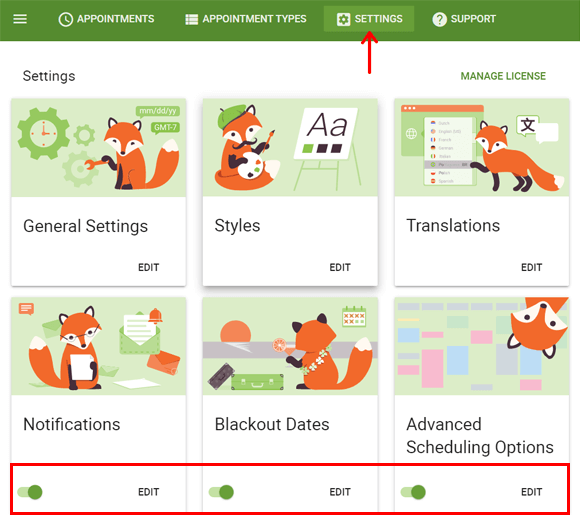
After you enable them, it’s better to look at the settings every feature contains. However, it’s better to create and display the booking calendars first and then configure these settings as per your needs. Later, all you need to do is click on the Edit option on the particular feature.
Now, let’s move forward on the next section of the Simply Schedule Appointments review.
D) How to Schedule an Appointment Using the Setup Wizard?
In this Simply Schedule Appointments review section, we’re going to show you how to schedule your first appointment type. And that’s by using the setup wizard of the plugin.
Note that, all the features or steps aren’t available in every plan. So, you may not get some of them on the other plan you choose. Here, we’re showing you that for the Business Edition.
Without any delay, now, let’s get into it.
Step 1: Opening Setup Wizard
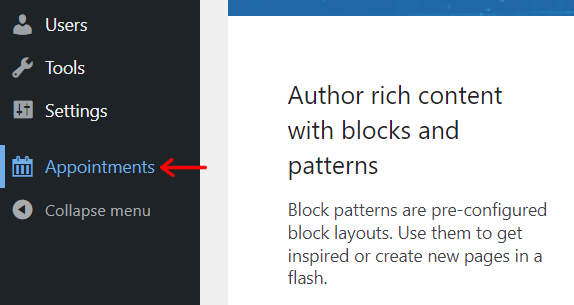
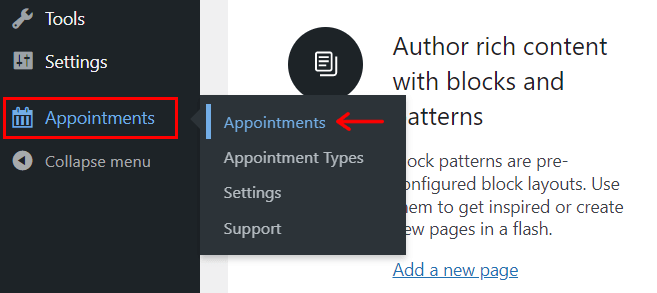
First, you’ve to click on the Appointments menu on your WordPress dashboard. That’ll take you to the setup wizard of the plugin.
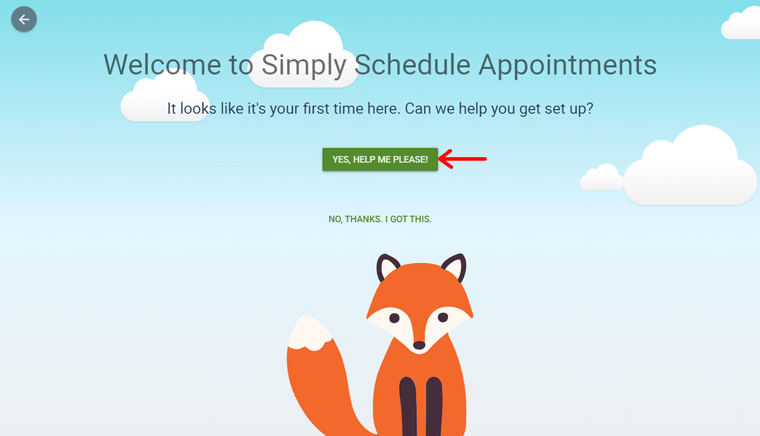
There, you’ll see a welcome message. Below that, there’s an option to gain help to get started with the configuration. To accept and deny the help, there are buttons ‘Yes, help me please!’ and ‘No, thanks. I got this.’, respectively.
So, click on the first button to get started with ease.
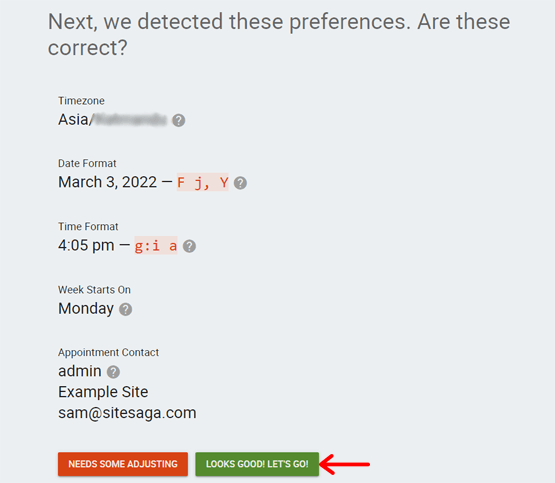
By getting help, the plugin detects some information based on your geographical location. If you want to use the exact data for your bookings, then click on the ‘Looks Good! Let’s Go!’ button. Else click on the Needs Some Adjusting button to make changes.
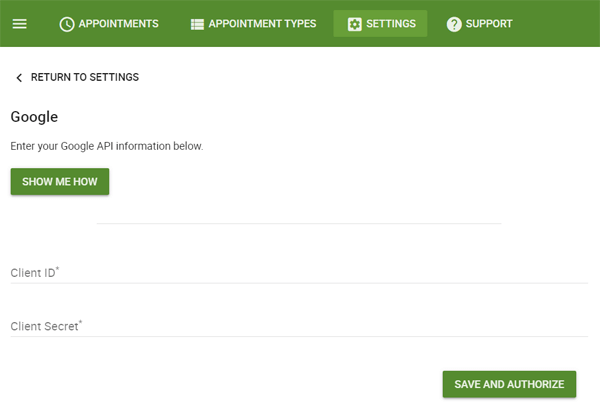
Step 2: Sync with Google Calendar
Next, you get the option to sync the plugin with your Google Calendar. If the step is not necessary for you, then click on the Skip This For Now button.
To sync the two calendars, you have to add the client id and client secret of Google Calendar. Then, you must click on the Save and Authorize button.
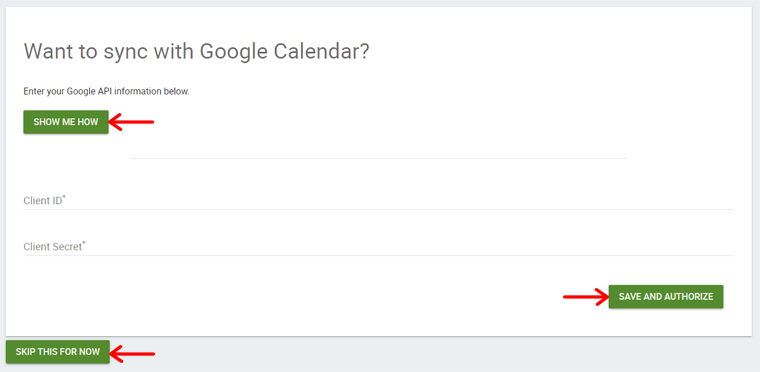
In case you don’t know how to get your client id and client secret key, then click on the Show Me How button. It’ll lead you to easy documentation by the plugin.
Step 3: Create Your First Appointment Type
After that, you get to see multiple forms in different tabs. By filling them you’ll create your very first appointment type. And it includes advanced scheduling options under various categories.
So, let’s look at them one by one as steps.
Step I: Basics
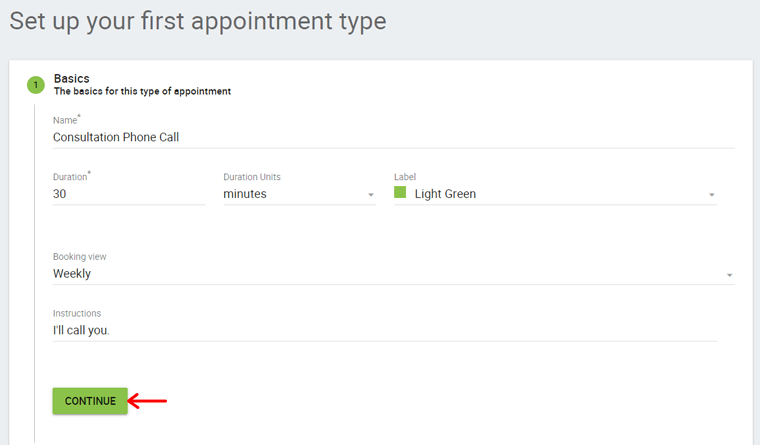
Here, you’ve to mention the basic information about your appointment type. So, enter them:
- Name: Add the appointment type name that you and your visitors will see on your site.
- Duration: Keep the maximum duration that the appointment can take place.
- Duration Units: Choose if the duration unit is to be in minutes, hours, days, or weeks.
- Label: Specify a color for your current appointment type to distinguish it from others.
- Booking View: Select if your visitors will see your calendar in weekly or monthly view.
- Instructions: Give instructions to your customers about the appointment if you need to.
After you fill in the required fields here, click on the Continue button.
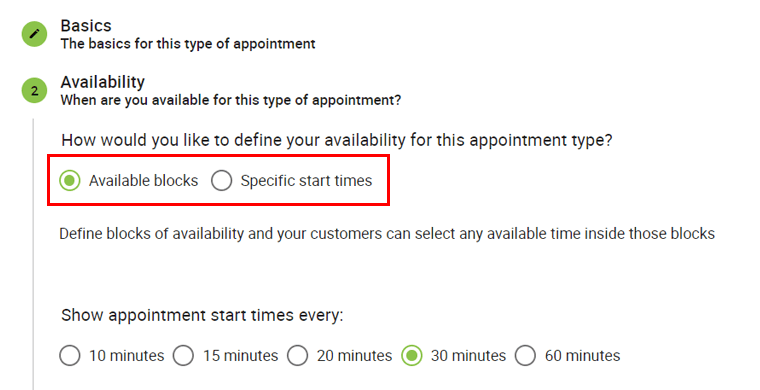
Step II: Availability
In this tab, you’re able to specify the date and time when you’ll be available for this appointment type. So, first, you get an option to select the way you can mention them. And the ways are:
- Available blocks
- Specify start times
Depending on your choice, you’ll get a different day and time selection diagram present below this option. Before going through them briefly, there’s another option. And that shows the appointment start time in 10, 15, 20, 30, or 60 minutes in the diagram.
Now, let’s get to know both ways.
1. Available Blocks
If you select this way, then you’re able to mention the available time duration for each day in the form of blocks. So, to show that you’re available, click on the space using the pencil tool, making green colored blocks.
While to remove the green-colored blocks and say you aren’t available at that time duration, click on it using the eraser tool.
Also, you can see the block options are for the time between 8 am to 4 pm by default. So, if you want to add the new time options in the diagram, then click on the ‘+’ option.
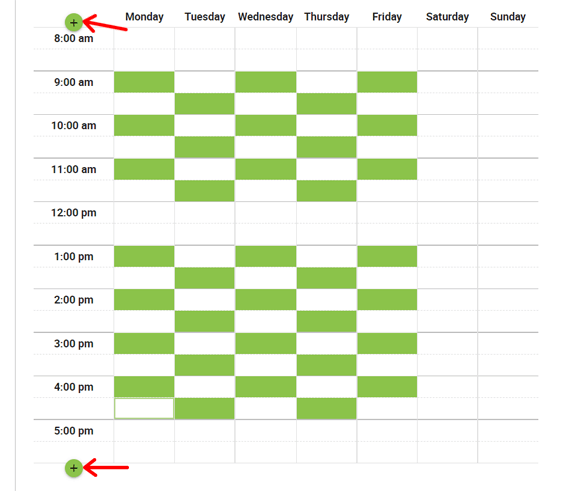
Thus, by using this way, customers can now select any time from those available time durations to book an appointment.
2. Specify Start Times
Here, instead of the time duration, you can denote the start time for the appointments. All you’ve to do is click on the circular buttons to add or remove the available time each week. The green circles mean the available time, while others denote you aren’t available.
Similar to the previous way, you can add new starting time options apart from the default ones by clicking on the ‘+’ option.
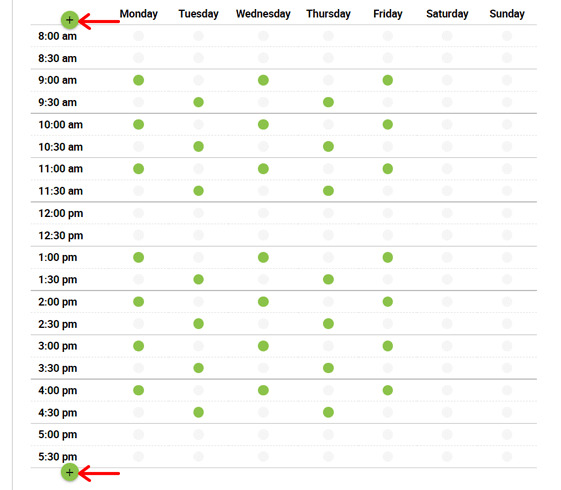
Not to mention, now, customers have to book an appointment on your mentioned start time if you choose this way.
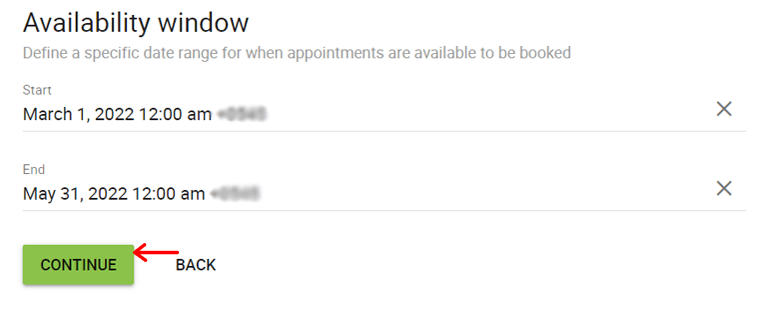
In the Availability window section, you can define the start and end dates for when the appointments are available to be booked.
Lastly, don’t forget to click on the Continue button to save the changes.
Step III: Scheduling Options
In this step, you get to set some rules on how and when the visitors can schedule this appointment type. So, let’s look at some of them:
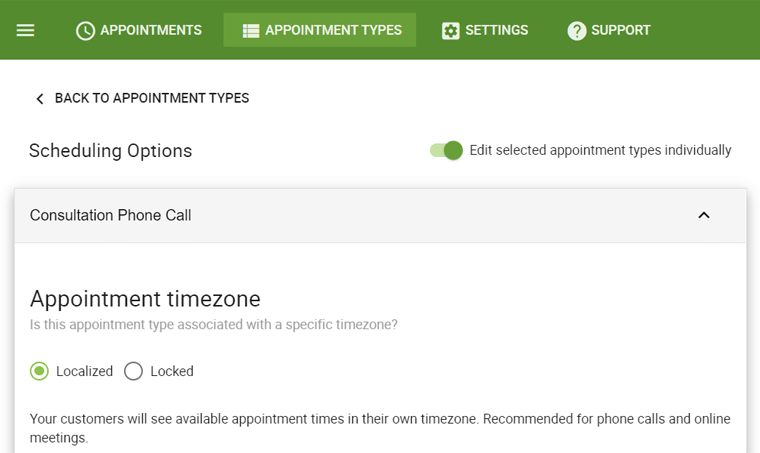
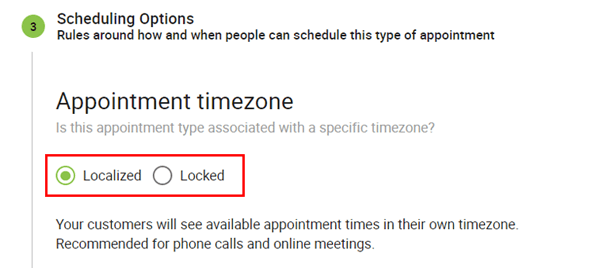
1. Appointment timezone
Here, there are 2 options to choose the timezone of appointments. They are:
- Localized: If your visitors are from multiple countries, then choose this option so that they can view with their own timezone.
- Locked: In case an in-person meeting is required for the appointment, then select this option to use your own timezone.
2. Appointment buffer
Now, you can select the amount of time that should be free before and after each appointment. So, you get to specify the duration, which can be in minutes, hours, days, or weeks.
3. Notice required
You may want to get notified about the appointment before a certain duration. So, here, you get to specify that time duration to get notice of the appointment.
4. Per day limit
At last, you can limit the number of appointments you can have in a day. Just tick on the checkbox and then enter the maximum number of appointments.
Also, click the Continue button to move to the next step.

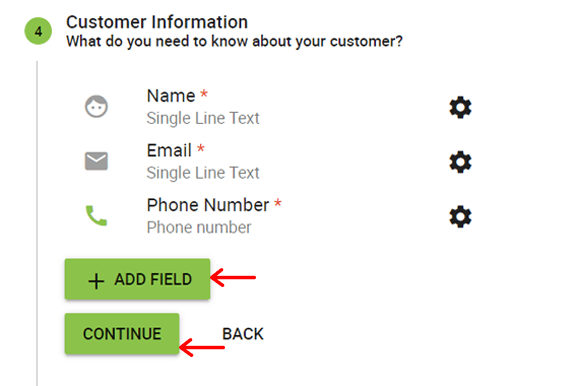
Step IV: Customer Information
Now, in this step, you can specify which fields to add to the appointment form for getting the customer information. In the free version, you get to choose among a few options. But for the premium versions, you can add new fields yourself.
By default, there are already 2 options, i.e., name and email. So, to add more, you’ve to click on the ‘+ Add Field’ button. Here, you can keep the fields’ label, type, icon, and instruction.
Lastly, click on the Continue button.
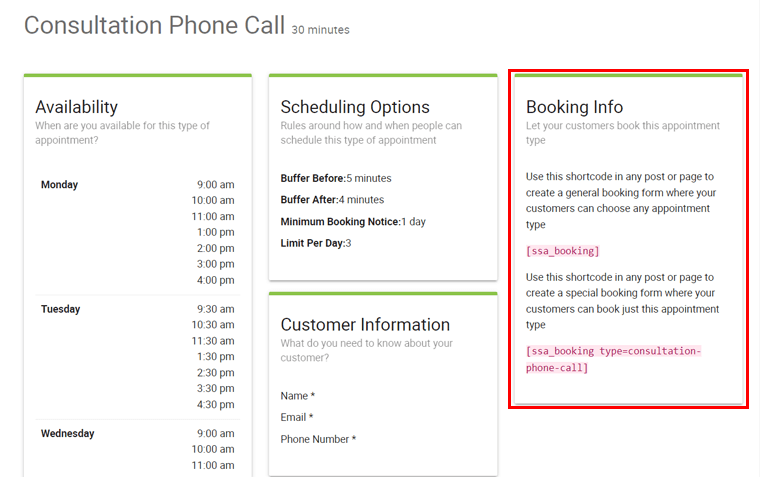
Step V: Review
In this last step, you get to review all that you’ve done to configure your appointment type. If everything seems fine, then click on the Continue button. Else, click on the Back button.
However, there’s a Booking Info section that includes 2 shortcodes. And that’s to display all your appointment types and only this appointment type on a webpage, respectively. So, first, note them somewhere to use them later.
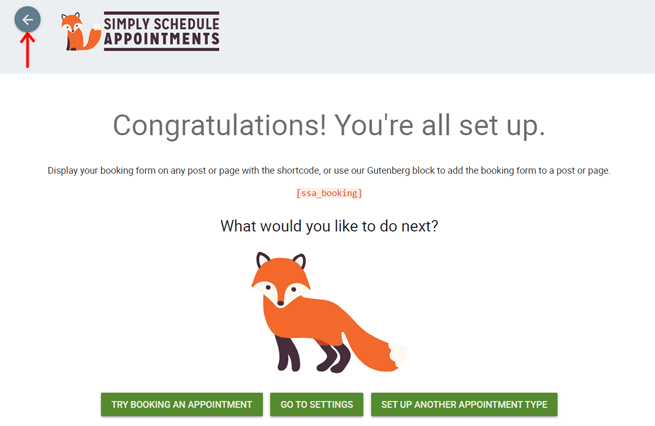
After everything is done, you’ll be redirected to the new page that contains 3 options. They are:
- Try booking an appointment
- Go to settings
- Set up another appointment type
Try using them, and at last, go back to your dashboard by clicking the back arrow.
Step 4: More Configuration Options
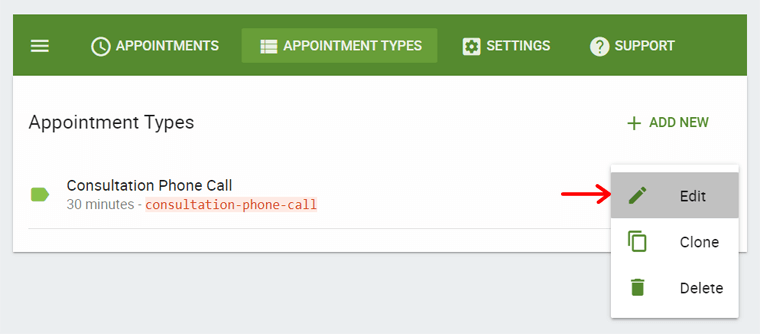
Some of the configuration options aren’t shown in the setup wizard. But you get them after you create an appointment type. To do that, navigate to the Appointment > Appointment Types menu from your dashboard.
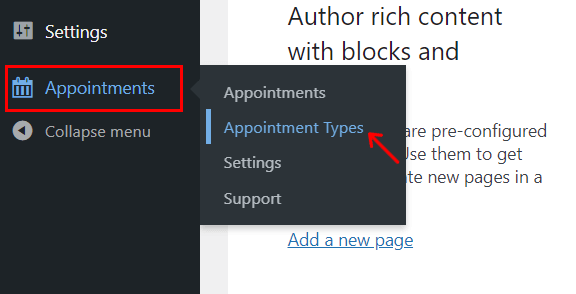
Then, on the settings icon of that appointment type, click on the Edit option. Now, you can see each step of the setup wizard in the form of tabs plus more new ones. So look if there are extra options in them. And if you need them, then you can use them.
Here, we’ll have a look at some of the other important tabs for features in the premium plan.
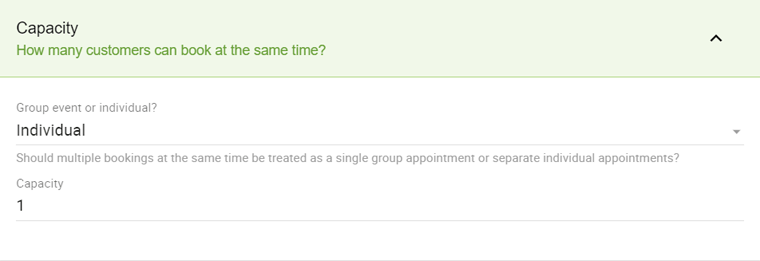
1. Capacity
In the capacity tab, you can choose your appointment type to be for an individual at a time or a group event. Accordingly, specify how many individuals can book at the same time. If you’re having a group event, then it’s better to keep the capacity of the appointment.
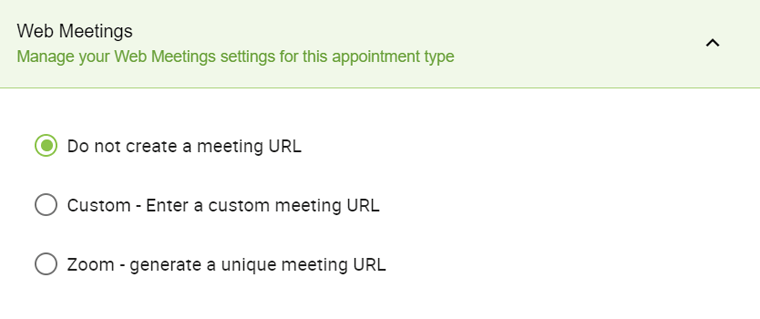
2. Web Meetings
Here, you can manage the setting for the web meetings. And it includes 3 options. As per what you select, you’ll have to add (or not) the link for that meeting. So, they are:
- Do not create a meeting link.
- Custom – Enter a custom meeting URL
- Zoom – Generate a unique meeting link
Lastly, don’t forget to save the changes by clicking on the Save button.
To know the detailed steps, check out their comprehensive documentation on web meetings.
Other than that, there are other various extra options under tabs like Notification, Webhooks, Team Members, Mailchimp, etc.
With that being said, let’s jump into our next Simply Schedule Appointments review section.
E) How to Display the Booking Calendar on Your Site?
To display your appointment booking calendars on the front-end of your site, you’ve to use the shortcodes we mentioned before. And there are other ways to do that as well.
In this review section of Simply Schedule Appointments, we’re going to show you exactly how to do that. So, let’s see how you can display all the appointment types and a specific one here.
1. Display All Appointments
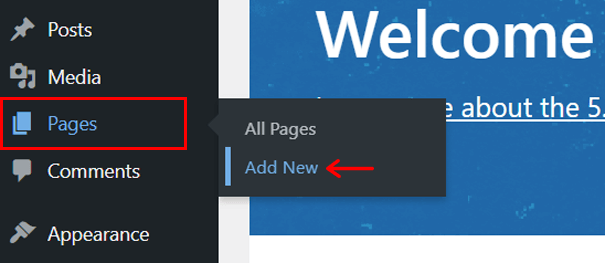
First, create a new page on your dashboard by navigating the Page > Add New option. There, add the title of the page. It’s fine if you already have a page where you want to add the appointments.
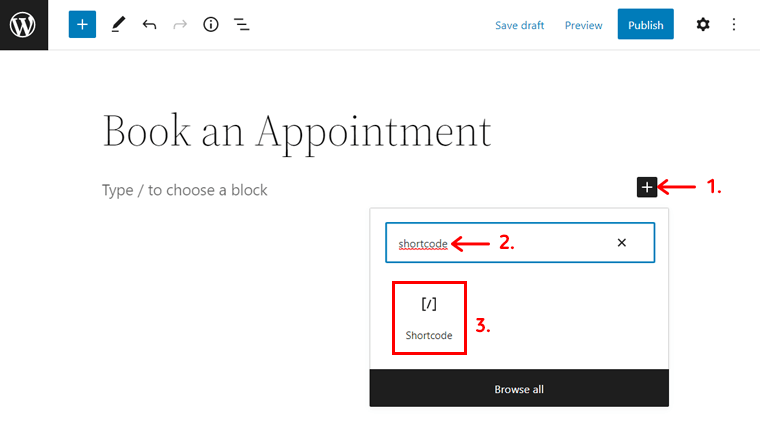
To display all the appointment types, you need to use the shortcode we mentioned before. So, first, you’ve to add a block named ‘Shortcode’. For that, click on the ‘+’ option, then search the block and lastly select the shortcode block to add on the page.
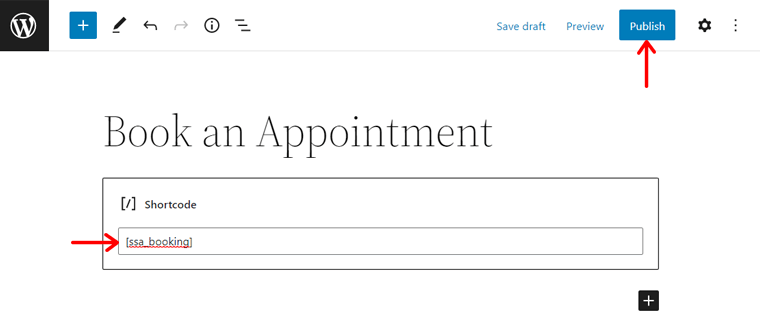
After that copy the shortcode you’ve been keeping for showing all the appointment types. Then, paste the shortcode in the shortcode block. And that’s:
[ssa_booking]
Now, publish/update the page by clicking on the Publish/Update button.
After that, click on the Preview option to look at it.
Alternative Method: Using WordPress Block
An alternative method to this is by directly using the ‘Appointment Booking Form’ WordPress block provided by the plugin. With that, you can show all the appointment types with ease.
All you’ve to do is click on the ‘+’ option on the page, and search for this block. Then, click the ‘Appointment Booking Form’ block to add it to the page. And click on the Publish button.
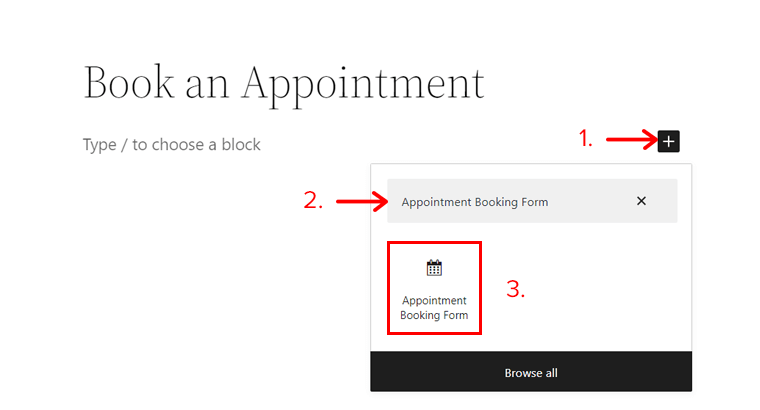
That’s all! Automatically, all the appointment types shall be displayed using this block.
Alternative Method: Using Page Builder Plugin
Another simpler and more stylish way is by using a page builder plugin. Elementor and Beaver Builder integrates well with SSA and also offers you modules to include in a booking page or site. So, with that, you can show all your appointment types to start the booking right away.
Here, we’ll show the brief steps to do so using the Elementor plugin. First, install and activate Elementor on your WordPress dashboard (if you don’t have one) like any other plugin.
After that, open your page where you want to add the appointments. There, click on the Edit with Elementor button.
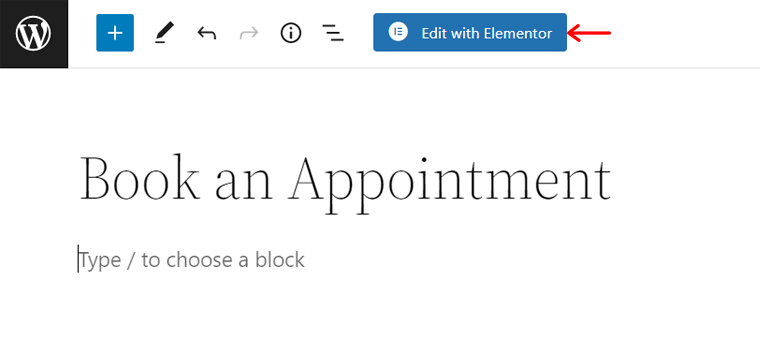
Once the interface of Elementor opens, search for the ‘Schedule an Appointment‘ block in the Elements section at the left-side menu. You can see the element in the search results. Now, drag that element and drop it to the Drag widget here section on the right-side live preview.
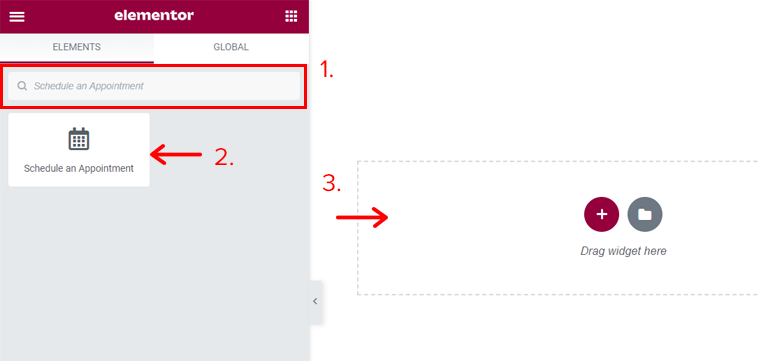
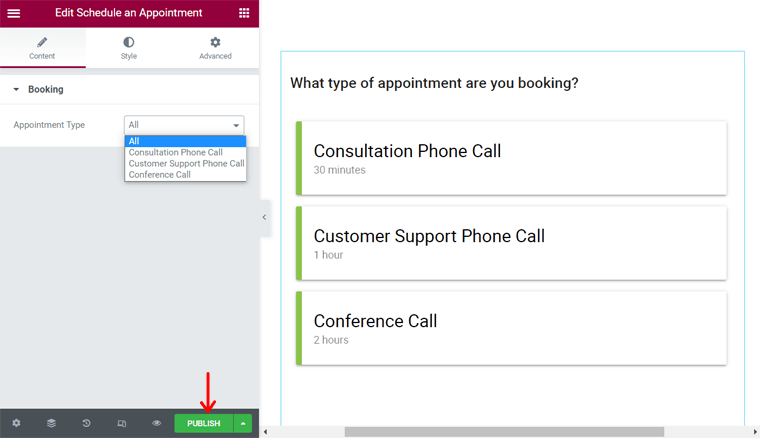
By doing that, you can see in the live preview that all the appointment types are already added to the page using the element. If you want to show a specific appointment type, then you can also do so. Lastly, click on the Publish button to save the changes.
2. Display an Appointment Type
Similar to the above steps, here also you have to first create a page where you want to add the calendar of a specific appointment type. If you don’t have one.
Then add the shortcode block. Now, copy the shortcode of the appointment type and paste it on the block. The shortcode is:
[ssa_booking type = first-appointment-type]

Here, ‘First-appointment-type’ is the name of the appointment type on your site you want to add. At last, publish/update the page and preview the webpage.
In our case, it’s: [ssa_booking type = consultation-phone-call]
3. Preview of Booking an Appointment
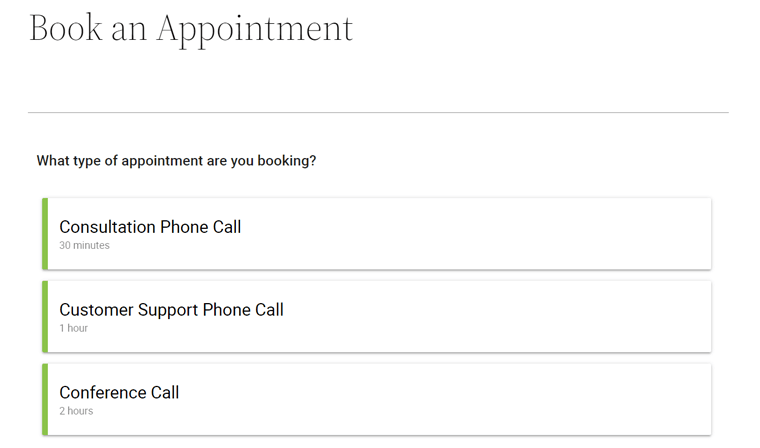
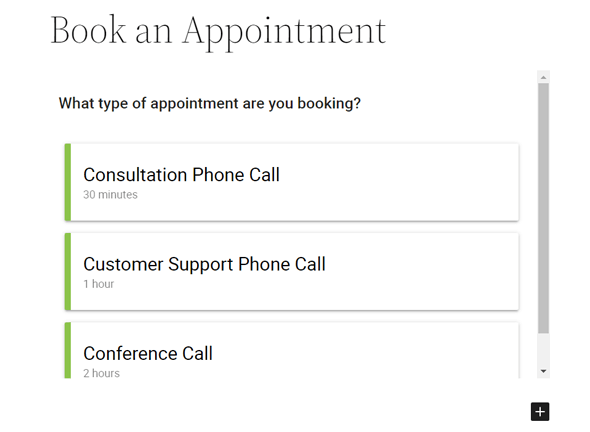
Congrats! You’ve completed the steps to create your appointment calendars and they are ready for scheduling. Now, let’s have a preview of how your visitors will book an appointment.
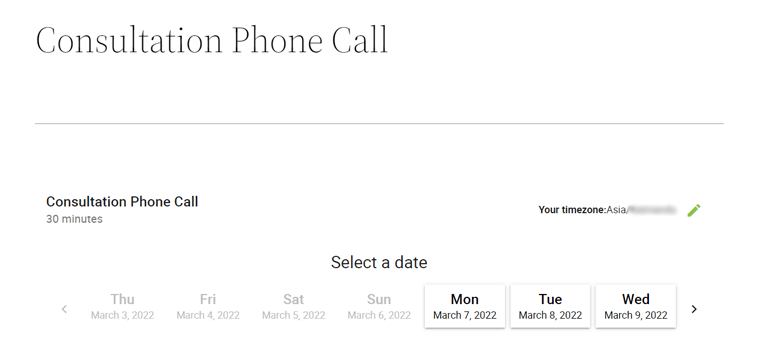
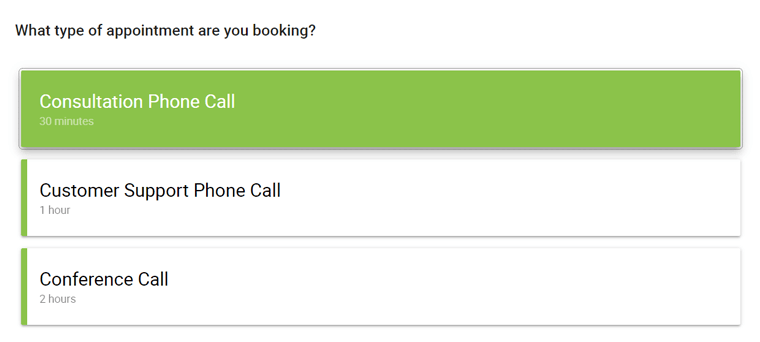
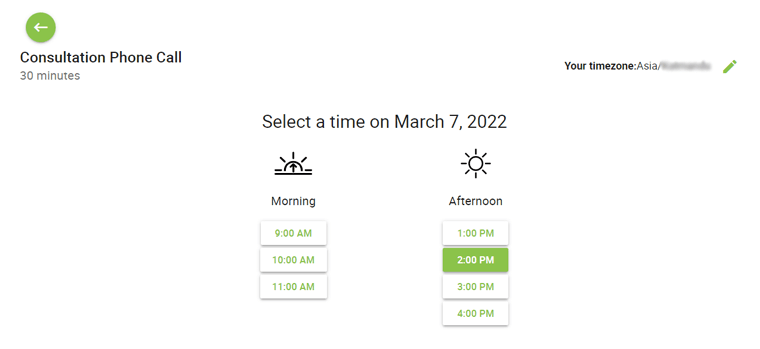
As a visitor, first, you’ve to go to the page where it includes all the appointment types. Then, choose the one appointment type you want to book.
Next, choose the appointment date available.

Following that, select the time among given choices.
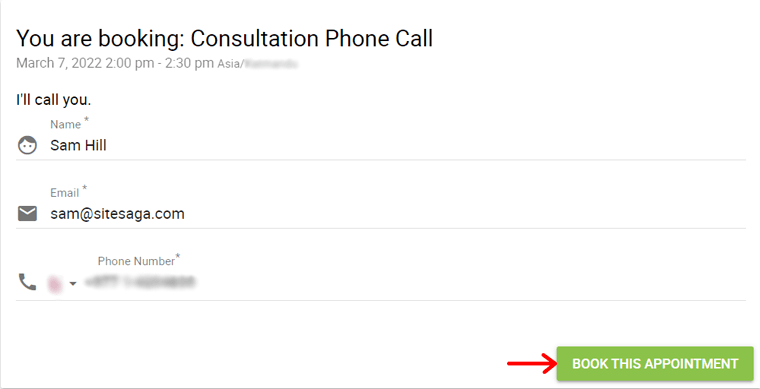
Now, you can see the booking form. Here, fill in the details and click on the Book This Appointment button.
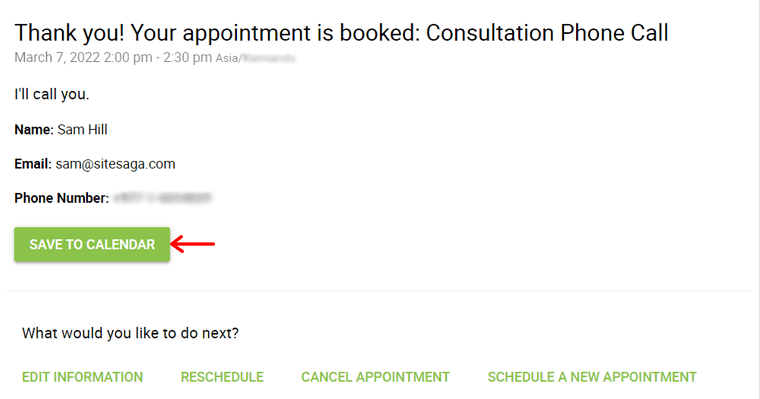
With that, your appointment gets booked. Also, you can choose to save the appointment date on your Google calendar or others. That’s all!
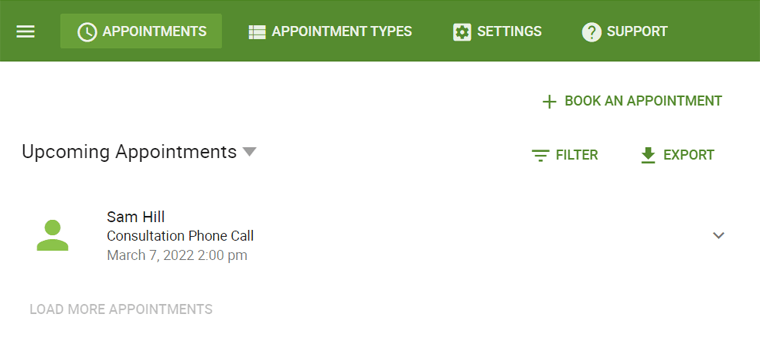
Want to have a look at the appointments that your visitors made? Then, navigate to Appointments > Appointment menu from the dashboard.
You can see your upcoming bookings here.
Now, let’s wrap this up and move ahead to the pricing plans review of Simply Schedule Appointments.
F) Pricing Plans of Simply Schedule Appointments
Want to start scheduling your appointments using this feature-rich plugin? Then, in this review section, we’re going to point out the pricing plans of the Simply Schedule Appointments plugin.
SSA is available in both free and premium versions. Depending on the features you want, you’ve to choose the right plan for your site.
You can easily install and use the free version of the plugin. And we already provide you with the steps to do so in our previous section.
Now, for the premium version, there are a few pricing plans available. And they are quite affordable. Here, we provide you with just a short glimpse of its 3 pricing plans. They are:
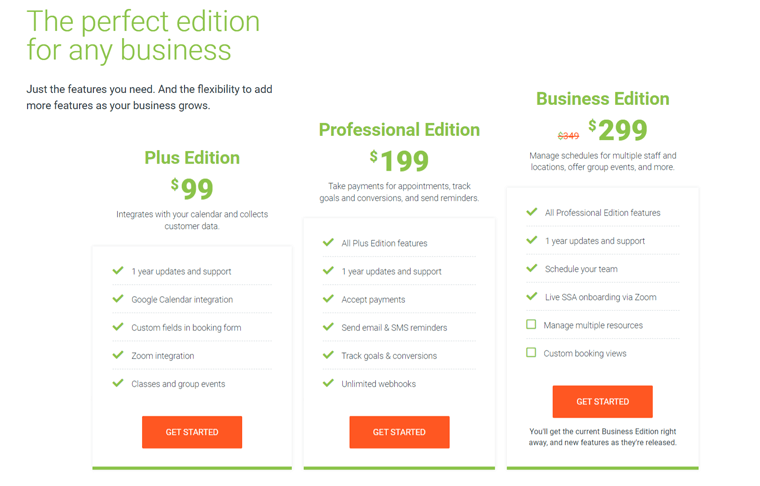
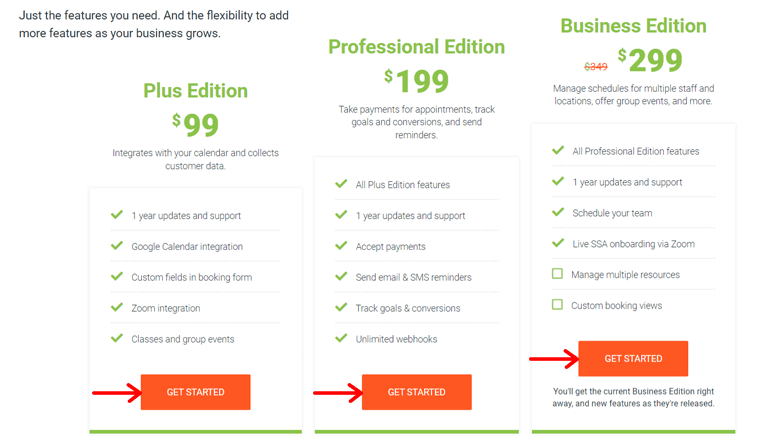
1. Plus Edition
At $99, you get 1 year of support and updates. There are multi-site pricing plans that cost $149 for 25 sites and $199 for 1000 sites.
Some of the features on this plan are:
- All the free features.
- Google Calendar integration.
- Custom fields in booking forms.
- Zoom integration, etc.
2. Professional Edition
This plan costs $199 and also gives 1 year of support and updates. The multi-site pricing plan costs $249 for 25 sites and $399 for 1000 sites.
Some of the features on this plan are:
- All Plus plan features.
- Accept Payments.
- Unlimited webhooks.
- Send email and SMS reminders, etc.
3. Business Edition
With the price of $299, it also provides 1 year of support and updates. While for the multi-site pricing plan, it costs $349 for 25 sites and $599 for 1000 sites.
Some of the features on this plan are:
- All Professional plan features.
- Schedule your team.
- Live SSA onboarding via Zoom, etc.
Moreover, you can go to the Pricing page of the plugin’s original site to check the features in detail. With that, let’s move forward onto our next section.
G) Customer Support Options in Simply Schedule Appointments
Looking after the customer support options in any plugin is necessary. And in the case of Simply Schedule Appointments, it also provides decent customer support, so let’s look at them in this review.
If you’re using the free version, then it’s best to go to its Support Forum in WordPress.org. It includes the queries or issues the users are having. So, check if their queries are solved or not.
While the other support options are available on its website. On the Help Center page, there’s a Common Issue section. Here, you can find guides on solving the common issues occurring when using the plugin.

In addition to that, there’s also a FAQ section where answers to commonly asked questions are described. Apart from them, you can find the comprehensive documentation of the plugin. It includes guides to set up and use the plugin in all of its free and premium versions.
On top of that, there’s also a Contact page. With that, you can send your name, email, and inquiry message and submit it to their team.
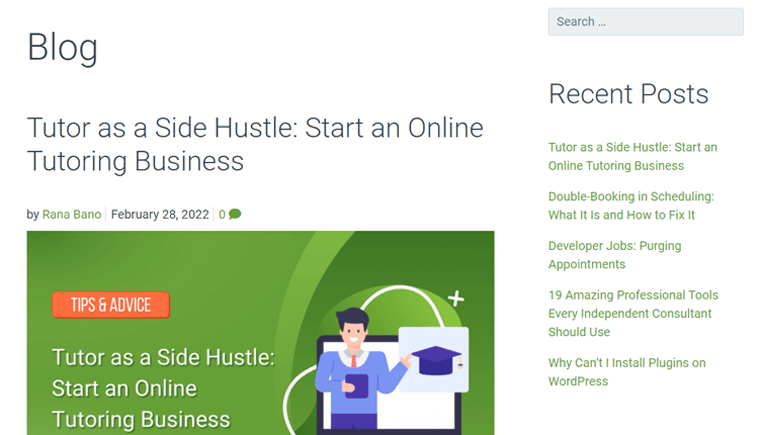
While on the Blog page, you get to know the updates and news on the plugin. Also, it includes tutorials about the plugin and other WordPress-related guides that are quite helpful.
Lastly, the plugin also offers a chat support option. You can send your details and queries to the team. And they assure you to respond in a few hours.
Built-in Support Options
And the support options not only end within its website. If you’re working with the plugin, then you get to use the built-in support features right from your WordPress dashboard.
All you need to do is navigate to Appointment > Support. There, you get to see a quick list of diagnostic information that can denote the answer to your queries or issues. Such as the outdated plugin version, failed schedule events leading to missing notifications, etc.
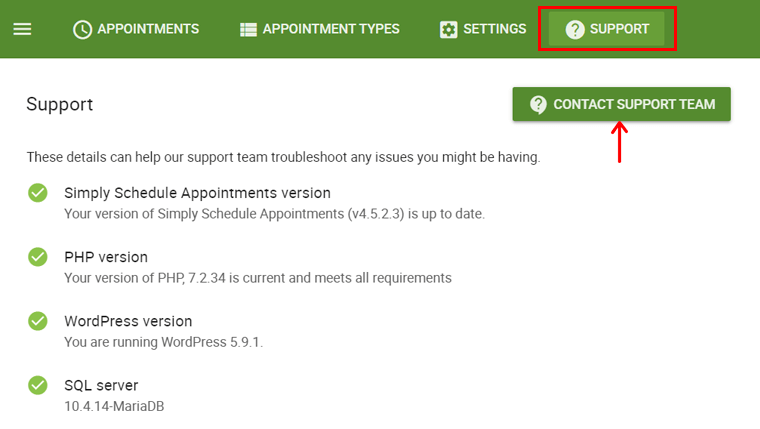
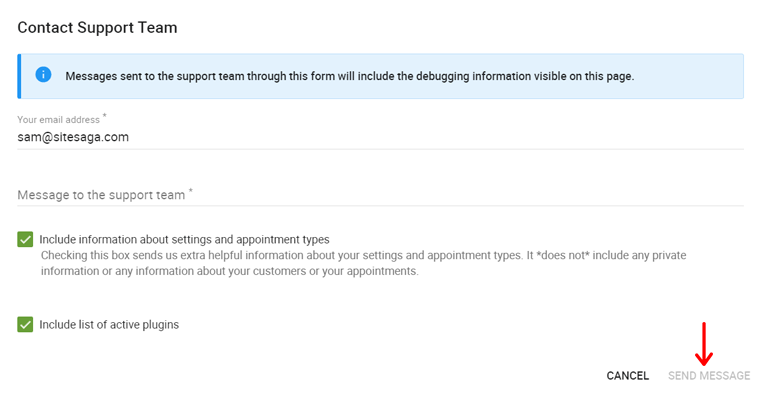
Furthermore, you can also click on the Contact Support Team button if you didn’t find anything on the Support tab. With that, a popup appears to collect your email address and message. By sending this message, the support ticket will be sent to the team.
Check out their documentation to know more about built-in support features in detail.
H) Pros and Cons of Simply Schedule Appointments
Now, in this review section, let’s have a look at the pros and cons of Simply Schedule Appointments.
Pros of Simply Schedule Appointments:
- Easy to use and set up within 5 minutes.
- Able to create an unlimited number of appointment types.
- Add the calendar anywhere on your site using shortcodes.
- Easy ways and advanced options to customize the timing, availability, and scheduling.
- Works well with many WordPress tools and plugins.
Cons of Simply Schedule Appointments:
- Not the cheapest WordPress booking plugin when it comes to the paid version.
- Requires to purchase the pro version for some important features.
I) Final Thoughts – Is it the Best Appointment Booking WordPress Plugins?
This review clarifies that Simply Schedule Appointments is one of the best free appointment booking WordPress plugins. We not only got to know its remarkable features but also know that it has a powerful setup wizard. With that, the user experience is great for all the users.
This plugin best suits podcasts, lawyers, agencies, personal trainers, hairstylists, etc. The best part is that it’s beginner-friendly, so you can easily use the free version. And in case there occurs any confusion, check out its detailed documentation and other support options.
So, if it meets your requirement for your business, then try using it first. We recommend you start with the free version of SSA. And then think about choosing the right premium plan.
Conclusion
That’s all, folks. We’ve come to the end of this Simply Schedule Appointments review article. After going through it, we hope you’re eager to try and consider using this plugin.
Overall, this plugin has excellent features to schedule your appointments easily. So, we recommend you to try it out by yourself taking this Simply Schedule Appointments review guide.
And in case you face any dilemma, then post a comment in the comment section below. Also, we’ll be happy to hear about your experience while using this remarkable plugin.
If you like such review articles, then make sure to also check out our other articles on Mesmerize review, Themify review, and Paid Memberships Pro review.
Lastly, we want you to stay connected with us so please follow us on Facebook and Twitter.
Some of the links on this article/page are affiliate links. If you click on such an affiliate link and purchase the product, we’ll earn a specific percent commission from the seller. But it won’t at all affect the price you’ll pay.