Are you interested to know what the WP-admin dashboard is? Think of it as the mission control center for your WordPress site, the WordPress admin dashboard gives you access to most of the functions of the site.
There is a variety of features included in the WordPress dashboard, often referred to as WP Admin or WordPress Dashboard.
For example, you can add new posts and pages, select the theme your site uses, install and manage plugins, change general site settings, and much more.
Because all of this functionality is located within the WordPress administration area, you must understand what the Admin Dashboard has to offer.
In this article, we will first explore what the WordPress admin dashboard is and how you can access it on your site.
After that, we will demonstrate some of the most important actions and how to configure the admin dashboard by your requirements.
What Is the WordPress Admin Dashboard?
Your WordPress website’s admin dashboard, also known as WP Admin or WP admin panel, functions as the control panel for your entire WordPress website.
There are numerous options available for creating content, adding functionality in the form of plugins, and changing the styling of your website in the form of themes.
If you are using WordPress, then you will be spending a considerable amount of time in the WordPress admin panel.
In this regard, it is important to understand how the WordPress admin work, what it allows you to do, and how it can be used to manage your website.
For changing the design of the WordPress dashboard or adding more features you can check our article on the best WordPress dashboard themes and plugins.
How Do You Access The WordPress Admin Dashboard?
If you append /wp-admin to the URL of the WordPress installation, you will always be able to access the WordPress admin dashboard.
It is most often possible to locate the WordPress admin at:
https://yourdomain.com/wp-admin
How Do You Log Into Your WordPress Admin Area?
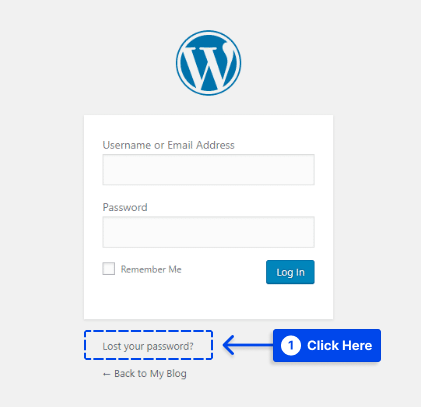
If you are not already logged into your WordPress admin dashboard when you attempt to access it by appending /wp-admin, WordPress will automatically redirect you to the WP admin dashboard login page.
However, you can always directly access the WordPress admin login page URL by visiting the following URL:
https://yourdomain.com/wp-login.php
It is the explanation for wp-admin vs wp-login. It is also highly recommended that you change the default WP admin login URL as the majority of bots, hackers, and scripts out there will scan for it.
It is possible to significantly reduce the number of bad login attempts to your website by changing this setting to something else simple and very effective.
As a result, you can decrease the risks associated with being a target of brute force attacks and decrease the bandwidth consumed by the automated bots that repeatedly access this URL.
There is no one-size-fits-all solution here, but there is one clever approach that can make your site more secure.
Furthermore, by clicking the “Lost your password?” button, you can reset your WordPress password.
How To Use The WordPress Admin Area: Basic Functionality
When you log into the WordPress admin area, you will see the Dashboard, which provides you with an overview of your site’s basics:
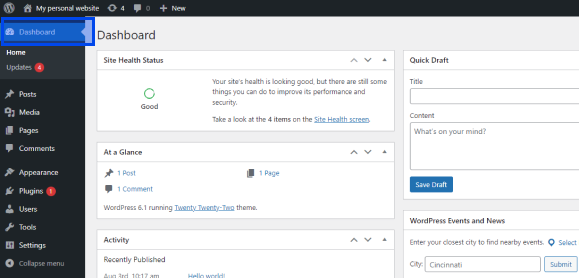
You can access other important areas of the WordPress admin by using the menu on the left side of the screen.
In the sidebar, there are several important actions. In this section, we will provide some information about each action:
Create New Posts Or Pages in WordPress Dashboard
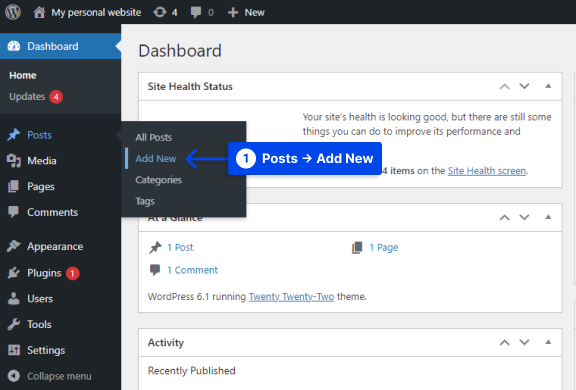
Follow these steps to create a new post or page:
- Go to Posts in your WordPress dashboard.
- Click on the Add New.
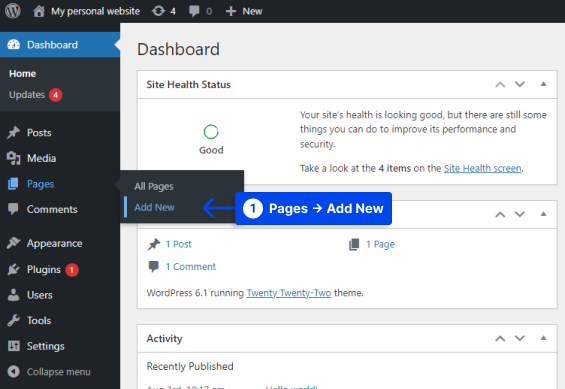
- Go to Pages in your WordPress dashboard.
- Click on the Add New.
Once this process has been completed, you will be able to create your content using the WordPress editor.
How to Change Your Site’s Theme And Looks
The theme of your WordPress site has a significant impact on how visitors experience it. From the Appearance section of the WordPress dashboard, you can customize your website’s appearance.
For example, you can change themes, install new themes, and control widgets and menus. Follow these steps to do this:
- Go to Appearance in your WordPress dashboard.
- Go to Themes.
- Click on Customize.
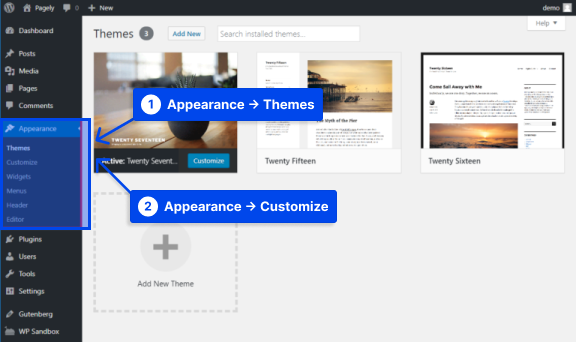
A real-time visual interface known as the WordPress Customizer will allow you to modify specific aspects of your theme.
Depending on the theme, the WordPress Customizer may provide you with access to various WordPress admin dashboard customization options, for example, Colors, Fonts, and Basic Layout Options.
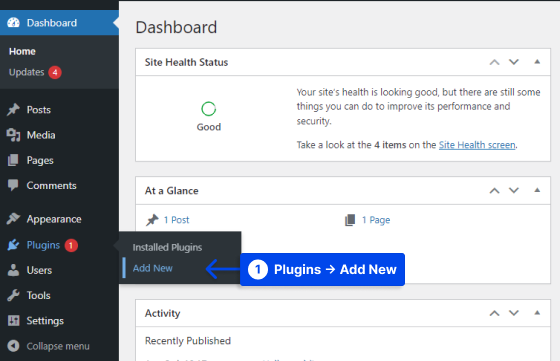
How to Install New Plugins in WordPress Dashboard
In contrast to themes that control the overall aesthetics of your site, plugins are primarily designed for adding new functionality or improving existing functionality.
Your dashboard provides an area for managing existing plugins and for installing new ones. Follow these steps to install a new plugin in the WordPress dashboard:
- Go to Plugins in your WordPress dashboard.
- Click on Add New.
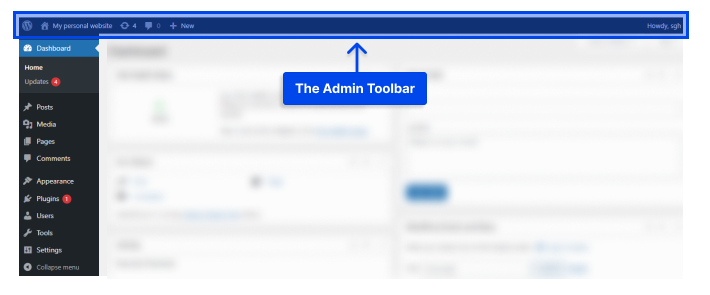
How to use The Admin Toolbar
If you have logged into your WordPress website, you will notice a floating black bar at the top of your screen. This is the admin toolbar.
Several frequently used WordPress features are conveniently accessible via the toolbar:
- The WordPress.org homepage.
- WordPress installation, themes, and installed plugins’ updates.
- A shortcut to your site’s home page can be found in your site title.
- The comments screen and the number of comments that have been moderated.
- A new post or page can be created and more can be done.
- The link to your user profile and to log out can be found.
Note: during the installation of WordPress plugins, some of them may add additional buttons to the admin toolbar.
How to Use the Dashboard Page
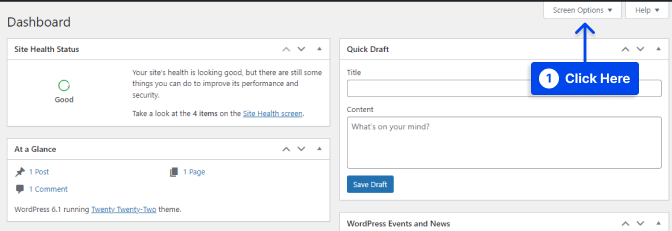
Upon logging into your WordPress site, you will see a large white space in the center of your screen. This is your WordPress dashboard.
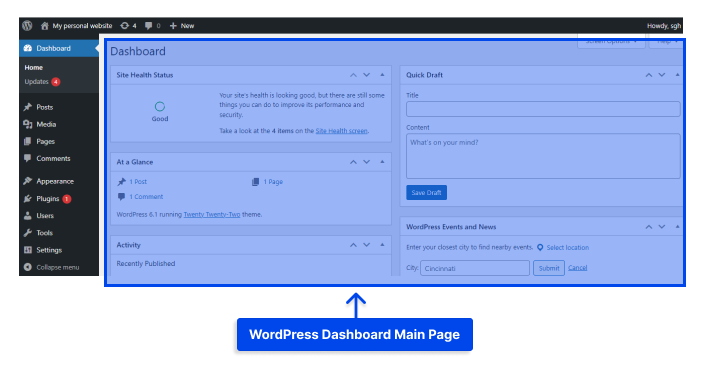
Using the WordPress dashboard, you can quickly see what is happening with your online presence.
Here you will find information concerning the number of posts and pages you have published recently on your website, as well as other information.
WordPress displays five boxes on the dashboard by default:
- The At a Glance feature displays a summary of your content, your theme, and the version of WordPress you are currently using.
- Activity displays recent posts that have been published or are ready to be published, as well as recent comments on those posts.
- In the Quick Draft section, you can quickly save an original draft post and view recent drafts.
- The WordPress Events and News section provides links to information about upcoming WordPress events in the local area as well as links to the latest projects using WordPress.
- The Site Health Status section shows the statistics of your site’s health.
You can customize which boxes appear on your dashboard by clicking the Screen Options tab at the top right of the screen.
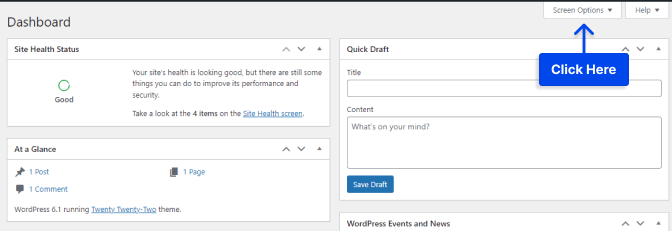
Alternatively, you can arrange the boxes on your dashboard by dragging and dropping them. Installing new plugins may result in some additional boxes appearing in your dashboard.
In some cases, you will be able to customize the settings by clicking the Configure link located on the box’s title bar.
How to Create and Manage WordPress Categories and Tags
Your posts can be classified using WordPress’ taxonomy system. The system consists of categories and tags. Categories are more general classifications, whereas tags are more specific classifications.
As an example, this article might fall under the WordPress Tutorials category. You may also want to assign tags such as WordPress Dashboard and WordPress Login to it.
There are no limits to the number of categories and tags you can create and use on your posts in any combination that you deem appropriate.
Follow these steps to do this:
- Go to Posts in your WordPress dashboard.
- Click on Categories.
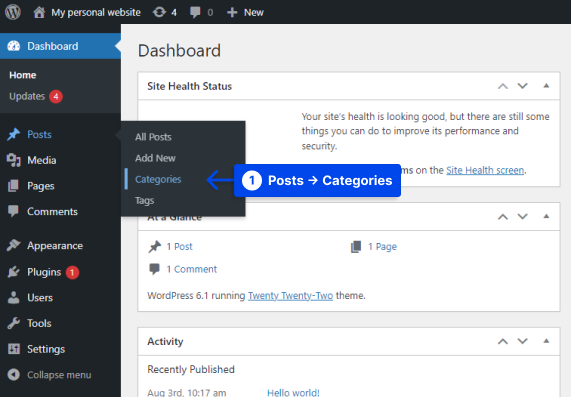
In this area, you will find a list of existing categories and a menu that allows you to create new categories.
- Set the category and click on the Add New Category button.
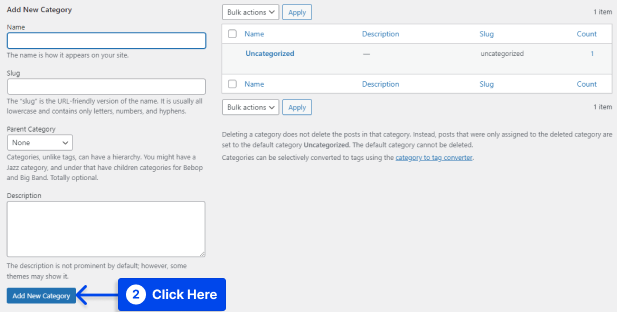
The process of adding a new category begins by selecting a name. As well as writing a short description, you can also choose if you would like to place it within a parent category.
However, the slug represents the URL-friendly name of the category. For example, /wordpress-tutorials or something similar would be the slug for the category WordPress Tutorials.
Upon adding a category, it will appear in the right-hand list. In order to assign a category to a post, you must do so through the editor.
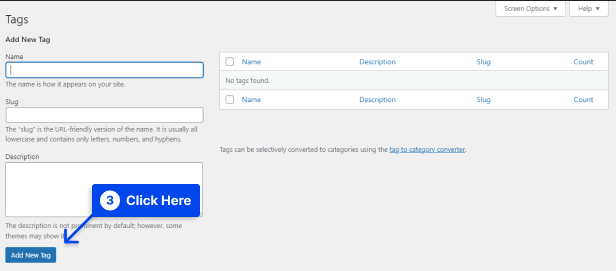
When it comes to the Tags page, the process for creating and managing WordPress tags is exactly the same as for the Categories page.
Follow these steps to do this:
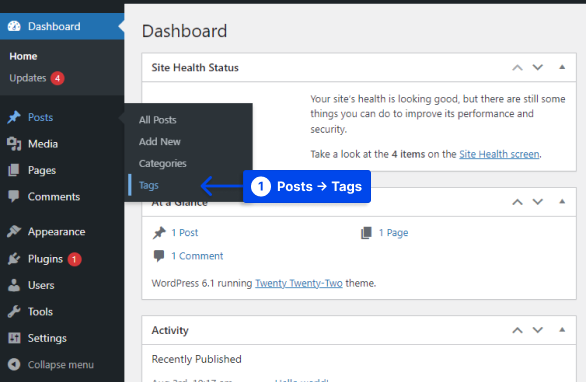
- Go to Posts in your WordPress dashboard.
- Click on Tags.
Tags are assigned names, slugs, and descriptions.
- Set the tag and click on the Add New Tag button.
Through the editor, tags can be assigned to posts just as they are with categories. In addition to making navigation easier, categories and tags allow your site visitors to find related content. As your content library grows, your taxonomy should be adapted as well.
How To Customize The WordPress Admin Dashboard?
If you are uncomfortable with the WordPress dashboard as it is configured out of the box, there are several options available for you to customize its appearance as well as the information displayed.
How to Use WordPress Screen Options
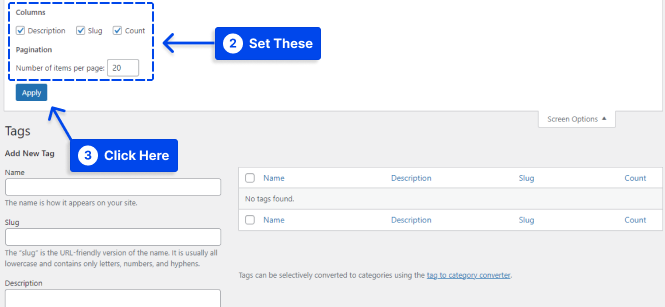
With the Screen Options feature, you can customize the behavior of individual WordPress admin areas.
The WordPress admin has a set of Screen Options for each area that allow you to control a variety of features, such as what information displays, pagination, and how the information is displayed.
Follow these steps to use it:
- Click on the Screen Options button in the upper right-hand corner of the screen.
There will be a list of settings available as soon as you click that button. It is important to note that these settings differ between different admin areas and are specific to that area only.
- Set the options and click on the Apply button.
How to Use User-Specific Admin Settings?
Numerous other admin control settings within WordPress are accessible through each user’s profile, in addition to the Screen Options.
Follow these steps to access these settings for your account:
- Go to Users.
- Click on Profile.
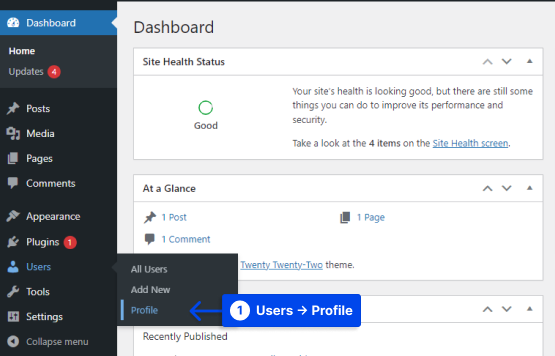
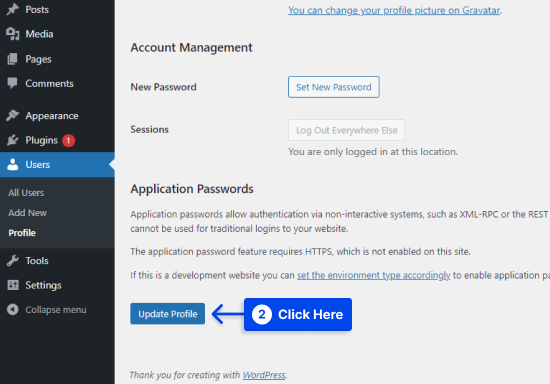
Using this area, you can disable syntax highlighting when editing source code directly, and your WordPress admin can be customized by changing the color scheme; there is also the option of disabling the WordPress toolbar.
- Make the changes and click on the Update Profile button to save the changes.
Frequently Asked Questions
In this section, we will answer some frequently asked questions to help you find your solutions:
Several factors contribute to this issue. Usually, it occurs when several plugins attempt to access the same resources at the same time.
If you experience this type of issue, simply disable your plugins one by one until you can determine which one is causing the problem.
The issue may also be the result of a problem with your browser. However, this can also be resolved quite easily. It may be helpful to try clearing your browser’s cache and then trying to publish or save your post.
Logging into your WordPress admin account is simple. You can do this by adding /login or /wp-admin to the domain name in the browser’s search bar.
For example, if the domain name of your website is YourDomain.com, you can search for “yourdomain.com/wp-login.php” or “yourdomain.com/wp-admin“.
Once you reach the login page, you will need to enter your WordPress login credentials and click on the Login button.
Admin URLs for WordPress are comprised of two components. In the first part of the URL, your domain name yourdomain.com appears, while in the second part it is /login or /wp-admin.
As a result, the full URL could be “yourdomain.com/wp-login.php” or “youryomain.com/wp-admin”.
Conclusion
We have described what the WordPress admin dashboard is and how you can access it in this article.
In addition to demonstrating some of the most important actions, this article also demonstrates how to configure the admin dashboard according to your preferences.
It is our sincere gratitude that you have taken the time to read this article. Feel free to submit any questions or comments using the comments section.
In order to stay updated with our articles, we invite you to follow us on Facebook and Twitter.