JetEngine relations give huge freedom for building dynamic and complex websites of different types in different industries. But the topic might not be so clear and feel complicated. That’s why it’s time to look at it in detail and talk about use cases, a building process, and common mistakes.
Table of Contents
What Are Relations in Simple Terms and When to Use Them?
I’ve already written this article about relations, how they look in a database, and why there are three types of them. But in this article, I will write mostly about practical cases.
So what are relations, and when do you need them?
In short, it’s the way to structurize content and make connections between objects.
Why do we organize content on the website? There are a few reasons:
- to keep an admin panel clean and systematized not to get lost;
- to be able to assign different templates for particular custom post types, so they will automatically look how they should;
- to display archives/collections of items automatically (the simplest example is a default post archive).
Let’s pay some extra attention to the last point. Categories are amazing for displaying a loop of items, and they do their job. Let’s say there are “Useful Resources” and “WordPress Tips” categories on the site, so I can easily display them as archives with links to the posts within these categories. Easy and cool, right?
But what if we create a tour agency website that has the following:
- tours with fancy layouts and descriptions;
- countries (where tours are taking place);
- tour guides that can go to different countries;
- transportation types (plane, bus, boat, etc.);
- tour properties (romantic, active, cultural, etc.).
There’s one problem – all of these items are actually connected: countries have certain tours, guides work in different countries (but that doesn’t mean that for all the tours in those countries), and so on.
So what to group in categories? And how to set up default WordPress tags so that all this information would not become a mess?
👉 Now, you know where I’m going with this: custom relations are the solution!
It means that you can have different post types, categories that organize them, or any other custom taxonomies, and “draw lines” between items to connect them, so these connections will be used further to display the right items the way you need them.
Other perks of using JetEngine Relations
Connecting posts is only the beginning; you can also create:
- relations between custom post types, custom content types, taxonomies, terms, and users (between themselves and one another);
- you can add meta fields to relations and use them. This is a great tutorial about using this functionality;
- Relations can be created using forms – check out this tutorial – which means that users can do it from the front end. It’s very useful for membership or listing sites. Related items can be not only connected but also disconnected via forms.
📢 In this article, I will use mostly post relations as examples, but remember that you can use other objects, e.g., taxonomies, CCT, users, etc.)
JetEngine Relations: How Not to Get Lost?
JetEngine is a very handy instrument for creating and displaying relations of any complexity. But one thing should be considered: because there are so many options, the most important thing is not to mix things up and not get lost. Creating relations is quite a straightforward process if you follow instructions from the Documentation.
The order of actions when working with JetEngine Relations feature
Follow these simple rules, and you will save a lot of time and energy. There are steps to follow when creating and working with JetEngine Relations functionality:
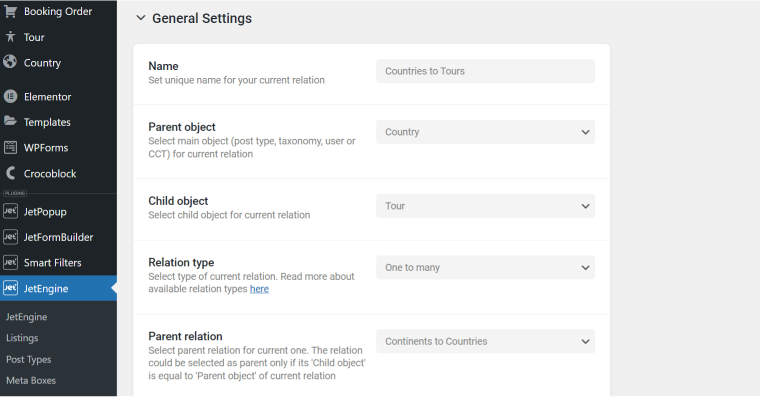
1. Create a Relation in JetEngine > Relations. Choose carefully what will be a Parent and what will be a Child. Name them properly to understand what the relation is about.
Don’t forget to activate the Register controls for the parent object toggle while creating the Relation. Also, I strongly recommend activating Allow to create new parents from children and others, as shown in the screenshot below, for a faster and easier process:
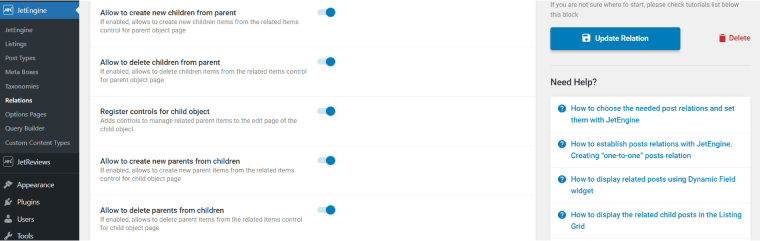
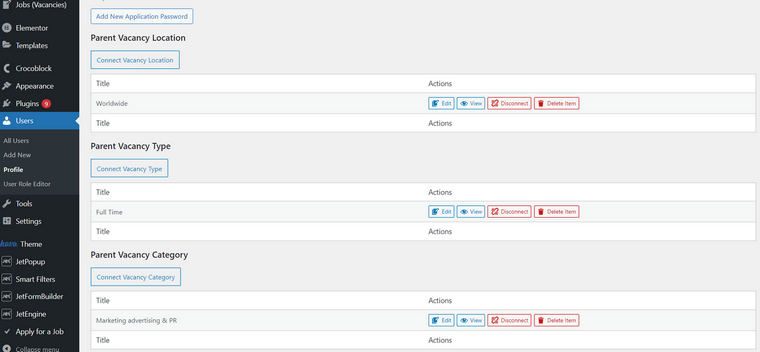
So when you go to the Parent page, you will be able to connect Children objects like in the picture below (and vice versa).
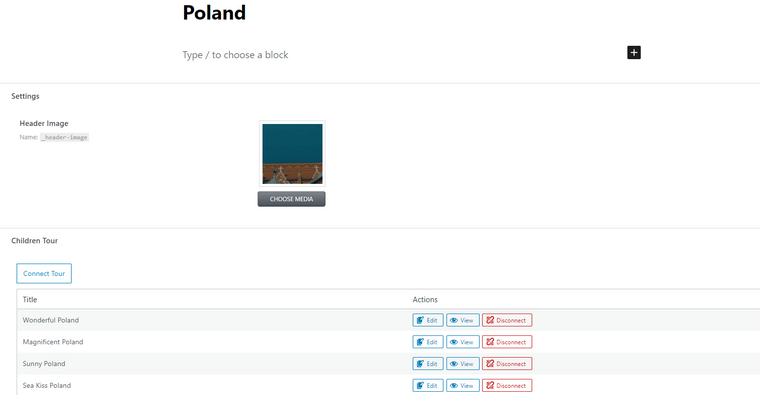
2. Now, add all the objects you want to be connected to the particular post, product, or taxonomy using this interface.
NOTE
If you don’t add/connect (the “Add New” button is to create a new Child/Parent, and “Connect” is to connect existing) child posts to the parent on this stage, you will not have any children (basically, no content) in your relation.
It would be the same as creating categories and posts but not assigning any posts to any categories.
3. Create a custom query with Query Builder. Don’t forget to use Marcos (in the Post&Page tab for posts, it’s a bit different for WooCommerce products or other entities, but it’s quite intuitive. We have a detailed article about using macros and creating custom queries with Related Items.
👉 Remember, Relation will not be displayed automatically anywhere on your front end after creating it. You need to query it first.
Each relation must have a dedicated query.
Why? JetEngine > Relations functionality is just a UI to establish a connection between posts. But to physically display related posts, there must be a query which is a request to a database. No query means no content on the front end.
A useful tip: name queries for the relations similarly to relations it works with, not to get lost.
4. Display the query on the front end by adding it “on top” of the selected Listing Grid using the “Custom Query” tab and choosing the right query from the list.
In the next sections, we will discuss use cases and how to display queries.
Alternative (legacy) way to query relations on the front end
I’ve mentioned that building a query in Query Builder is a must, and that’s the best way to do it because it makes the process more organized. Query Builder offers much more options and flexibility; also, you can use the same query for many templates/pages, filters, etc. But there’s an alternative way to create a query – right in the editor using the “Post Query” / “Terms Query” / “Users Query” tabs.
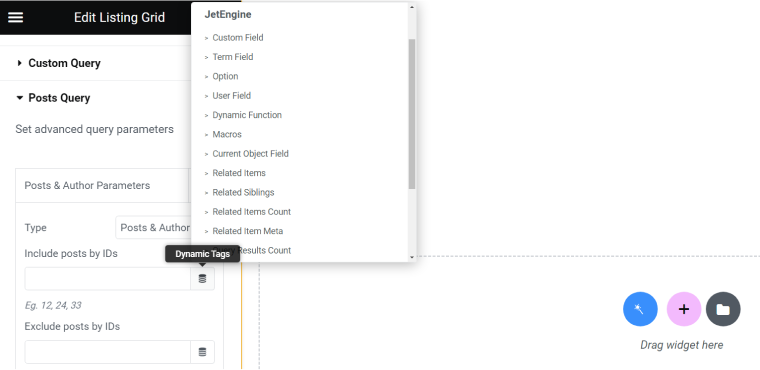
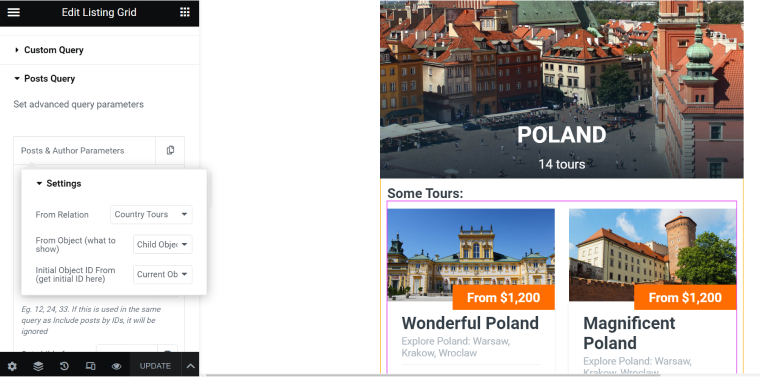
To use this method for posts, instead of getting a query from the Custom Query tab, go to the Post Query tab, hit “Add new,” select “Post & Author Paremeters” type, and then use dynamic tags – you will see the list of them after clicking on the icon on the right side of the field.
👉 Do not type any custom macros in the input field (as used in the legacy version of the Relation feature, with “%” characters). They will not work unless you use the legacy version (with a small exception to the Tax Query for Posts). Use dynamic tags instead.
You can use particular tags from the list or go to Macros (one of the tags in the list) and use one of the macros; it has more choices (e.g., Grandchild/Grandparent relations).
JetEngine Relations Use Cases and Examples
There can be many more use cases, yet I will discuss only a few.
Case 1: Using Relationships when creating custom Single/Archive templates
It’s one of the most straightforward use cases for Relations and Queries based on them. There are just two steps here:
- Add a Listing Grid widget/block and select the Listing you want to use (make sure it already exists). You will see that all the objects from the listing are displayed.
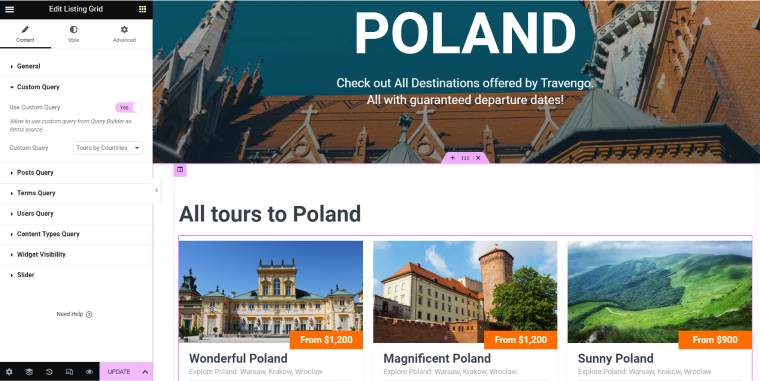
- Go to the Custom Query tab and activate the query you want to use from the dropdown list (make sure the query already exists in Query Builder). Voila! You will see how this “layer” of the query cuts off all the unnecessary objects and leaves exactly what you adjusted in the Query Builder for this particular query.
In the example from the screenshot, I wanted to display child objects of the Country post type – Tours post types, but only those that belong to the particular country. I’ve selected the “All Tours” listing (the general one) as a Source for the Listing Grid and then activated the Custom Query toggle and chose the previously created query that retrieves child “Tour” objects connected to the parent object “Country.”
Case 2: Retrieving related objects inside the Listing
If in Case 1 we dealt with Listing Grid, now let’s talk about Listing (JetEngine > Listing > Create New). As in other examples, I will use the “Country to Tour” relation. Let’s say I want to display the list of tours in the Country listing item. To do so, add Dynamic Field; the Source should be “Post/Term/User/Object Data,” and in Object Field, choose “Related items for the current object.” Choose your relation there.
You might see an error message that data can’t be displayed in the current format and instructions on what to do – to change the callback in Filter Field Output. Do it, and choose what works for you, like this:
Case 3: Relations used to set up filters
I would say relations are essential for setting up filters if you want to give your clients really good UX and filtering options. Of course, you will need the JetSmartFilters plugin, and the rest of the steps are very easy, just follow this detailed tutorial.
👉 Please be attentive and don’t mix up a parent with a child in Filter settings; for example, don’t put Tour as a “post type” if you want to create a “Tours by Country” filter – because the filtering will be done for the Country, as a data source for filtering.

Case 4: Displaying grandparent and grandchild objects
First, let’s clarify the relation structure of grandparent/grandchild objects. Look at this scheme:
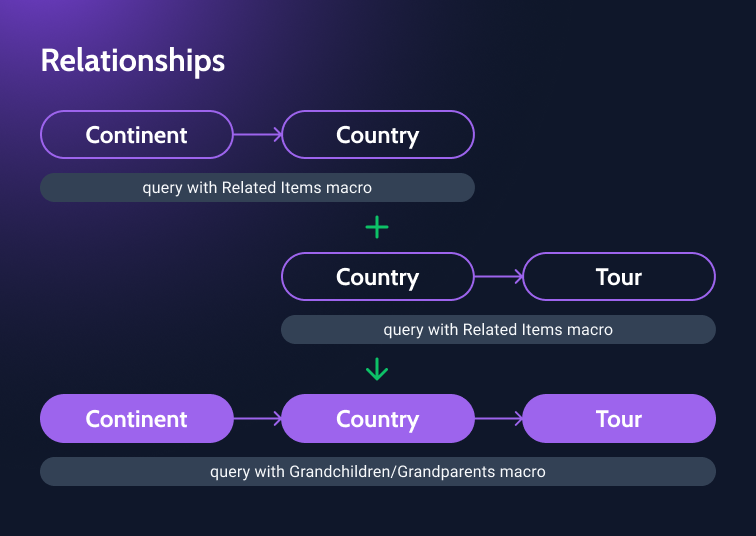
We have two relations; in the first one, “Country” is a child, while in the second one, “Country” is a parent. So, in the aftermath, we can reach from “Continent” to “Tour” thanks to JetEngine functionality that supports such structures. Let’s see how to do it.
First, create two relations (in my case, it’s “Continents to Countries” and “Countries to Tours,” and for the second one, choose a Parent relation:
That’s it, now two relations are connected, and grandchildren objects can be retrieved from the grandparent and vice versa.
I want to get a list of Tours that belong to the Continent and display them in the Continent template.
👉 Please pay attention that we need three queries to do it:
- Continent to Country (Related Items macro);
- Country to Tour (Related Items macro);
- Continent to Tour (Grandchild Relation macro).
Now, it’s time to display them in the Continent template:
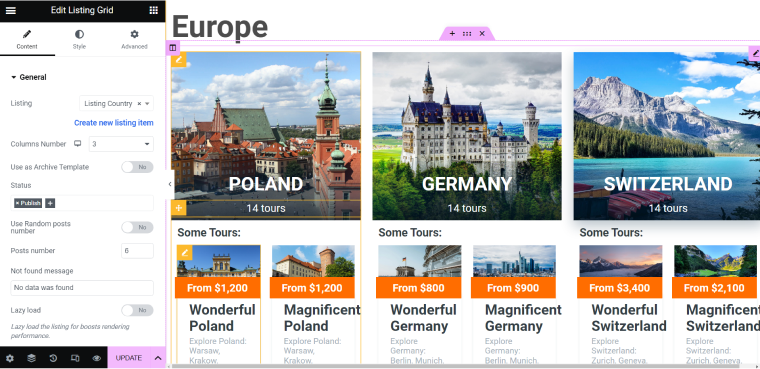
Case 5: Nested listings with related items
When creating such listings, you will get a similar result to Grandchild/Grandparent object listings. But this case has other use cases, usually when you need to display all the “levels” of the objects.
💡 Let’s say you have “Worker” and “Location” CPTs. All the workers are assigned to particular locations (so we create a Relation where “Location” is Parent and “Worker” is Child). You can make:
- a listing for the “Worker” CPT (photo, name, position);
- then a listing for “Location” with a “Worker” listing inside;
- and then display the “Location” listing on the “Our Team” page, so you will get both locations and the workers.
Getting back to our example with countries and tours, I’ve opened the “Country” listing, added the Listing Grid widget with “Tours listing” as a source, and set up a post query that retrieves only Related items – Children. (Or use a Custom Query previously created in Query Builder).
This is what I’ve got after adding Listing Grid with “Countries listing” as a source to the “Continent” template.
NOTE
Be very careful and reasonable with nested listings, don’t go over the top, it can significantly slow down your site because of too many queries sending requests to the server. If there is a lot of content, try not to use nested listings or pay extra attention to optimizing the site/page.
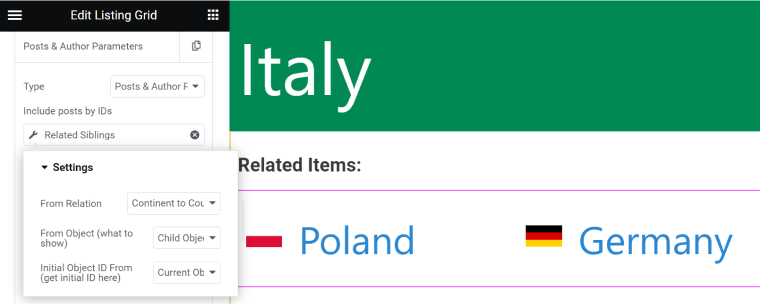
Case 6: Displaying related posts
The easiest way to display related posts (that have the common parent in Relation) is to use the “Related Sublings” macro, choose the right relation, and display Child objects:
In case you want to display posts of the same taxonomy, check out this tutorial (and yes, macros with % will work in this case). But the best way is to use Query Builder, where you don’t need to type any macros.
Case 7: Connecting Users with Taxonomies
This case can be really useful for membership sites. Check out this tutorial to get step-by-step guidance on how to do it in this particular case.
Case 8: Context feature for displaying data from related items
Context is an advanced and powerful feature for displaying one Parent object from the one-to-many relationship.
The Context in JetPlugins means the object that will be used at the current moment for retrieving data. By default, the context is always “Current Post” for the Single or Current Item for Listing. But the Context tab lets you select something else and basically build a mini-listing inside another listing.
You can find the “Context” tab at the bottom of Dynamic Field settings:
And in Query Builder > Query Tab > Advanced Settings in the dynamic tags (Macros) list:

Let’s discuss examples of when it can be really handy.
Membership/job board websites
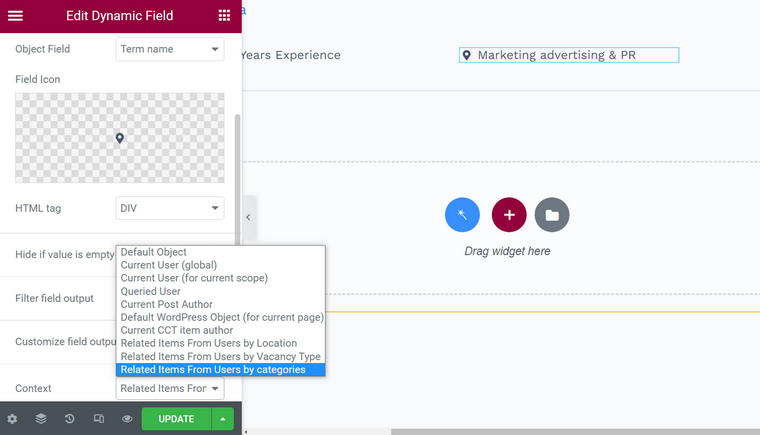
If you check our demo website with the Job Board dynamic template, you will see that employees have their locations displayed. Employees are Users on this website, and they have relations with Location terms and others:
You can choose each of them from the Context list to display. As you can see, it’s very straightforward:
Displaying the post’s author
You can display a post’s author in a nice custom way. Let’s say you want to add a cool author’s block to the Single post template with a photo and other meta fields. So, if you use Relations, connect this post type to Author as a Child to Parent, and then apply the Context feature, it will be the best solution for this task.
👉 Note that Context works with all the post types, not only with Users. Also, you can retrieve the same information (e.g., the user’s location or author’s meta fields) using other methods: callbacks in the Dynamic Field widget/block, creating an additional (nested) listing, or displaying it with Listing Grid. But it’s more like a workaround while you can do the same in a few clicks with Context.
Common Mistakes When Working With JetEngine Relations
There are some common mistakes users make when working with the Relations feature:
- Mixing up Child and Parent objects when building queries.
- Forgetting the order of actions as described above and doing it in the wrong order:
- first, the Relation should be created;
- then all the connections are made (Child/Parent objects linked to each other);
- then the Query (in Query Builder) should be created with the right macros;
- all the listings that will be displayed should be created or already exist;
- and only then should it be displayed on the front end.
- Being afraid that adding one more query in Query Builder would slow down the site, while queries themselves are not a reason. It all depends on the number of such queries on one page and the content: if you place 10 of them with heavy content, it’s logical that the site will send many requests to the server with everything this entails.
- Improper naming of relations and listings based on them. Because of this, developers sometimes get lost. So, it’s a good idea to name relations “Parent to Child,” for example, “Movies to Actors.” And then, when creating listings based on them, you can give them the same names.
- Using additional listings and listing grids in cases when using the Context feature is possible.
JetEngine and caching plugins
Some caching plugins, such as Lightspeed Cache and others, can cause glitches while creating and displaying Relations and Queries: they can disappear from the list of Relations or Queries, listings could appear empty, etc. It’s better to deactivate a caching plugin when you work on creating and displaying relations and then reactivate it again.
Useful tip
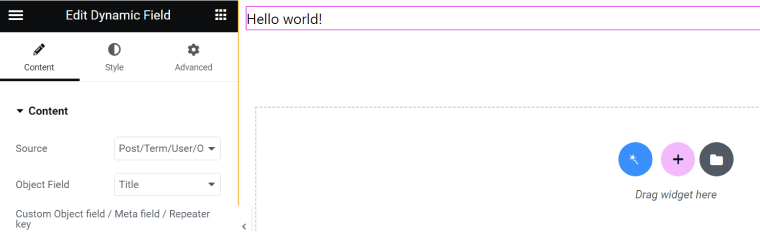
When building a listing, template, or page, there can be a glitch when you use Dynamic Field. It will show you a preview of another post. Don’t panic; save changes and reload the page.
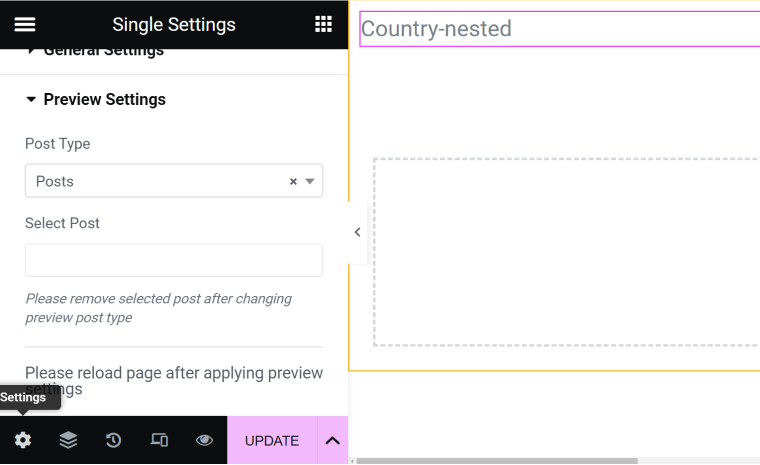
This is how the preview looked first when I built a template for a “Country” CPT, and the title there is definitely not “Hello world!”:
But also, it can happen because the preview is not set up in Settings (the icon on the bottom left corner of Elementor (if you use it). There, you need to set up the post type and the particular post for a preview; otherwise, you will see the title of the template instead of the post, etc.:
The Bottom Line
The JetEngine Relations feature is a great asset for building an elaborated website structure and displaying exactly what you want the way you need. The key to success when creating and displaying them is to follow a clear logic and the order of actions described at this article’s beginning.